Buck Pond Build

Joined
Jun 11, 2012
Messages
696
Reaction score
56
Location
Indiana
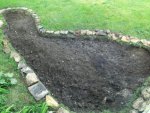
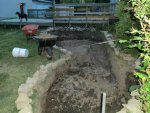
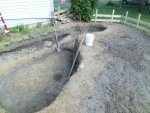
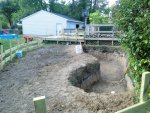
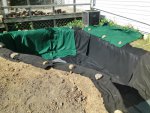
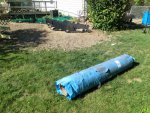
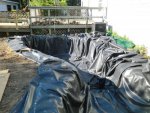
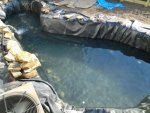
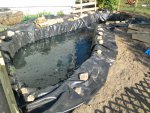
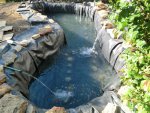
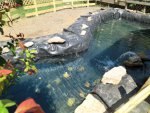
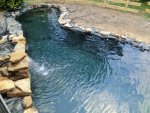
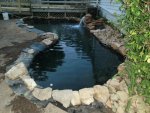
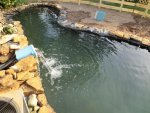
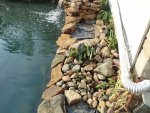
Ok, here is the thread showing the progress of my pond. Kind of a retrospective because I finished my koi pond tonight and transferred all of my fish into it. I ended up NOT doing a few at a time because they were so damn hard to catch I had to drain my goldfish pond to get them all. And sad news, I'm missing 1. I bought 12, but I only found 11 once I drained the pond. I'm missing at least 1 common goldfish too so I think a predator has been through my yard having a snack. Not too worried about it though, I'm only out about $5. So without further adieu, here is the building of my pond.

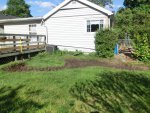
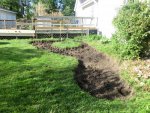
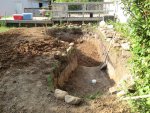
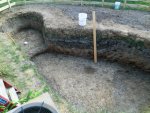
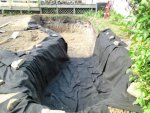
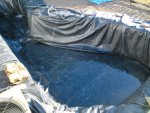
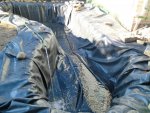
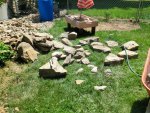
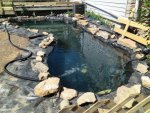
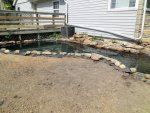
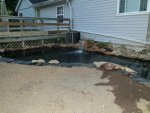
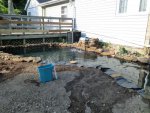
These first two shots show the removal of the sod and the original shape of the pond.
 

Attachments

  • CIMG0679.JPG
    CIMG0679.JPG
    122.2 KB · Views: 242
  • CIMG0687.JPG
    CIMG0687.JPG
    145.6 KB · Views: 253
Joined
Jun 11, 2012
Messages
696
Reaction score
56
Location
Indiana
Here is a top view of the pond with the first batch of flagstone. I pulled all of those rocks out of the hole. As I dug, I found more and more rocks. I didn't have to spend a dime on rocks for this whole project.
 

Attachments

  • CIMG0707.JPG
    CIMG0707.JPG
    118.1 KB · Views: 271
Joined
Jun 11, 2012
Messages
696
Reaction score
56
Location
Indiana
Here I'm starting to finally get some depth in the hole. I'm down to about the right deep in this leg, 3', and the far side is almost to 4'.
 

Attachments

  • CIMG0773.JPG
    CIMG0773.JPG
    91.7 KB · Views: 263
Joined
Jun 11, 2012
Messages
696
Reaction score
56
Location
Indiana
Here are the shots at the end of memorial day. I had 3 buddies come over and help me dig. The dirt I removed originally I put in a pile behind my garage, but I finally decided to build up the front of the pond instead of lowering the back to level it out, so my buddies just threw the dirt straight up onto the ground. It sped things up greatly, and it turned out to be all clay which came in handy later. It was also at this point when we hit 4' that my wife said "Holy crap, are you insane? We're going to drown the entire neighborhood in that thing." So we decided to build a small fence around it until our kids are tall enough to reach the bottom and are VERY strong swimmers. Ugly fence, but necessary for the next couple of years.
 

Attachments

  • CIMG0780.JPG
    CIMG0780.JPG
    139.1 KB · Views: 270
  • CIMG0785.JPG
    CIMG0785.JPG
    113.7 KB · Views: 263
  • CIMG0788.JPG
    CIMG0788.JPG
    106.3 KB · Views: 293
  • CIMG0792.JPG
    CIMG0792.JPG
    126.2 KB · Views: 259
Joined
Jun 11, 2012
Messages
696
Reaction score
56
Location
Indiana
Putting in the first of the felt underlayment. I put 3" of sand in the bottom which is a lot less than I wanted so to make up for this I put felt on the bottom as well. I only ordered enough felt for the walls and I didn't want to wait for more to arrive so I went and bought all of the black, green and gray felt they had at Walmart. It's slightly different but I don't anticipate any problems.
 

Attachments

  • CIMG0823.JPG
    CIMG0823.JPG
    97.8 KB · Views: 223
  • CIMG0837.JPG
    CIMG0837.JPG
    99.1 KB · Views: 226
Joined
Jun 11, 2012
Messages
696
Reaction score
56
Location
Indiana
The liner arrived! It was 216 pounds! It was a bear to put in by myself, but I managed using some fairly interesting techniques, sort of the same methods used to hang drywall on celings. Probably looked pretty funny if anyone was watching.
 

Attachments

  • CIMG0849.JPG
    CIMG0849.JPG
    142.4 KB · Views: 240
Joined
Jun 11, 2012
Messages
696
Reaction score
56
Location
Indiana
Got it roughed in and put the hose in. After a few inches was in, I started smoothing out the wrinkles and folding the excess under. My well water is 40 degrees, I spent two hours in this god awful cold water. My feet turned blue.
 

Attachments

  • CIMG0851.JPG
    CIMG0851.JPG
    89.1 KB · Views: 246
  • CIMG0856.JPG
    CIMG0856.JPG
    76.6 KB · Views: 286
  • CIMG0861.JPG
    CIMG0861.JPG
    88.5 KB · Views: 246
Joined
Jun 11, 2012
Messages
696
Reaction score
56
Location
Indiana
Here is the start of day 2 of filling. I put my first pump in to keep the water cirulating and to get some good bacteria going in my filter buckets. I ended up putting rocks on the bottom to hold the large flaps down that were created by my rectangular liner being forced into such a tiny little pocket.
 

Attachments

  • CIMG0867.JPG
    CIMG0867.JPG
    74 KB · Views: 251
  • CIMG0869.JPG
    CIMG0869.JPG
    107.6 KB · Views: 253
  • CIMG0872.JPG
    CIMG0872.JPG
    105.5 KB · Views: 222
Joined
Jun 11, 2012
Messages
696
Reaction score
56
Location
Indiana
Day 3 of filling, pretty straightforward, not much to see, took about 2 hours to get the last foot then I spent time fine tuning the level all around the pond. Here is a shot of some of the many flagstones I pulled out of the hole. And here it is filled with both pumps running. The pump buckets sit at the two far ends of the pond and pump to the central waterfall location where the rocks are starting to be stacked up.
 

Attachments

  • CIMG0882.JPG
    CIMG0882.JPG
    94.9 KB · Views: 238
  • CIMG0887.JPG
    CIMG0887.JPG
    155.6 KB · Views: 292
  • CIMG0896.JPG
    CIMG0896.JPG
    110.6 KB · Views: 222
Joined
Jun 11, 2012
Messages
696
Reaction score
56
Location
Indiana
Here is my first test setup of the waterfall. Just playing really.
 

Attachments

  • CIMG0909.JPG
    CIMG0909.JPG
    109.2 KB · Views: 243
Joined
Jun 11, 2012
Messages
696
Reaction score
56
Location
Indiana
Starting to pick and choose which rocks go where. This was the part of the process I was dreading, but it turned out to be really fun.
 

Attachments

  • CIMG0925.JPG
    CIMG0925.JPG
    105.4 KB · Views: 211
Joined
Jun 11, 2012
Messages
696
Reaction score
56
Location
Indiana
More rocks in place, and I put the hose back in to work more on fine tuning the level. The wet spot in the dirt is near a low spot. Here is a good shot of the water at dusk. The black liner makes the water look black. You cannot see the bottom, it's a really cool effect.
 

Attachments

  • CIMG0941.JPG
    CIMG0941.JPG
    74.7 KB · Views: 260
  • CIMG0943.JPG
    CIMG0943.JPG
    85.9 KB · Views: 242
Joined
Jun 11, 2012
Messages
696
Reaction score
56
Location
Indiana
Here is a shot of a brainstorm I had that didn't pan out. I made this little filter box from a pet food container. I was going to put each hose into one box, and then stand them up in the waterfall pit, but they were too tall. I tried to increase the waterfall height, but it looked bad so I got rid of the boxes and opted for a tiny bog up there instead. It's a shame too they worked great, the water was spotless the 3 days these were in use.
 

Attachments

  • CIMG0952.JPG
    CIMG0952.JPG
    90.7 KB · Views: 237
  • CIMG0957.JPG
    CIMG0957.JPG
    100.6 KB · Views: 256
Joined
Jun 11, 2012
Messages
696
Reaction score
56
Location
Indiana
First plants planted in edging, and wife couldn't resist, had to go swimming.
 

Attachments

  • CIMG0961.JPG
    CIMG0961.JPG
    95.3 KB · Views: 258

taherrmann4

Tmann
Joined
Mar 3, 2011
Messages
3,142
Reaction score
702
Location
Louisville KY
Hardiness Zone
6
Country
United States
Looking good!!! Looks a lot bigger with the water in it than when it was just a hole. You can always dr up the fence once you get finished if you don't like the way it looks now.
 

Ask a Question

Want to reply to this thread or ask your own question?

You'll need to choose a username for the site, which only take a couple of moments. After that, you can post your question and our members will help you out.

Ask a Question

Members online

No members online now.

Forum statistics

Threads
30,905
Messages
509,867
Members
13,115
Latest member
crystal8899

Latest Threads

Top