Cape Cod Pond Build

Joined
Jun 29, 2020
Messages
144
Reaction score
89
Location
Buzzards Bay, MA
Hardiness Zone
6b
Country
United States
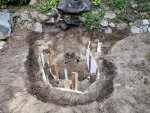
Hello! I've posted a couple of times in the forum here already, but didn't do a "formal" introduction so here goes. I live on Cape Cod in Massachusetts and retired about a year ago after getting laid off unexpectedly. I was planning of working at least a couple of more years, but since I was close to retirement age, I figured I'd give it a go. So far, so good and I've got lots of projects to keep myself busy. One of those things is building a small, backyard pond. I was given a plastic, preformed, kidney-shaped pond a few years ago, but never really did much with it and wanted to eventually do a "proper" pond build. The pond will incorporate a waterfall that will be built out of an existing set of concrete and stone stairs that runs through a rock garden in a portion of the backyard. The stairs were apparently used by previous owners as access to a neighbor's garden area which is now completely overgrown. It's pretty much a stairway to nowhere at this point, so I figured I'd turn it into a waterfall, building the pond at its base. I did try using it as a waterfall for the little preformed pond, but found out that the rock and stone lost too much water without a liner. I began collecting rock and stone about a year ago from roadsides, construction sites, etc. and in the spring purchased a Savio Signature 4100 pond kit with 15x20 liner. The kit includes a bio-falls and skimmer. I started construction in earnest a couple of weeks ago. To date, I've got the basic pond shape dug, the liners installed, and I've rocked about half of it. One issue I encountered was the sandy soil in this area. The walls kept caving in while digging, so I came up with the idea of using styrofoam to shore them up. I figured styrofoam won't degrade and won't puncture the liners. I did have to initially stake each section in place, but found that once the soil was compacted behind them, they stayed in place after the stakes were removed. That is, all but one taller section which collapsed, but it wasn't bad working around that. So far, I've left most of the styrofoam in place as I rock from the bottom, but I did end up removing a couple of corner pieces and one large lower section which remained in place. I'm curious if anyone else has ever used styrofoam or if I'm the first guinea pig. Pictures below show the excavated pond with styrofoam sections staked in. The black liner denotes the bottom of the waterfall. I'll post more pictures as construction progresses.

pond_styrofoam_1.jpg
pond_styrofoam_3.jpg
 

Attachments

  • pond_styrofoam_2.jpg
    pond_styrofoam_2.jpg
    334.8 KB · Views: 100

TheFishGuy

( Insert something funny )
Joined
Jul 9, 2020
Messages
1,356
Reaction score
937
Location
Colorado
Showcase(s):
1
Hardiness Zone
4b or 5a
Country
United States
looks like the pond is going to be amazing and I look forward to following you on your journey of ponding!
 

Mmathis

TurtleMommy
Joined
Apr 28, 2011
Messages
13,918
Reaction score
8,099
Location
NW Louisiana -- zone 8b
Hardiness Zone
8b
Country
United States
Awesome! I totally understand about the soil situation, but my problem is clay rather than sand. From what I’ve been told, sand is much worse than clay to deal with, so best wishes to you! More pictures, too, as you progress!
 
Joined
Nov 28, 2017
Messages
2,710
Reaction score
1,887
Location
North Oklahoma
Hardiness Zone
7a
Country
United States
You are indeed a first as far as I know, but it’s a matter of thinking outside the box, and using what’s available, so please, give it a try! Let us know how it goes.
 
Joined
Nov 11, 2010
Messages
4,069
Reaction score
4,013
Location
Chicago Area
Hardiness Zone
5b
Country
United States
You are indeed a first as far as I know, but it’s a matter of thinking outside the box, and using what’s available, so please, give it a try! Let us know how it goes.
Hi Welcome to our group and good luck with your pond. It looks like a great start. So I had a similar problem. At one point over 100 years ago we were part of the beach so there is sand in the ground wherever you dig including under our building. My wife wanted me to change the shape of the pond two years ago and I had to remove some of the liner and try to figure out how to hold back a wall of loose sand and dirt. We ended up putting a 4x8 sheet of 3/4 inch plywood in to hold the wall up. We set a few heavy rocks at the bottom of it to keep it from moving. Eventually the earth behind it compacted and it’s walkable and we have plantings in it. It’s amazing how much pressure the water will apply to your wall so once you have the styrofoam in place the water will hold everything up. You will need to compact the sand after you fill your pond with water. Compacted sand is actually very strong. That’s what’s holding our building up! Btw everyone here lately is building a bog. I recommend you look into it. It will significantly help keep your pond water clean so you can see your fish!
 
Joined
Jun 29, 2020
Messages
144
Reaction score
89
Location
Buzzards Bay, MA
Hardiness Zone
6b
Country
United States
Here are some pictures of the current progress. I'm probably about half-way finished rocking in the pond area. The hot and humid weather here has been slowing things down considerably. :-(

pond_rocking_1.jpg
pond_rocking_2.jpg
pond_rocking_3.jpg
 
Joined
Dec 16, 2017
Messages
13,487
Reaction score
10,613
Location
Ct
Showcase(s):
1
Hardiness Zone
6b
Country
United States
Welcome to wonderland.
Instead of using styro there is a product that roofers use it's a protection board it is only 1/8" thick but it fiberglass coated in a asphalt like coating. it's simply called a protection board i used some in my build but as protection from sharp edges more then for holding back walls but if you bury it into the floor and into the sides a bit it should do the job nicely. I know the sands on the cape all to well as i was raised in Ma myself and have been a builder all my life. While yes you can get a good compaction with sand just add water to a weak spot and watch how fast it washes out. A couple other things you can do to strengthen your build without retaining walls is to try and overlap each stone over the lower when the seems are right above one another they are far less stable. and waterfall foam you can spray in behind and around the rocks don't spray to where you want the foam to be in the finish stop shy of and let the foam expand. can tell your getting the hang of it, as the upper section is looking real nice. Try and stop any run off water from rains from reaching the outside of the pond.
 
Joined
Jun 29, 2020
Messages
144
Reaction score
89
Location
Buzzards Bay, MA
Hardiness Zone
6b
Country
United States
A couple other things you can do to strengthen your build without retaining walls is to try and overlap each stone over the lower when the seems are right above one another they are far less stable. and waterfall foam you can spray in behind and around the rocks don't spray to where you want the foam to be in the finish stop shy of and let the foam expand. can tell your getting the hang of it, as the upper section is looking real nice.

Thanks for the comments and vote of confidence. I'm trying to make sure I lock everything in place as I go along by filling in any larger voids with smaller rocks. Maybe I'm going a bit overboard in doing this, but I have plenty of time on my hands and figure it can't hurt. I do plan on using some foam when I'm done to try to lock things together even more.
 
Joined
Oct 28, 2013
Messages
13,101
Reaction score
13,438
Location
Northern IL
Showcase(s):
1
I do plan on using some foam when I'm done to try to lock things together even more.

If you dry stack well and lock it like you said with gravel, I wouldn't worry about foaming the inside of the pond. Foam isn't really meant for structural strength and you'll find it can start to deteriorate over time and start to break apart in the pond.

Looks great so far by the way!
 

TheFishGuy

( Insert something funny )
Joined
Jul 9, 2020
Messages
1,356
Reaction score
937
Location
Colorado
Showcase(s):
1
Hardiness Zone
4b or 5a
Country
United States
how is your pond building coming along now?
 
Joined
Jun 29, 2020
Messages
144
Reaction score
89
Location
Buzzards Bay, MA
Hardiness Zone
6b
Country
United States
how is your pond building coming along now?
Thanks for asking! The pond itself is done, as is the landscaping around it. Unfortunately, I didn't take enough care when building the waterfall and had to track down a few leaks. Very frustrating! I don't see any more obvious wet spots along the waterfall, but It still loses about an inch of water a day (from about 700 gal covering a 9x7 foot area). I think I'm just going to live with it for now. Around the pond I added concrete edging, a couple of shrubs, and some flowers, then finished the area off with bark mulch. I still need to get the electrical situation taken care of (right now I'm running on an extension cord), but that'll be a project for next year. I did get some cloudy water in the beginning, but a UV light put in the skimmer box seemed to clear that up within a couple of days. The kit I bought came with the light included. Getting back to the water loss issue, I've seen a lot of birds taking baths and drinking from the waterfall, but I really can't imagine their splashing is responsible for losing an inch a day. I'll try to get some pictures posted in the near future.
 

TheFishGuy

( Insert something funny )
Joined
Jul 9, 2020
Messages
1,356
Reaction score
937
Location
Colorado
Showcase(s):
1
Hardiness Zone
4b or 5a
Country
United States
Thanks for asking! The pond itself is done, as is the landscaping around it. Unfortunately, I didn't take enough care when building the waterfall and had to track down a few leaks. Very frustrating! I don't see any more obvious wet spots along the waterfall, but It still loses about an inch of water a day (from about 700 gal covering a 9x7 foot area). I think I'm just going to live with it for now. Around the pond I added concrete edging, a couple of shrubs, and some flowers, then finished the area off with bark mulch. I still need to get the electrical situation taken care of (right now I'm running on an extension cord), but that'll be a project for next year. I did get some cloudy water in the beginning, but a UV light put in the skimmer box seemed to clear that up within a couple of days. The kit I bought came with the light included. Getting back to the water loss issue, I've seen a lot of birds taking baths and drinking from the waterfall, but I really can't imagine their splashing is responsible for losing an inch a day. I'll try to get some pictures posted in the near future.
wonderful update, and I look forward to pics :)
 

Ask a Question

Want to reply to this thread or ask your own question?

You'll need to choose a username for the site, which only take a couple of moments. After that, you can post your question and our members will help you out.

Ask a Question

Members online

Forum statistics

Threads
30,879
Messages
509,650
Members
13,098
Latest member
Snowy

Latest Threads

Top