Fellow inventors/innovators; will this work?

Joined
May 7, 2008
Messages
560
Reaction score
9
Location
Salem Oregon
Trying to modify existing Easy Pro aquafalls filter = more effective with fines. Please, I need help from fellow inventors--Dr. Dave? Dr. Case? Others?

Bought 3 cubic feet of Aqua UV plastic bio-media = 8 inch layer in the aquafalls. should be great for bio-media sites, but they are also reputed to reduce fines.

How? do they "capture" the fines as water goes up through such a circuitous course. OR, do the fines settle out below the bio-media. OR both.

If the fines are "captured" in the bio-media, then the bio media need to be agitated to push the fines out through the drain for cleaning.

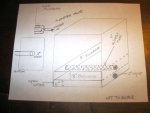
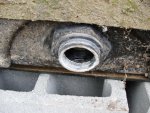
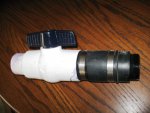
Here's the idea. Put a 3 inch bulkhead in the bottom of the aquafalls. To this attach piping & knife valve = new drain. Current drain isn't a drain, it's a second 2 in. input bulkhead on the other side of the box at the bottom. With the bulkhead lip the water only starts to drain at about 1- 1.5 inches. Leaves some stagnant water + waste in the bottom

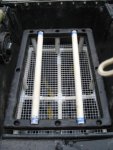
Hook up pump to one of the 2 in. input bulkheads as usual--plug the other. Install a 6 inch high PVC stand inside the box on the bottom to create open water. Then, on top of this stand put the bio-media. Put a second 8 inch stand on top of this one and one layer of standard matting on top. On top of that put the bio-ribbon I already have. On top of that goes the rock grate.

Install a new 2 in. bulkhead right in the middle of the 8 inch layer of bio-media. Insert a two inch pipe that runs entirely across the box with a cap on the other end and multiple holes drilled at various angles. holes need to be large to minimize pressure so as not to overly disturb the helpful bacteria.

On the outside of the box plumb in a selector so I can shut off water flow to the original input and run it through the fines as I open the drain and clean the filter.

What do you think?
 
Joined
May 7, 2008
Messages
560
Reaction score
9
Location
Salem Oregon
see if these help.
 

Attachments

  • Garden pond foto 60-expansion 2009.jpg
    Garden pond foto 60-expansion 2009.jpg
    46.1 KB · Views: 281
  • Garden pond foto 61-expansion 2009.jpg
    Garden pond foto 61-expansion 2009.jpg
    46.1 KB · Views: 278

DrDave

Innovator
Moderator
Joined
Aug 29, 2007
Messages
6,851
Reaction score
112
Location
Fallbrook, Ca USA
Give it a try. Looks loke your plan is to divert the intake water to flush the bottom water out using the multidrilled pipe for cleaning and using the bottom drain for the exit.

Pictures of the unit before and after for posting would also be helpful for others with this same system.
 
Joined
May 7, 2008
Messages
560
Reaction score
9
Location
Salem Oregon
Sounds like you've got it. Only the diverted water will agitate the biomedia dislodging the fines and all of that will go out through the bigger drain. Maybe I should put that agitator pipe near the top of the fines and face the holes down.

Here are some pictures of the work I did today. i built the lower stand out of 3/4 in. pvc. in the last picture the second stand is on top of the first. between the first and second stands will go the biomedia in media bags. BTW, the 4 inch bulkhead on the left I plan to use to try and divert the water from the waterfall, through a 4 in pipe back to the pond. It may end up requiring two, but I'll try one first. So, the diverter pipe will go under the second stand from left to right
 

Attachments

  • garden pond foto 67-expansion 2009.jpg
    garden pond foto 67-expansion 2009.jpg
    71.1 KB · Views: 321
  • garden pond foto 66-expansion 2009.jpg
    garden pond foto 66-expansion 2009.jpg
    62.4 KB · Views: 254
  • garden pond foto 65-expansion 2009.jpg
    garden pond foto 65-expansion 2009.jpg
    84.2 KB · Views: 294
  • garden pond foto 63-expansion 2009.jpg
    garden pond foto 63-expansion 2009.jpg
    69.5 KB · Views: 296

DrCase

Moderator
Moderator
Joined
Dec 29, 2007
Messages
4,400
Reaction score
789
Location
Arkansas
Hardiness Zone
7a
I got in a little late on this one
your doing a nice job on your project its really looking good ..
The little bit of stagnate water on the bottom could be over come by shutting your drain valve and flushing a second or third time
Keep the build pics comming
 
Joined
May 7, 2008
Messages
560
Reaction score
9
Location
Salem Oregon
Hi Dr. Case,

I thought about flushing like you're saying. Running water through it several times. However, the Aquafalls didn't come with a real drain--I'm just using one of the two 2 in. bulkheads for water inflow. (Picture below). Pretty big oversight for them not to put in a real drain--frankly I think 2 in. is too small for that size box anyway.
 

Attachments

  • Garden pond foto 68-expansion 2009.jpg
    Garden pond foto 68-expansion 2009.jpg
    87.8 KB · Views: 281

DrCase

Moderator
Moderator
Joined
Dec 29, 2007
Messages
4,400
Reaction score
789
Location
Arkansas
Hardiness Zone
7a
That will still work..
by flushing the bottom a few times with the pond water will dilute the muck on the very bottom
a drain on the bottom would have been better but thats what you got
 
Joined
Jul 7, 2009
Messages
2,817
Reaction score
19
Location
North Carolina
can you drill into the very bottom of the container to put in a true bottom drain? Like a shower drain, which you can cap off with a ball valve? You can then just stand the unit on a pair of blocks to allow for the piping that needs to go underneath to clear the muck.
 
Joined
May 7, 2008
Messages
560
Reaction score
9
Location
Salem Oregon
You guys are right about flushing and that's what I'd been doing. putting a cheap submersible pump in the pond hooked to a garden hose and then flushing from the top while the other input bulkhead was opened. . But don't you think a true bottom drain would be better? I ordered a 3 in. bulkhead and a 3 " knife valve. I'll run a simple 90 degree elbow and then take the pipe out through the blocks and put a knife valve. What do you think? these fotos are of the old system: right side 2 in. input bulkhead i was using as a drain and of the "appliance" used to control it.
 

Attachments

  • Garden pond foto 69-expansion 2009.jpg
    Garden pond foto 69-expansion 2009.jpg
    89.4 KB · Views: 256
  • garden pond foto 70-expansion 2009.jpg
    garden pond foto 70-expansion 2009.jpg
    66.9 KB · Views: 211
Joined
Jul 7, 2009
Messages
2,817
Reaction score
19
Location
North Carolina
right. that's exactly what I'm talking about! The "appliance" as you call it is a ball valve. It will open or close your bottom drain. Drill the bottom, push in your bulkhead and then caulk it really tightly with an aquarium sealant or my favorite PL Roofing and flashing sealant. Make sure to work it all in very tightly and let it dry at least 24 hours before using it.

Just put a elbow (preferably a sweep elbow versus a sharp 90 degree one) in your contraption so that it bends forward under your filter box. Then stand your box on cinderblocks to accommodate the new bottom drain. Plug up that side drain.

Unless, of course, you are seeking to use that side drain to attach your contraption to?
 

Ask a Question

Want to reply to this thread or ask your own question?

You'll need to choose a username for the site, which only take a couple of moments. After that, you can post your question and our members will help you out.

Ask a Question

Members online

No members online now.

Forum statistics

Threads
30,879
Messages
509,650
Members
13,098
Latest member
Snowy

Latest Threads

Top