My mini-pond pics and stories

Joined
Apr 24, 2010
Messages
116
Reaction score
1
Location
Virginia
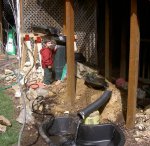
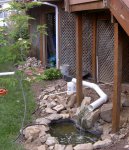
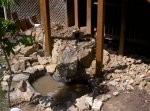
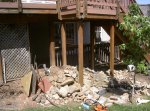
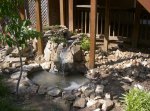
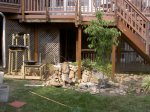
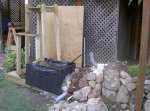
Pond newbie here. I'm finally fulfilling a childhood fantasy - I mean beautifying my yard - by adding a small pond / water feature. Will post pics as I go along.

I have a quite-small backyard, so not much space to work with. Mainly I wanted an interesting feature, something to add some nice background sound, and something for my kids to have some fun with as well (I have a 2 year old son that is obsessed with water).
 
Joined
Apr 24, 2010
Messages
116
Reaction score
1
Location
Virginia
First the "proof of concept", done after installing the pond bed (got at Lowes). I've got one larger and three smaller tubs to use for the water run areas. Wanted to make sure the flow was good with the pump I have (I think it's 33 gph - a very small pond pump, but adequate for what I want).

It worked well.

My son stood there for about an hour - "Iss water! Iss water!". He loved it.
 

Attachments

  • IssWater.jpg
    IssWater.jpg
    104 KB · Views: 812
Joined
Apr 24, 2010
Messages
116
Reaction score
1
Location
Virginia
Intent is to have several small water drops/falls feeding into the main pond, integrated into a rock garden environment with various plants - mostly things like ferns and such; some annuals and some perennials. I decided to even have a tunnel, which seemed like it'd be pretty cool, giving a "spring" effect. I made the tunnel out of 4" PVC.

I had a cool rock that with an interesting story. Shortly after we moved into our house I noticed what appeared to be a fist-sized rock jutting up in our front yard. I tried prying it up, and it wouldn't budge. Being a guy - well - I had to get that rock up. After much digging and prying, I ended up with a quite large rock (about 100 lbs), with one side concave. It looked like a really neat rock to integrate into the water feature, so voila.

After the proof of concept I decided to use it as the fall into the main pond. Since it's very heavy I didn't want it to sink over time and crush the side of the pond, so I reinforced it with several rebars and concrete beneath it. That sucker's not moving.

There's a nice Chinese dogwood I planted a couple of years ago in front of it. Hopefully there won't be a problem with roots; I think dogwoods are fairly benign, and it's a hard-side pond.

So after a couple of days of work, here's the status:
 

Attachments

  • PICT8376m.jpg
    PICT8376m.jpg
    158.4 KB · Views: 773
Joined
Apr 24, 2010
Messages
116
Reaction score
1
Location
Virginia
I added one of the three smaller pools above it, and used a section of cut PVC between the two, and cemented some small rocks to make it look good. I'm adding some black coloring to the cement for appearance. After covering the tunnel area, and completing most of the lower section, it looked like this:
 

Attachments

  • PICT8381.jpg
    PICT8381.jpg
    159.3 KB · Views: 678
  • PICT8383.jpg
    PICT8383.jpg
    160.2 KB · Views: 614
Joined
Apr 24, 2010
Messages
116
Reaction score
1
Location
Virginia
Then after adding a few rocks to make some "planter" areas, and some plants, the current status is this. Pretty much done with phase 1 - the lower section. Still have to set the rocks in place around the pond itself, and am adding some more plants.

The upper section will take a while - I'm going to build a wood frame that'll be about 5 feet high, on which to attach rocks, to brace the larger waterfall. From that there will be a run with a drop or two down to the entrance of the tunnel. I'll probably integrate a wooden water wheel in there somewhere.

This is a fun project, I have to say. I look forward to working on it every weekend.
 

Attachments

  • PICT8384.jpg
    PICT8384.jpg
    159.8 KB · Views: 876
Joined
Apr 24, 2010
Messages
116
Reaction score
1
Location
Virginia
Thanks. Wait'll it's done!

WolfStock said:
(I think it's 33 gph - a very small pond pump, but adequate for what I want).

Actually after checking it's 330 gph. Shows how much of a novice I am.
 
Joined
May 19, 2010
Messages
40
Reaction score
0
Location
UK
Its already making a big difference! look forward to the final master piece :smile:
 
Joined
Apr 24, 2010
Messages
116
Reaction score
1
Location
Virginia
Unfortunately I haven't made progress the past few weeks - I've been out of town for a couple of weeks, and before that had to spend a couple of weeks building up my irrigation system. Good thing too since we didn't get a drop of rain while we were gone. My garden and the pond plants stayed well watered fortunately. The plants are taking nicely.

Speaking of that - one probably I have with irrigation is my 1/2" drip line wants to pop up out of the ground due to heat expansion. Anyone with any ideas on that? I mostly have it right on the surface and held down with hooks every few feet. It's been *really* hot here lately though, and it's looking ugly.

I should be able to get back on the pond after next weekend. I did do some work on the rim - placing the main set of rim rocks. Next step is the framework for the upper waterfall section. I've already get it planned out and a few pieces cut, but nothing put together yet.

As a side note - one thing I've been having a problem with is rapid algae growth (green water). I've been adding chlorine to keep it at bay, though I know that's not the best solution (especially when it comes time to add plants and maybe fish later). I've seen there are a few threads talking about algae - need to consult with them. Seems like the best solution is a small UV filter.
 
Joined
Apr 24, 2010
Messages
116
Reaction score
1
Location
Virginia
Finally able to start working on it some more. This past weekend I started on the "upper" section, which will consist of a top feeder pool about 6' high, falling into another pool, then into another, with probably a wooden water wheel between the 2nd and 3rd pools. I tried finding a water wheel online or in stores but nothing looked good - if anyone has any thoughts let me know. I'll probably just wing it - there are plenty of examples/info online about water wheels, and actually a lot of real ones at mills in this area.

The framing, with pool placement, and then the beginnings of the rock placement on the framing (stucco style, with plywood, plastic, wiring, mortar, and rocks - will add a finishing mortar for looks later):
View attachment 3301
 

Attachments

  • PICT8614.jpg
    PICT8614.jpg
    158.9 KB · Views: 576
  • PICT8616.jpg
    PICT8616.jpg
    156.4 KB · Views: 518

Ask a Question

Want to reply to this thread or ask your own question?

You'll need to choose a username for the site, which only take a couple of moments. After that, you can post your question and our members will help you out.

Ask a Question

Members online

Forum statistics

Threads
30,907
Messages
509,889
Members
13,117
Latest member
bospond

Latest Threads

Top