my 2 cents;
this post is rambly and I can see why CW had questions as so do I. Much of waterfall design is in the eye of the beholder. My waterfall may do nothing for you but someone else may love it. Hence part of the problem. So, IF this were mine;
I'd NOT put much height for the waterfall as nothing I'm seeing in your pics makes me think it would look like it has always been there. You'd have to re-landscape to gain some berms and such to allow a 'hill' to be turned into a waterfall. So, that leaves a low waterfall scenario; I hope this is what you're aiming to achieve. For MY bog, I went with a raised box where the front/pond-side wall is made from stacked sandstone ledgerock. This gave me a 'wall' effect, much like what you're aiming for (I think). You could do the same and turn your waterfall into a bog as well, giving you even more filtration. I mean, you're going to pump water there anyhow, so why not let plants and bacteria help you out even more?
This wall of stone idea gave me many options re 'weir'. I ended up going with a top layer (one row higher than the bog water level) with gaps between. So in essence, I have multiple areas for the water to pour through and some shoots over the wall while most dribble/stream down the rock. You can then manipulate this top course of flat rock to put the water where you want it. One opening or many. You can even adjust your wall of stone to give you shelves for the water to either pool or drip off of.
To build the above, you'd make a box from ground-contact 4x4 (or 4x6), probably no higher than 12". You take your liner and wrap it up the front wall and over, then into your bog/waterfall, and then back up. The front of this liner should extend into your pond by 12" and the pond liner should come UP under the bog liner by the same or more. This eliminates wicking problems. Now, when you do this, you need a shelf able to support the stacked stone in front of the wood box with liner. I used 6" for 4" stone, but should have gone 8" for extra options. This stone lies ON the bog liner and stacks in front of it. At the top, you create a 'fold' that goes back toward the pond (I'll attach a pic of my bog/liner design) and then into the bog proper; this keeps the water from going BEHIND the rock and thus is forced down and over.
So the above is a bog design waterfall but you can go further if instead of a 'wall', you can use a tumble of round stone of various sizes to do the same, but you'd still need some sort of outer structure that is lined to contain all your waterfall water. Idea is the same but materials is different. You can use wood, concrete block, soil/berm, but whatever you use, the whole idea is all the water has to be contained. A bowl shape is used for most waterfalls (it's what I used on my 3 falls, but I also have berms to allow it to look more natural. I'll attach a pic of that too.
Re plantings; I wanted this look; rocks on the sides of falling water with plants on top and trailing down the sides. To get this, I put plants INSIDE my waterfall cavity, sitting on rocks/blocks and lifting out of the top to cover my waterfall 'top' rocks. For the plants trailing down, I set two pots of creeping jenny, one to either side of my 'tall' waterfall. Took about a year but now I have to actually trim it back. I'll see if I can also post a before and after pic to illustrate. It takes some time and patience but it's worth it. IF you can direct some of your water to go over your rocks, you could plant in the crevices of your waterfall rocks but since you won't have any soil, you'll probably lose anything during the winter/dormant months. I used pots of soil and they stay living.
Okay, pics;
design
View attachment 142993
before plantings; you can see the stacked sandstone and the gaps for water pour;
View attachment 142994
after plantings;
View attachment 142995
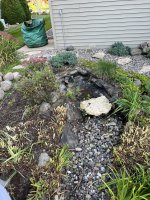
initial expanded waterfall (from one to two pours, same source point); note only rocks on sides;
View attachment 142996
after pots of creeping jenny placed on sides
View attachment 142998
the following summer;
View attachment 142997
and currently;
View attachment 142999
View attachment 143000