Split level pond

Joined
Sep 5, 2012
Messages
12
Reaction score
0
Location
Milton keynes, U.K
Hi guys,

I am in the process of moving my koi pond and want to create a two level pond, the upper level I want to build with a cement block or brick with a 30 degree cut out which will follow the radius of the lower level. I am not sure wether to go for a preform upper level or epdm liner which will give me more flexibility as my brick laying is not that great. I intend on the water cascading down a shear face but again have not made a decision on how to do this yet. The lower pond will have a bottom drain and will be epdm. Filtration I am ok as I have an advantage bead filter already however was wondering on what size my return pipe work should be. The pond outlet will be in 4" pipe but the feed into the filter is only 2". The size of the two bodies of water will be around 2500 gallons. Has anyone good experience in fitting epdm liners and is it easy to it the bottom drain?

Thx

Dave
 

sissy

sissy
Joined
Jan 17, 2011
Messages
33,086
Reaction score
15,702
Location
Axton virginia
Showcase(s):
1
Hardiness Zone
7A
Country
United States
That would depend on freezing as most cheaper preforms are not very deep .Bottom drain no clue don't have one
 
Joined
Apr 10, 2010
Messages
3,214
Reaction score
1,296
Location
Phoenix AZ
IMO preforms are much more difficult to install correct or precisely. Not level? Pull the pond out and try again, and again. With liner it's no problem. IMO EPDM is more durable and will out last most preforms. And of course, like you said Dave, EPDM forms to exactly what you want, and size you want. EPDM for the same size pond is much cheaper, although there are lots of preforms here on CraigsList for cheap.

EPDM connection to bottom drains is pretty easy. I can't remember reading about anyone ever having a leak...I assume it happens, but doesn't seem common. Set the liner in the pond, over the drain (which is concreted in place so it doesn't move). Add some water and remove winkles. Fill pond completely making sure it's not stretched in corners. That sets the liner. Empty the pond and now make the drain connection. When you fill with water again there's almost no chance the liner will move and pull out...not that there's a huge chance if the first filling step is skipped. But it's good insurance especially for an inexperienced builder.

No mention of TPRs (Tangential Pond Returns). Without those you lose most of a bottom drain's function. Commonly skipped in water gardens unfortunately.

Pump size drives pipe size. Without knowing the pump size I can't help on pipe size.

I know the building practices in the US and UK are very different when it comes to masonry. I use bond beam block to form collars and walls.

8X8X16%20U%20Shaped%20Solid%20Bond%20Beam.JPG


I like these because they can be dry stacked (no mortar at all). They can be placed however you like, curves, whatever. In larger ponds horizontal rebar is easy to place inside, along with vertical rebar, and then the voids are filled with concrete. Very string, very easy, no experience required to do a good job. In smaller ponds the rebar and concrete can be skipped and the voids just filled with clay soil and compacted. For the top course I use a hammer to knock down the top on one side of the block a little bit. That leaves kind of an 'L' shape. Place high side toward the pond. The liner gets tucked into the block and back filled with soil. The result is about 2" of exposed liner and plants can be planted even right inside the block (assuming they were all filled with soil) and the plants will soon cover the liner.
collar_bond_beam.jpg


The blocks also make it easy to get a perfectly level top.
 
Joined
Jul 10, 2012
Messages
427
Reaction score
152
Location
West Chester, PA
Showcase(s):
1
I have a split level pond. Ours was built with cinder block, (hollow), much as water bug described. Vertical rebar was used in the voids and filled with concrete. I then faced with stone. The difference is at the top of the wall. We didn't want any liner to be visible at all and we wanted basically a capped wall. So once the cinder block was laid, we mortared a row of regular red brick around he top, the red brick is only 4" wide while cinder block is 8". The pond liner and EPDM liner was put in place. We then had found some garden edgers that had natural edges and were almost the same thickness as the red brick.

These were laid on the top of the liner in front of the red brick which sandwiched the liner between the brick and edger. The liner was trimmed off at the top of the brick. We then took 2ft. X 1ft. flagstone and using retaining wall glue and glued the flagstone on top of the red brick and the edgers. We also put some mortar between the joints of the flagstone. This lasted us 17 yrs. The garden edgers have broken down since they were in the water and about 40% need to be replaced now. The flagstone joint mortar also needs to be repointed now.

We were planning to do that this year but decided to build a new pond in another area of the yard. If we did redo the edgers and mortar, I would expect it to last another 15 years which by then we'd probably have to replace the liner. It would be over thirty years then.

If you do something like this, I echo Waterbugs suggestion about pre filling and stretching and settling the liner. Also, leave a good 6-12 inches of liner above the red brick when you do the initial trim of the liner. Once you refill the pond, just set a few edgers on the liner to hold it in place and let the water and liner sit for few days to really let the liner stretch. Then put all the edgers in place and do the final trim on the liner. Now you can glue on the flagstone capstones.

I'm doing a similar design on my new pond which you can see in the showcase.

I'll see if I can get a picture of the top of our current pond to show you how we did it. I'll post it tomorrow.

Craig
 
Joined
Sep 5, 2012
Messages
12
Reaction score
0
Location
Milton keynes, U.K
Thx everyone, it has given me something to go with, I was wondering if anyone has had experience with a vertical waterfall transition from upper to lower. Also for this effect I am guessing I will need to tee the return and balance the flow so most of the return flow is into the main pond?
 
Joined
Apr 10, 2010
Messages
3,214
Reaction score
1,296
Location
Phoenix AZ
I'm not sure what you mean by "vertical waterfall transition". The upper pond isn't going to just overflow into the lower pond?
 
Joined
Sep 5, 2012
Messages
12
Reaction score
0
Location
Milton keynes, U.K
That is what is was thinking of, however I could bottom drain both and have a return into both from the pump? This would keep the higher level separate and easier to build. Was hoping for some aeration though with the water movement.
 
Joined
Apr 10, 2010
Messages
3,214
Reaction score
1,296
Location
Phoenix AZ
You can of course make two separate ponds that appear to be connected, but there are some downsides. Like having to double everything, 4 pumps instead of 2, 2 skimmers, etc. And you'll have 2 smaller ponds volume wise.

Balance a single pump and 2 separate ponds is a difficult task. You'd need some kind of float system hooked to a valve actuator or maybe a solenoid controlled valve. My guess is a second pump would be cheaper...certainly easier to make work.

By connecting the two there's lots of interesting things you get almost for free. For example, you could put a bottom drain in the upper pond and instead of going to a filter you can have that drain overflow into the lower pond. That allows you to place a screen (Google "sieve filter pond") between the two ponds to catch the waste from the upper pond. From the screen the water can fall into the lower pond.

But it didn't sound like the upper pond was going to be that big if you were considering a preform. Maybe not worth a bottom drain and TPRs.
 
Joined
Jul 10, 2012
Messages
427
Reaction score
152
Location
West Chester, PA
Showcase(s):
1
I got called in early this morning to work and it was too dark for any good pictures. I only have limited pics here on my work PC so they aren't as good or exactly what I want to show you.

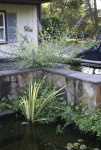
In the first pic you can see the upper pond and the lower pond below it. From your description above I think this is what you mean by having a split level pond. Our waterfall is to the right in this picture. Both ponds are 4' deep with some shelves at 12".

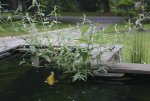
In the second pic you can see the waterfall,(It's only about 8" wide), on the left, behind the butterfly bush is where the upper pond extis under the flagstone cap down to the lower pond. The butterfly bush volunteered there and we didn't yank it because we knew we were replacing the pond so we weren't worried about the roots invading the wall. As it turned out, the roots went for the water, no problems. We never thought a butterfly bush would be an aquatic plant!!!!

As I indicated above, you can see where our edgers have broken down and need to be replaced. Like to the right of the butterfly bush that edger broke in half and is all gone. Same thing in the far left corner there is a small edger that is gone entirely. Some of the edgers have lasted quite well and others not so well. But over all, 17 yrs hasn't been bad.

We have no bottom drains in either of these ponds. Instead we went "over the wall" in each pond and ran a 2" black plastic flex pipe across the bottom. The flex pipe had a whole lot of 3/8" holes drilled into the length of it. This allowed the water to be sucked in from the bottom of each pond. The lines went underground and were merged together with a "T" and then to the pump and filter which was housed in the garage. The return from the filter went out to the ponds and was split into a return for each pond. We had valves on all four lines, (2 suctions and 2 returns), which were used to meter the amount of water drawn from each pond, and the amount returned to each pond.

We had to do this becasue originally the waterfall from the top to the bottom wasn't enough of a flow to change over and filter the upper pond water properly. We should have had a much bigger waterfall. The other problem was that even with a bigger waterfall, a lot of debris would sink to the bottom of the upper pond. Only floating debris got swept over the waterfall. After the first year we had muck building up in the bottom of the upper pond and knew we needed a way to draw water from bottom of the upper pond.

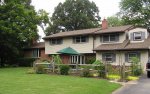
Overall it has served us very well. The third pic is kind of a general view of the pond area. We went with a formal pond because we felt it was the best fit for our property. With the huge trees around the house we couldn't really put the pond anywhere else. And we thought a more formal pond fit better with the entrance area to the home.

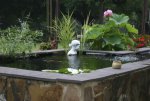
The fourth pic is an overall view of most of the top pond. Again, you can see the flagstone caps and edgers would need repair if we were going to keep this pond. Anyone visiting, as well as our family, get a nice, up close and personal visit from our Koi everytime you walk up the drive or to the front door.

And since I'm here I threw in a pic of some of our local residents. :) The Koi in the upper pond are 20-25" and we have 7 in the upper pond. Lower pond used to have goldfish but we replaced them last year with 8 new Koi, mostly 6-10" now. Over all the pond is 3700 gals, with about 1700 in the upper and 1600 in the lower. We have Koi babies every year, from a few to over 100 one year. Guess it depends on how hungry the frogs are each year!

I'm leaving for the weekend but if you want to see how the liner was finsihed under the flagstone, just let me know here and I'll post a pic when I get back home Sunday evening.

Craig
 

Attachments

  • IMG_8646.jpg
    IMG_8646.jpg
    90.1 KB · Views: 986
  • IMG_8469.jpg
    IMG_8469.jpg
    66.1 KB · Views: 924
  • house.jpg
    house.jpg
    104.2 KB · Views: 942
  • IMG_8481.jpg
    IMG_8481.jpg
    65.1 KB · Views: 1,085
  • IMG_8354.jpg
    IMG_8354.jpg
    63.5 KB · Views: 893
Joined
Sep 5, 2012
Messages
12
Reaction score
0
Location
Milton keynes, U.K
Hi Craig thanks for this! You are indeed right in what I am planning, my pond will be curved profile rather than formal, how did you finish off the liner for the waterfall, I am considering getting a stainless steel plate made to bond the liner to that will allow for the water to run into the lower pond without effecting the retaining wall of the upper. The upper pond was only really going to house my Rudd, goldfish, with the main pond keeping the koi and carp happy. I had thought the build up being an issue and am also now thinking I may ditch the waterfall idea and join the upper to lower with a drain. I am stuck with the filter that I have which is a bead filter although I don't want to change it anyway, so only want to have one pump inlet although I could split the return. The upper level is only going to be around 600 gallons with the lower being the remain 2400.
 
Joined
Jul 10, 2012
Messages
427
Reaction score
152
Location
West Chester, PA
Showcase(s):
1
Thanks for the compliments.

Yes.. we love our lotus. We've had if from the start and it's always done well. We have repotted it many times and given many "babies" away from it.

I'll get a close up pic of how we finished off the top and the waterfall and post it later this weekend. Our main reason for two ponds was to keep Koi up top with no plants and goldfish in the bottom with plants. We had heard how bad Koi can be with plants. But they have behaved up top very well and we were able to keep plants.

With only a 600 gallon top pond I'm not sure how much you really need the bottom drain unless you think your fish load will get heavier and/or you expect a lot of leaves and such to fall in to it. The waterfall could be enough with an occasional muck out of the bottom once or twice a year. I wanted 100% freedom so that's why I installed the over the wall drain suctions later on. It was too late for me to add a bottom drain.

I'm not really sure how you can connect the two bottom drains with out having the upper pond drain to the lower pond. In our system we kind of had the same problem. But since we used two inch pipe as a suction instead of 4" bottoms, we put in two one-way valves just before the two lines converged into one so neither could backflow into the other if the power went off and the pump was off. You could do the same as well I guess but you'd have to step the 4" down to 2". If you do that, make sure the one-way valves are somewhat easily accessible. The flappers in them can sometime stick and you may need to be able to get to them over the years once in awhile. Make sure those are installed with union joints and not glue joints so they can be easily taken out. Or if you want to use glue, (union joints can quickly run up the price tag), install a clean out right next them so you can get in and free a stuck flapper.

As a general rule, any place on a drain line where you step the diameter down, you should make sure that joint is accessible or has a cleanout close by since that is where things will usually get stuck. :grumble: It's not as important on the return lines as that should be carrying only filtered water.

Craig
 

addy1

water gardener / gold fish and shubunkins
Moderator
Joined
Jun 23, 2010
Messages
44,413
Reaction score
29,198
Location
Frederick, Maryland
Showcase(s):
1
Hardiness Zone
6b
Country
United States
Beautiful pond craig! and beautiful lotus. Love that pink color.
 

sissy

sissy
Joined
Jan 17, 2011
Messages
33,086
Reaction score
15,702
Location
Axton virginia
Showcase(s):
1
Hardiness Zone
7A
Country
United States
Have you checked to see if anyone has done this on you tube and they could have suggestions how to do it .I found a lot of parts on eastern koi.com that were cheaper .
 

Ask a Question

Want to reply to this thread or ask your own question?

You'll need to choose a username for the site, which only take a couple of moments. After that, you can post your question and our members will help you out.

Ask a Question

Members online

Forum statistics

Threads
30,902
Messages
509,841
Members
13,113
Latest member
Leolady

Latest Threads

Top