Hi everyone
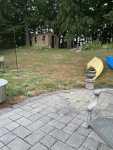
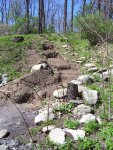
I need some help on where to start my waterfall into my pond. This will all be a new build. I am including a picture. In the first picture i am stand where the pond will be. The second the pond will be to the left of the patio. It is 17ft to the big rock and approximately a 40 degrees incline. I would prefer not to go all the way to the top of the hill by the rock because that is alot of material and more importantly a-lot of rock i would need. I want it to look natural yet don’t know how to do that if i start in the middle of the hill. I have googled my heart out for pictures but have found nothing. Anyone have any ideas or pictures?
I need some help on where to start my waterfall into my pond. This will all be a new build. I am including a picture. In the first picture i am stand where the pond will be. The second the pond will be to the left of the patio. It is 17ft to the big rock and approximately a 40 degrees incline. I would prefer not to go all the way to the top of the hill by the rock because that is alot of material and more importantly a-lot of rock i would need. I want it to look natural yet don’t know how to do that if i start in the middle of the hill. I have googled my heart out for pictures but have found nothing. Anyone have any ideas or pictures?