Overview
My Pond Journey: Part One (building the pond)...
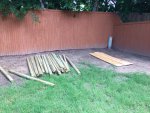
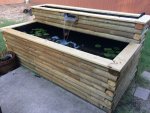
I had wanted to build a pond for a LONG time and I finally got the chance to do so last summer (pond was built in 2016, original post was in 2017 on my goldfish forum). My original idea was to have a partially in ground but mostly above ground pond that wrapped around two sides of my existing concrete patio in a L shape. The more I looked into this concept and how much material it would take to build it seemed very complex and VERY expensive (over $1000 in materials alone). In the end, I decided to stick to a standard rectangular shaped pond and got down to planning and picking materials. I was trying to pick a material that was readily available and relatively inexpensive which led me to narrow it down between 4 x 4 landscape timbers or the standard rounded off landscape timbers. Again, $$ was a big deciding factor and I went with the standard rounded off timbers because it was about 1/2 the cost (under $400 for the rounded off landscape timbers compared to almost $800 for the 4 x 4 squared timbers). (1st picture)
The final plan was to buy 8 foot long landscape timbers and cut enough of them in half so that I would have a pond that would be 4 ft by 8 ft for the outer dimensions. I still wanted to dig down into the ground a little but ended up putting it all above ground in the event that I decided to sell the house and the potential buyers did not want a pond. I don't know who wouldn't want a goldfish pond in their backyard, but I can imagine some people wouldn't? You know, those people that don't like fun things.
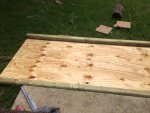
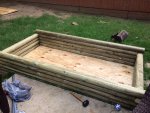
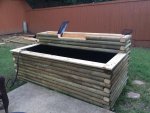
I decided that I was going to line the inside of the framework of landscape timbers with plywood to provide a more solid/even structure to put the liner into and started to build. The base of the pond was a 4 x 8 sheet of 1/2 inch (or 3/4 inch?) plywood supported and/or leveled out in some of the corners by 12 x 12 concrete pavers (2nd picture). I started laying out the timbers on top of the plywood in an overlapping "log cabin" fashion and I would pre-drill and hammer each new layer into the previous one using 6 inch long galvanized steel nails. (3rd picture) This went on for what seemed like an eternity over the span of a couple days before I finally felt like I had it tall enough or got tired of the process.. (I ended up stopping at about 30 inches high to allow tiny humans to be able to see into the pond without a step ladder). Once I had the main part of the pond as high as I wanted it I lined it with plywood and cut off the extra plywood that was sticking out above the timbers (4th picture).
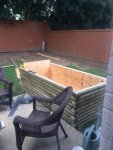
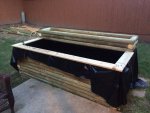
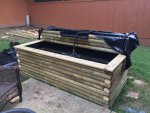
Once the box was lined with plywood I placed the pond liner inside the box and folded it to fit the shape of the rectangle which is a lot more difficult than it sounds. After putting the pond liner in the main part of the pond I started building he overflow box and topped off the rest of the pond edge with some 1 x 6 boards to give it a more finished look (Picture 5). I finished building the overflow box as high as I wanted it to go and lined it with plywood as well. After the overflow box was lined with plywood I cut off the excess liner from the main part of the pond to see how it would look (Picture 6). Then came the really hard part.. I lined the overflow box with pond liner and started trying to figure out the waterfall feature itself. As you can see in Picture 7, I initially had a really large opening that was lined in pond liner which led to water just running over the edge and dripping down the front of the wood into the pond below. After a lot of reading and researching on the internet I decided that the opening was too large and the material was allowing too much leakage around the sides. That's when I decided to make the opening smaller and to build a spout out of metal instead of plywood lined with pond liner. (I still don't know what I was thinking with that first idea, I probably just wanted to get it built and be done with it..?) The first spout was made of sheet metal which of course rusted/corroded overnight and was quickly replaced with aluminum (Picture 8 shows the original sheet metal spout). With the aluminum waterspout in place I was finally done with the overflow box, right?
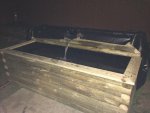
Wrong... I still had some leakage issues but I did some more reading/researching and ended up talking to my uncle (who has ponds of his own) and he suggested I spray the area where the metal spout meets the pond liner with the rubberized "leak seal" spray and allow it to dry for at least 24 hours before turning the water back on. I followed his advice and found the spray he suggested (triple checking to make sure it was safe to use around water and fish) and after using it I allowed it to dry/cure for 24 hours. Finally, the leaking was gone for good and I was ready to put the 1 x 6 boards on top of the overflow box to finish it off (Picture 9).
Based on comments and questions from the original post on my goldfish forum, I will add the following details below...
I used the Total Pond liner from Home Depot and it's 14.5 mil PVC with polyster weave in between the layers, which according to the website that makes it equivalent to 20 mil PVC in strength. I bought one of the larger liners they had because I didn't know how big the pond would end up being (originally planned it to be about two times larger than it ended up being) and I believe I got it for around $100 or so at the time. I measured the inner dimensions of the pond the other day and I came up with about 450 gallons when I have it about 1 1/2 to 2 inches from the top of the liner plus another 20 gallons in the overflow box. SO total volume of water circulating through the system is about 470 gallons @ 1000 gallons per hour (give or take due to gravity in tubing, etc).
I live in north Texas where it rarely gets super cold, for example we had one or two days where it got at or below freezing this "winter" and the top of the pond tried to freeze over. We occasionally will have a stretch of 2 to 3 days where it will get cold enough to get icy on the roads/bridges but it hasn't gotten super cold the last couple of years. It does get rather warm here during the summer but the fish seemed to do pretty well last summer so I am hoping this year will be the same. I wanted to dig down at least a foot or two to provide some sort of protection against freezing in the cold months and getting too hot in the summer, but it would have required more time and more money on renting digging/trenching equipment, etc. I hopefully won't regret not doing so in the future but so far it doesn't seem to be a factor.
I had wanted to build a pond for a LONG time and I finally got the chance to do so last summer (pond was built in 2016, original post was in 2017 on my goldfish forum). My original idea was to have a partially in ground but mostly above ground pond that wrapped around two sides of my existing concrete patio in a L shape. The more I looked into this concept and how much material it would take to build it seemed very complex and VERY expensive (over $1000 in materials alone). In the end, I decided to stick to a standard rectangular shaped pond and got down to planning and picking materials. I was trying to pick a material that was readily available and relatively inexpensive which led me to narrow it down between 4 x 4 landscape timbers or the standard rounded off landscape timbers. Again, $$ was a big deciding factor and I went with the standard rounded off timbers because it was about 1/2 the cost (under $400 for the rounded off landscape timbers compared to almost $800 for the 4 x 4 squared timbers). (1st picture)
The final plan was to buy 8 foot long landscape timbers and cut enough of them in half so that I would have a pond that would be 4 ft by 8 ft for the outer dimensions. I still wanted to dig down into the ground a little but ended up putting it all above ground in the event that I decided to sell the house and the potential buyers did not want a pond. I don't know who wouldn't want a goldfish pond in their backyard, but I can imagine some people wouldn't? You know, those people that don't like fun things.
I decided that I was going to line the inside of the framework of landscape timbers with plywood to provide a more solid/even structure to put the liner into and started to build. The base of the pond was a 4 x 8 sheet of 1/2 inch (or 3/4 inch?) plywood supported and/or leveled out in some of the corners by 12 x 12 concrete pavers (2nd picture). I started laying out the timbers on top of the plywood in an overlapping "log cabin" fashion and I would pre-drill and hammer each new layer into the previous one using 6 inch long galvanized steel nails. (3rd picture) This went on for what seemed like an eternity over the span of a couple days before I finally felt like I had it tall enough or got tired of the process.. (I ended up stopping at about 30 inches high to allow tiny humans to be able to see into the pond without a step ladder). Once I had the main part of the pond as high as I wanted it I lined it with plywood and cut off the extra plywood that was sticking out above the timbers (4th picture).
Once the box was lined with plywood I placed the pond liner inside the box and folded it to fit the shape of the rectangle which is a lot more difficult than it sounds. After putting the pond liner in the main part of the pond I started building he overflow box and topped off the rest of the pond edge with some 1 x 6 boards to give it a more finished look (Picture 5). I finished building the overflow box as high as I wanted it to go and lined it with plywood as well. After the overflow box was lined with plywood I cut off the excess liner from the main part of the pond to see how it would look (Picture 6). Then came the really hard part.. I lined the overflow box with pond liner and started trying to figure out the waterfall feature itself. As you can see in Picture 7, I initially had a really large opening that was lined in pond liner which led to water just running over the edge and dripping down the front of the wood into the pond below. After a lot of reading and researching on the internet I decided that the opening was too large and the material was allowing too much leakage around the sides. That's when I decided to make the opening smaller and to build a spout out of metal instead of plywood lined with pond liner. (I still don't know what I was thinking with that first idea, I probably just wanted to get it built and be done with it..?) The first spout was made of sheet metal which of course rusted/corroded overnight and was quickly replaced with aluminum (Picture 8 shows the original sheet metal spout). With the aluminum waterspout in place I was finally done with the overflow box, right?
Wrong... I still had some leakage issues but I did some more reading/researching and ended up talking to my uncle (who has ponds of his own) and he suggested I spray the area where the metal spout meets the pond liner with the rubberized "leak seal" spray and allow it to dry for at least 24 hours before turning the water back on. I followed his advice and found the spray he suggested (triple checking to make sure it was safe to use around water and fish) and after using it I allowed it to dry/cure for 24 hours. Finally, the leaking was gone for good and I was ready to put the 1 x 6 boards on top of the overflow box to finish it off (Picture 9).
Based on comments and questions from the original post on my goldfish forum, I will add the following details below...
I used the Total Pond liner from Home Depot and it's 14.5 mil PVC with polyster weave in between the layers, which according to the website that makes it equivalent to 20 mil PVC in strength. I bought one of the larger liners they had because I didn't know how big the pond would end up being (originally planned it to be about two times larger than it ended up being) and I believe I got it for around $100 or so at the time. I measured the inner dimensions of the pond the other day and I came up with about 450 gallons when I have it about 1 1/2 to 2 inches from the top of the liner plus another 20 gallons in the overflow box. SO total volume of water circulating through the system is about 470 gallons @ 1000 gallons per hour (give or take due to gravity in tubing, etc).
I live in north Texas where it rarely gets super cold, for example we had one or two days where it got at or below freezing this "winter" and the top of the pond tried to freeze over. We occasionally will have a stretch of 2 to 3 days where it will get cold enough to get icy on the roads/bridges but it hasn't gotten super cold the last couple of years. It does get rather warm here during the summer but the fish seemed to do pretty well last summer so I am hoping this year will be the same. I wanted to dig down at least a foot or two to provide some sort of protection against freezing in the cold months and getting too hot in the summer, but it would have required more time and more money on renting digging/trenching equipment, etc. I hopefully won't regret not doing so in the future but so far it doesn't seem to be a factor.
Planning and Construction
My Pond Journey: Part Two (selecting equipment)
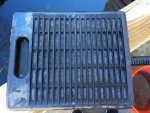
Now that the pond was built the next several months were filled with trial and error trying to figure out what type of equipment I needed for optimal flow, filtering, etc. I originally had just the Active Aqua 1000 gph pump (Picture 1) with the original sponge pre-filter on it which seemed to work pretty well for a little while but would clogged up quite quickly. I ended up adding a layer of Marineland bonded filter pad to improve filtration which helped clear the water up a lot but would clog up on a daily basis. I don't know anyone who would want to unclog a pond filter on a daily basis so I decided to research some larger pond filters and ended up adding the TetraPond SF1 Submersible Flat Box Filter before the pump as a MUCH larger pre-filter (Picture 2).
Changing filters unfortunately lead to the pond starting the cycle almost all over again from the beginning which lead to a very cloudy pond that suffered frequent algae blooms. After jump starting the cycle with some beneficial bacteria I was still dealing with a huge floating algae problem (due to prolonged sun exposure and excess nutrients from the fish) that just didn't seem to want to go away. I went back to the drawing board and did some more research on the internet and decided that I would try a UV clarifier (Picture 3) to see if it would help clear up the algae problem. Now, I had a 1000 gph pump pulling the water through a LARGE pre-filter and sending it up through a UV clarifier to an overflow box that has a layer of pea gravel which I was hoping provided some surface area for beneficial bacteria. The overflow box holds about 20 gallons of water and has the aforementioned layer of pea gravel and will hopefully be home to some beautiful new plants in addition to the few I already have from last summer.
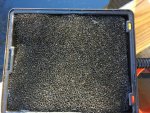
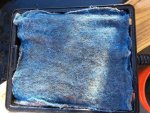
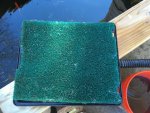
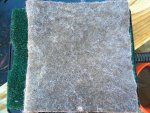
The waterspout allows for the water that has already passed through multiple layers of filtration to spill back into the pond providing surface agitation and oxygenation for the fish below. Over the colder months I decided to add the Aquascape 75000 Pond Air 2 (Picture 4) to provide more oxygen for the fish and hopefully keep the pond surface from freezing over. All this equipment means I have a decent amount of power cords and air tubing to deal with but it is pretty well confined to the back of the pond where no one sees it unless they go around to the back of course (Picture 5). Inside the TetraPond SF1 Submersible Flat Box Filter, I have multiple layers of media that either came with the filter or was added along the way including a bottom layer of biomedia (Picture 6), one layer of Marineland bonded filter pad (Picture 7), the black filter pad that it came with (Picture 8), two more layers of Marineland bonded filter pad (Picture 9), the green filter pad that it came with (Picture 10), a final layer of folded over "white" filter media (Picture 11), and the top or lid of the filter box (Picture 12). I like to provide multiple layers of mechanical filtration which also acts to increase surface area for beneficial bacteria!
DISCLAIMER: Since this article was written I have changed the layout of my filter media based on what I have learned about setting a filter up to optimize it. I still have the bio-media on the bottom but have moved the white fine "polishing" filter pad on top of it as the bottom layer of mechanical media so it can catch all the fine particles that get through the other sheets and won't immediately get clogged up with the larger particles like it did when it was the top layer. On top of the white fine filter I have the sheets of Marineland bonded filter pad since they are almost as fine as the white sheet but not as much. Then on top of that I have the medium green filter pad and on top of it all is the course black filter pad that came with the pre-filter. This layout was to make sure the top layers of filter media are filtering out particles in an optimum manner and hopefully will help keep the bio-media on bottom from getting clogged up.
Now that the pond was built the next several months were filled with trial and error trying to figure out what type of equipment I needed for optimal flow, filtering, etc. I originally had just the Active Aqua 1000 gph pump (Picture 1) with the original sponge pre-filter on it which seemed to work pretty well for a little while but would clogged up quite quickly. I ended up adding a layer of Marineland bonded filter pad to improve filtration which helped clear the water up a lot but would clog up on a daily basis. I don't know anyone who would want to unclog a pond filter on a daily basis so I decided to research some larger pond filters and ended up adding the TetraPond SF1 Submersible Flat Box Filter before the pump as a MUCH larger pre-filter (Picture 2).
Changing filters unfortunately lead to the pond starting the cycle almost all over again from the beginning which lead to a very cloudy pond that suffered frequent algae blooms.
After jump starting the cycle with some beneficial bacteria I was still dealing with a huge floating algae problem (due to prolonged sun exposure and excess nutrients from the fish) that just didn't seem to want to go away. I went back to the drawing board and did some more research on the internet and decided that I would try a UV clarifier (Picture 3) to see if it would help clear up the algae problem. Now, I had a 1000 gph pump pulling the water through a LARGE pre-filter and sending it up through a UV clarifier to an overflow box that has a layer of pea gravel which I was hoping provided some surface area for beneficial bacteria. The overflow box holds about 20 gallons of water and has the aforementioned layer of pea gravel and will hopefully be home to some beautiful new plants in addition to the few I already have from last summer.The waterspout allows for the water that has already passed through multiple layers of filtration to spill back into the pond providing surface agitation and oxygenation for the fish below. Over the colder months I decided to add the Aquascape 75000 Pond Air 2 (Picture 4) to provide more oxygen for the fish and hopefully keep the pond surface from freezing over. All this equipment means I have a decent amount of power cords and air tubing to deal with but it is pretty well confined to the back of the pond where no one sees it unless they go around to the back of course (Picture 5). Inside the TetraPond SF1 Submersible Flat Box Filter, I have multiple layers of media that either came with the filter or was added along the way including a bottom layer of biomedia (Picture 6), one layer of Marineland bonded filter pad (Picture 7), the black filter pad that it came with (Picture 8), two more layers of Marineland bonded filter pad (Picture 9), the green filter pad that it came with (Picture 10), a final layer of folded over "white" filter media (Picture 11), and the top or lid of the filter box (Picture 12). I like to provide multiple layers of mechanical filtration which also acts to increase surface area for beneficial bacteria!
DISCLAIMER: Since this article was written I have changed the layout of my filter media based on what I have learned about setting a filter up to optimize it. I still have the bio-media on the bottom but have moved the white fine "polishing" filter pad on top of it as the bottom layer of mechanical media so it can catch all the fine particles that get through the other sheets and won't immediately get clogged up with the larger particles like it did when it was the top layer. On top of the white fine filter I have the sheets of Marineland bonded filter pad since they are almost as fine as the white sheet but not as much. Then on top of that I have the medium green filter pad and on top of it all is the course black filter pad that came with the pre-filter. This layout was to make sure the top layers of filter media are filtering out particles in an optimum manner and hopefully will help keep the bio-media on bottom from getting clogged up.
Fish / Plant Stock
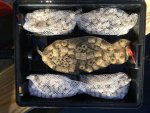
I currently have 14 goldfish in my pond (8 shubunkins, 2 sarasas, 4 common/comet mutts that I've raised since being fry) but might add one or two more eventually. My post in the introductions section includes pictures of the fish if you're interested, but I'm sure I'll add more to this "showcase" as time goes on.
Videos
This first video is my oldest goldfish (and recently departed/missing goldfish ) playing in the waterfall.
The second video is an older video of me feeding the goldfish and minnows, I can't believe how big the newest ones have gotten already in less than a year. The stunted/runty looking fish are the 5 common/comet mutts that I've had since them being fry, including the one with scoliosis that I couldn't bear to cull but his curve has gotten WAY worse with time (so I probably should've culled him, hindsight is 20/20, eh?)
The last video is a more recent video of the water hyssop growing like crazy and the fish of course. I tried to zoom in a couple of times to show the baby minnows I had swimming around but they're the darker/wild color so they don't show up as well.
) playing in the waterfall.The second video is an older video of me feeding the goldfish and minnows, I can't believe how big the newest ones have gotten already in less than a year. The stunted/runty looking fish are the 5 common/comet mutts that I've had since them being fry, including the one with scoliosis that I couldn't bear to cull but his curve has gotten WAY worse with time (so I probably should've culled him, hindsight is 20/20, eh?)
The last video is a more recent video of the water hyssop growing like crazy and the fish of course. I tried to zoom in a couple of times to show the baby minnows I had swimming around but they're the darker/wild color so they don't show up as well.
-
 1.jpg.6d3c125656d1350881ae3e5ad88950f7.jpg
 -
 2.jpg.b0e8c074cde94dbc1a06e04d9f41959e.jpg
 -
 3.jpg.e94d4af2296bfc2edaee88e654690a39.jpg
 -
 4.thumb.jpg.ac40bd2bd94e86a88512b763abf22672.jpg
 -
 5.jpg.12bd9dc983b696b6ed0d996efee382ca.jpg
 -
 6.jpg.27fe8ce1009ed6b215bbe4ef419abc74.jpg
 -
 7.jpg.b2c230eaa9588fcd0295375ce56c4016.jpg
 -
 8.jpg.9555e796dfcacbe879011fab6827cec9.jpg
 -
 9.thumb.JPG.5205bcbc69e7841c39457e9080a70869.JPG
 -
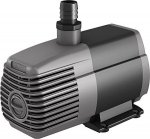 image171ZZPKkXLjL._SX450_.jpg.0c6df29ee9163b478bceb2d38bb3d8a6.jpg
 -
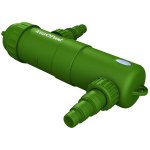 image391jCNu5ItxL._SL1500_.thumb.jpg.1cb6bc40c58f79fb9fd762e54903b81c.jpg
 -
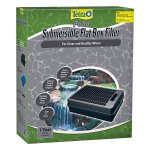 image2811SCrxIPUL._SL1500_.thumb.jpg.69f69129e2b6c6075e67d709ede5b2d4.jpg
 -
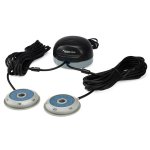 image4101DzdGv2cLL._SL1500_.thumb.jpg.37a3ec03defad3f83833fb8178dd4522.jpg
 -
 image50539.JPG.df413f1288d88cbc9c4d5ccdec484ea0.JPG
 -
 IMG_0524.JPG.fd39acfe963845bbc26c6e5e40a20e06.JPG
 -
 IMG_0525.JPG.2bd8c58c34e2dc4cdf3f5e91b5392023.JPG
 -
 IMG_0526.JPG.d14c6da14c760c324e8ae47bb078dabd.JPG
 -
 IMG_0527.JPG.519e029e24e6d0d26d4c72787b5863b0.JPG
 -
 IMG_0528.JPG.af53e7b4efa3e00cc0c5c87c1a5207d0.JPG
 -
 IMG_0530.JPG.c880491665322434a83618443702d862.JPG
 -
 IMG_0531.JPG.04b8497edc6a60c688b39e895fd69cf9.JPG