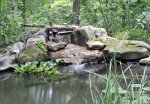
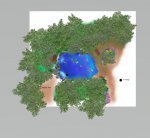
Overview
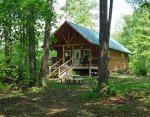
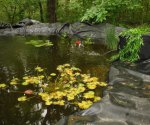
Building our new 2,000 gallon pond in our woodland garden at our cabin, "The Old Bear's Den" @ Old Bear Creek.
Planning and Construction
Planning & construction of the 2,000 gallon pond

STAGE 1 - Building the main pond
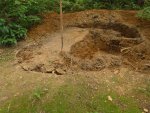
Step 1: Knowing that there is a massive ridge of solid rock beneath the surface of our property, we probed the prospective pond site to see if we could get the depth we wanted.
Step 2: Our pond site is on a slope so I "hired" my father, a retired land surveyor, to see if the spot would be suitable. With use of an antique level, tripod and rod, we surveyed the site to determine just how high of a berm we would need to build up on the low end.
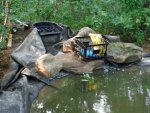
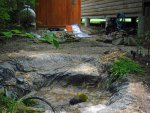
Step 3: Dig! We didn't plan to dig right away but with a forecast of an incoming cold front, and a week of dry weather, we took total advantage of it. I spent 8 hours over two mornings digging down to bare rock, and was able to get about half the area dug. The third morning my husband was able to join me and within 5 hours we had the job done.

Step 4: Remove roots, rocks, and sharp edges.
Step 5: Lay down felt underlayment. Walking on the felt in bare feet allowed me to find any stones that I missed.

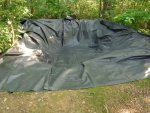
Step 6: Drape the 45 mil Firestone pond liner over the hole.

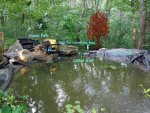
Step 7: Start filling the pond with water while working out the wrinkles in the pond liner. Since we would be leaving town for a week, I did not fill the pond all the way to the top. I placed a small submersible pump into the pond to keep the water moving until we can continue our build. This will keep the mosquitoes from invading!
Within an hour of finishing the partial pond fill, we finally got rain! So we achieved our goal to get the pond completely dug and lined before rains could make a sloppy mess of our pond hole!

Steps 8, 9 and 10 - The pond had been "perking" for a week while we were away on vacation, and had topped off with rain water. I treated the water with dechlorinator/heavy metals remover, followed by a starting dose of nitrifying bacteria a few days later. I added new plants to pond, cleared out the "hiking trail" behind the pond that will allow access to maintain the pond equipment, and set up a temporary homemade filter until the actual equipment can be set up. The temporary filter contains the bag of bio media that will eventually be placed in the filter falls. Included in that bag are some of the bio media from the filter on the established pond. I left the small pump in the pond to continue to stir things up from the bottom.
Step 11: Getting waterfall pump ready and concealing hose with artificial plants.


Step 12: Leak check of filter falls plumbing connections, and running it with filter media until the time comes to install it.

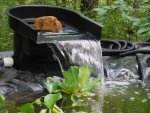
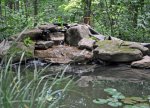
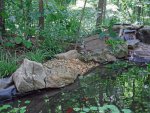
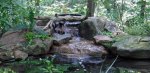
Step 13: Main waterfall construction.
A) Partial build of the waterfall, man those boulders are heavy!

B) Waterfall rocked up and flow tested for the third time. Making sure we are happy with the arrangement before we foam it in.

C) Waterfall test #4 - Rearranging things until we're perfectly happy with it. Its worth taking the time for sure....

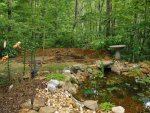
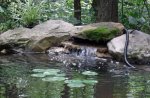
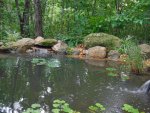
Step 14: Overflow box at Pickerel Cove! Set at the highest water level to direct excess rainfall safely away from the pond without eroding pond edges or loosing fish.
A) I set the overflow box further back from the main edge of the pond to create the illusion that the pond continues off into the woods. I've left the liner detached temporarily to allow for any adjustments as we continue to work the pond edges. When complete, the liner will be glued into the box and a debris/fish saver net installed. A pipe from the back of the box runs into the ground and downhill out into the woods to direct overflow water away from the pond. This pipe has netting around its outlet to prevent rodents and other things from entering and clogging the outflow pipe.


B) Widened mouth of cove and placed framing boulder.

C) Liner and net glued in and box capped with a plastic paver.


Perfect timing! The day after I finished the overflow we got a total down pour of rain which put it to the test. Worked perfectly and I'm happy with the pond level.
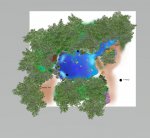
NEW PLAN!
Our original design connected our two ponds via a short stream, but we've changed our minds. We will now dismantle the original pond and lengthen the stream. Creating a more natural appearance of a stream emerging from the woods and down to the big pond.

View attachment 113566
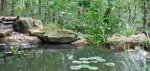
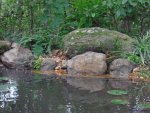
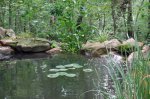
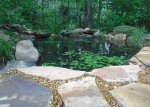
Step 15: Hide liner and naturalize edges with rocks, plants and dirt. Taking our time and trying not to use too many boulders so our pond doesn't look like a flooded firepit. Using native mosses and ferns transplanted from other areas of our property to blend in with the non-native plants we purchased.


And continuing along the shoreline...


Step 16: Built side waterfall using a modified vacuum cleaner nozzle for the fountainhead.

Step 17: Building the shoreline viewing area and blending it into our existing flagstone path.

Step 18: Hide pipes. DONE!
STAGE 2 - Building the creek
Step 1: Relocated fish, plants and critters to new pond. Drained and demolished the old pond. I removed all the edging rocks and organized them into piles, scooped all the gravel and laid it out on a tarp for later, and tore down the old waterfall.

Step 2: Day two of the creek build and we decided to scrap the creek idea!
We decided that the space offered not only the best view of the pond, but was much roomier than our previous viewing area. So we filled in the old pond hole completely, and we have a clean slate. There is the possibility of making a smaller creek closer to the edge of the woods, but we'll see. For now we'll just be finishing out the pond edge where the creek inlet would have been, and maybe upgrade our seating. Other than running the electric out to a new box and hiding pump cords, we are done with this project for now.


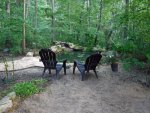
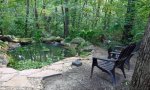
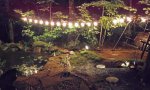
Upgraded the pond seating!

Final sketch:
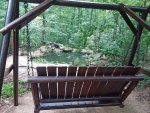
Finishing touch added to the pond swing:

STAGE 1 - Building the main pond
Step 1: Knowing that there is a massive ridge of solid rock beneath the surface of our property, we probed the prospective pond site to see if we could get the depth we wanted.
Step 2: Our pond site is on a slope so I "hired" my father, a retired land surveyor, to see if the spot would be suitable. With use of an antique level, tripod and rod, we surveyed the site to determine just how high of a berm we would need to build up on the low end.
Step 3: Dig! We didn't plan to dig right away but with a forecast of an incoming cold front, and a week of dry weather, we took total advantage of it. I spent 8 hours over two mornings digging down to bare rock, and was able to get about half the area dug. The third morning my husband was able to join me and within 5 hours we had the job done.
Step 4: Remove roots, rocks, and sharp edges.
Step 5: Lay down felt underlayment. Walking on the felt in bare feet allowed me to find any stones that I missed.
Step 6: Drape the 45 mil Firestone pond liner over the hole.
Step 7: Start filling the pond with water while working out the wrinkles in the pond liner. Since we would be leaving town for a week, I did not fill the pond all the way to the top. I placed a small submersible pump into the pond to keep the water moving until we can continue our build. This will keep the mosquitoes from invading!
Within an hour of finishing the partial pond fill, we finally got rain! So we achieved our goal to get the pond completely dug and lined before rains could make a sloppy mess of our pond hole!
Steps 8, 9 and 10 - The pond had been "perking" for a week while we were away on vacation, and had topped off with rain water. I treated the water with dechlorinator/heavy metals remover, followed by a starting dose of nitrifying bacteria a few days later. I added new plants to pond, cleared out the "hiking trail" behind the pond that will allow access to maintain the pond equipment, and set up a temporary homemade filter until the actual equipment can be set up. The temporary filter contains the bag of bio media that will eventually be placed in the filter falls. Included in that bag are some of the bio media from the filter on the established pond. I left the small pump in the pond to continue to stir things up from the bottom.
Step 11: Getting waterfall pump ready and concealing hose with artificial plants.
Step 12: Leak check of filter falls plumbing connections, and running it with filter media until the time comes to install it.
Step 13: Main waterfall construction.
A) Partial build of the waterfall, man those boulders are heavy!
B) Waterfall rocked up and flow tested for the third time. Making sure we are happy with the arrangement before we foam it in.
C) Waterfall test #4 - Rearranging things until we're perfectly happy with it. Its worth taking the time for sure....
Step 14: Overflow box at Pickerel Cove! Set at the highest water level to direct excess rainfall safely away from the pond without eroding pond edges or loosing fish.
A) I set the overflow box further back from the main edge of the pond to create the illusion that the pond continues off into the woods. I've left the liner detached temporarily to allow for any adjustments as we continue to work the pond edges. When complete, the liner will be glued into the box and a debris/fish saver net installed. A pipe from the back of the box runs into the ground and downhill out into the woods to direct overflow water away from the pond. This pipe has netting around its outlet to prevent rodents and other things from entering and clogging the outflow pipe.
B) Widened mouth of cove and placed framing boulder.
C) Liner and net glued in and box capped with a plastic paver.
Perfect timing! The day after I finished the overflow we got a total down pour of rain which put it to the test. Worked perfectly and I'm happy with the pond level.
NEW PLAN!
Our original design connected our two ponds via a short stream, but we've changed our minds. We will now dismantle the original pond and lengthen the stream. Creating a more natural appearance of a stream emerging from the woods and down to the big pond.
View attachment 113566
Step 15: Hide liner and naturalize edges with rocks, plants and dirt. Taking our time and trying not to use too many boulders so our pond doesn't look like a flooded firepit. Using native mosses and ferns transplanted from other areas of our property to blend in with the non-native plants we purchased.
And continuing along the shoreline...
Step 16: Built side waterfall using a modified vacuum cleaner nozzle for the fountainhead.
Step 17: Building the shoreline viewing area and blending it into our existing flagstone path.
Step 18: Hide pipes. DONE!
STAGE 2 - Building the creek
Step 1: Relocated fish, plants and critters to new pond. Drained and demolished the old pond. I removed all the edging rocks and organized them into piles, scooped all the gravel and laid it out on a tarp for later, and tore down the old waterfall.
Step 2: Day two of the creek build and we decided to scrap the creek idea!
We decided that the space offered not only the best view of the pond, but was much roomier than our previous viewing area. So we filled in the old pond hole completely, and we have a clean slate. There is the possibility of making a smaller creek closer to the edge of the woods, but we'll see. For now we'll just be finishing out the pond edge where the creek inlet would have been, and maybe upgrade our seating. Other than running the electric out to a new box and hiding pump cords, we are done with this project for now.
Upgraded the pond seating!
Final sketch:
Finishing touch added to the pond swing:
Fish / Plant Stock
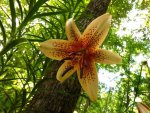
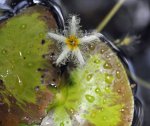
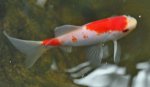
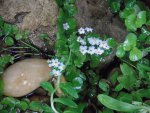
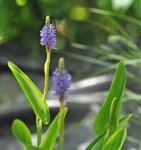
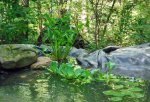
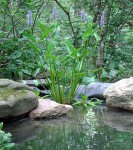
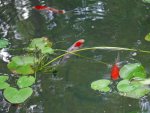
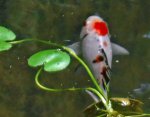
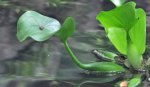
Plants in and around the pond: James Brydon waterlily, Perry's Baby Red waterlily, white snowflake, yellow snowflake, water hyacinth, frogbit, water lettuce, lizard's tail, chameleon plant, Louisiana Black Gamecock (pond plant cup from Lowes), Sioux water lily, plus one unidentified water lily, blue pickerel rush, aquatic forget-me-nots, Clyde Ikins waterlily, native mosses and ferns, Japanese silver grass, liriope, creeping jenny, hornwort, and anacharis.
Fish:
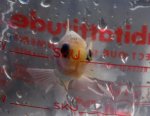
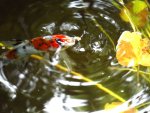
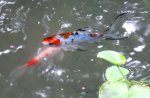
10 total ranging in size from 2.5" to 5.75"
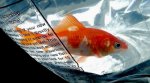
Feeder tank rescue - "Candy Corn" - I HOPE this fish retains it's color!

Feeder tank rescue and starter fish - "Nitro"

Sarassa Comet - "Red Light"

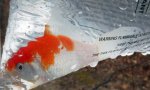
Petco rescue shubunkin (long fins) - "Tire Smoke"

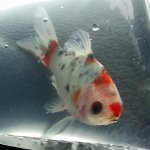
Shubunkin (short fins) - "Rudolph"

Shubunkin and Sarassa - "Speck" and "Tancho"
Unfortunately Speck was chased to death by our largest fish.

Shubunkin - "Bristol" (named for the dragway, not the type of shubunkin)

Sarassa - "Wally" (Parks)

Shubunkin - "Nokoi" (cuz it's no koi...)
Comet - "Big John"

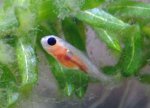
Some of the babies from the pond that I brought into a tank indoors:
 - The brown one, and the little white fry in the next picture, both came in on a plant that I brought in from the pond to place in our little indoor tank. The larger three are some that I netted from the pond, that I am guessing are a month or more older than the other two.

Fish:
10 total ranging in size from 2.5" to 5.75"
Feeder tank rescue - "Candy Corn" - I HOPE this fish retains it's color!
Feeder tank rescue and starter fish - "Nitro"
Sarassa Comet - "Red Light"
Petco rescue shubunkin (long fins) - "Tire Smoke"
Shubunkin (short fins) - "Rudolph"
Shubunkin and Sarassa - "Speck" and "Tancho"
Unfortunately Speck was chased to death by our largest fish.
Shubunkin - "Bristol" (named for the dragway, not the type of shubunkin)
Sarassa - "Wally" (Parks)
Shubunkin - "Nokoi" (cuz it's no koi...)
Comet - "Big John"
Some of the babies from the pond that I brought into a tank indoors:
- The brown one, and the little white fry in the next picture, both came in on a plant that I brought in from the pond to place in our little indoor tank. The larger three are some that I netted from the pond, that I am guessing are a month or more older than the other two.Videos
-
 cabin.jpg
 -
 digging.jpg
 -
 diggingscape.jpg
 -
 feltdown.jpg
 -
 linerin.jpg
 -
 partfull.jpg
 -
 candycorn.jpg
 -
 nitro.jpg
 -
 redlight.jpg
 -
 ruddy.jpg
 -
 specktancho.jpg
 -
 tigerlily.jpg
 -
 tiresmoke.jpg
 -
 2weeks.jpg
 -
 snowflakenikon.jpg
 -
 bigcomet1.jpg
 -
 newshu.jpg
 -
 bamboo.jpg
 -
 hosehide.jpg
 -
 leakcheck.jpg
 -
 partialWF.jpg
 -
 pondedgePAINT.jpg
 -
 FMN.jpg
 -
 bluepick.jpg
 -
 boots.jpg
 -
 Froggie.jpg
 -
 DSCF7001.JPG
 -
 DSCF7004.JPG
 -
 BristolnWallysm.jpg
 -
 pickerelcove.jpg
 -
 fallstest3.jpg
 -
 fallstest4sm.jpg
 -
 DSCF1002.JPG
 -
 DSCF1001.JPG
 -
 NewRiver.jpg
 -
 lastfish.jpg
 -
 edges.jpg
 -
 finfalls.jpg
 -
 sidefall.jpg
 -
 Nokoi.jpg
 -
 bigfalls.jpg
 -
 boulder.jpg
 -
 pickcovefalls.jpg
 -
 westshore.jpg
 -
 shorelinetest.jpg
 -
 demo.jpg
 -
 DSCF8003.JPG
 -
 DSCF8004.JPG
 -
 swing.jpg
 -
 bat.jpg
 -
 tanager.jpg
 -
 waiting.jpg
 -
 Newpond.jpg
 -
 DSCF9001.JPG
 -
 night.jpg
 -
 DSC_0101e.jpg
 -
 DSC_0141d.jpg
