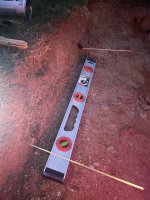
Dug pond wall steep on one side

Joined
May 21, 2023
Messages
78
Reaction score
16
Country
United States
@GBBUDD is your man for building a natural looking pond. And honestly you can start with a square hole and hide the shape with careful rock placement, plants, adding wood elements, etc. So many ways to jazz it up!
Okay that makes me feel better. I did some back filling on the corners to curve at the corners. I did exactly what you guys told me. Fill tamp wet omg miracles. I was able to make the backfill dirt more compact. But I don’t the edges are level. So I still can’t lay my underlayment and liner until I try to level it. It’s higher on the pati end maybe cause the patio is there. I would have to take some dirt off that side to lower that side to be level with the other side. So it’s still a pond in progress. Haha but I’m enjoying the journey.
 
Joined
May 21, 2023
Messages
78
Reaction score
16
Country
United States
Thanks @Lisak1 , I'll cut your commission check later.

John j from Modern design aquascaping when he sizes his bogs in particular. He way over sizes it with probably 4 feet on all sides. That way the area that is doing the work is clear of having boulders over it thus cutting down the effectiveness of the bog. But it allows for a huge shelf for extra pockets for planting rock work and creativity.

I started with a simi circular design but the extra fabric in areas I kept hearing over and over don't cut someday you'll wish you had it. Well I turned that someday into while I was building and one of the results from this was the pitcher plant bog. Absolutely one of the most favored parts of my pond when people see it for the first time.

Brian helfrige aquascapes pond designer says over and over he will give a consult to the owner get a feel for what they want. But as far as this is exactly this or exactly that is never the case. You need to listen to your rocks. They will design the over all shape. They do talk to a builder. There's qusually one side that has the most character. But it may not look the best compared to others around it.

In my show case I put someone else's drawings showing some edge detailing to make a natural looking pond . Trust me even though there are like a dozen there that's hardly all there can be as most of mine differed from those.

When building you need to think like water. But in ponding there is also a usual traight. That being that without a pump or a sponge that water can actually lift upwards of 2 inches creating a leak. The absolute worst in ponding.
Folds in the EPDM can act like a straw and suck water up. No rubber does not absorb water but it happens . The other way is some plants are hollow and can do the same or they can act like a sponge and draw the water out.

Keep this in mind as you build and the rest is left to your imagination.

I will add all you boulders for shelves should come up higher than the shelf by at least 2 inches above or below the water line so these can hold back soil, The whicking we just talked about and underwater holding back gravel that you may place for the natural look.
Thank you. I am taking notes and will use your reply’s as a bible for sure. I’m off on leveling at the moment it looks higher on the patio side.
 
Joined
May 21, 2023
Messages
78
Reaction score
16
Country
United States
Thank you. I am taking notes and will use your reply’s as a bible for sure. I’m off on leveling at the moment it looks higher on the patio side.
I don’t see the examples though you mentioned still trying to figure out how to move around the site.
 
Joined
May 21, 2023
Messages
78
Reaction score
16
Country
United States
Okay that makes me feel better. I did some back filling on the corners to curve at the corners. I did exactly what you guys told me. Fill tamp wet omg miracles. I was able to make the backfill dirt more compact. But I don’t the edges are level. So I still can’t lay my underlayment and liner until I try to level it. It’s higher on the pati end maybe cause the patio is there. I would have to take some dirt off that side to lower that side to be level with the other side. So it’s still a pond in progress. Haha but I’m enjoying the journey.
leveling process. I’m going to dig down to where the wooden sticks are. This should level for me. Then going to put concrete blocks around so I can have concrete under the liner not just soil and liner.
 

Attachments

  • 34E6EE37-041C-4413-B47B-76166E90011C.jpeg
    34E6EE37-041C-4413-B47B-76166E90011C.jpeg
    244.4 KB · Views: 5
Joined
Dec 16, 2017
Messages
13,535
Reaction score
10,658
Location
Ct
Showcase(s):
1
Hardiness Zone
6b
Country
United States
@newponddiyer I WOULD FORGET ABOUT ALL THE FORUM CATAGORIES whoops sorry on caps, stick with your build post here and keep all your questions here . That way Your not spending hours days or weeks trying to find a response . but where was it? answer in your build page. heck i still add to mine and its 6 years old now .

Be very careful with concrete block under the liner. They can have sharp edges you will want to ease the edge so it won't cut or make a sharp corner
 
Joined
May 21, 2023
Messages
78
Reaction score
16
Country
United States
Oh Okay I was using them to level and for soil stability. I don’t know how to keep questions in a specific forum.
 
Joined
May 24, 2019
Messages
1,208
Reaction score
2,048
Location
Tennessee
Hardiness Zone
7a
Country
United States
Take your time and read, read, read about some of the fantastic ponds that people on here have made. Addy ( the Queen of Bogs and apparently snakes) made this drawing that helped me a lot when I made my pond. https://www.gardenpondforum.com/threads/hello-ready-to-learn.31365/#post-496690

Click on the top left for the Forums then you can select a category that interests you. The one I probably relied on the most was https://www.gardenpondforum.com/forums/pond-construction-equipment.8/

Ask your questions - everyone has had the same ones probably and many are willing to offer advice here.
 
Joined
Dec 16, 2017
Messages
13,535
Reaction score
10,658
Location
Ct
Showcase(s):
1
Hardiness Zone
6b
Country
United States
liner ugh it’s 15x20
a 15 foot wide liner will only give you 1 foot for trimming at the surface 2 feet deep leaves you with 8 feet wide . don't make any mistakes with that little to spare
 
Joined
Dec 16, 2017
Messages
13,535
Reaction score
10,658
Location
Ct
Showcase(s):
1
Hardiness Zone
6b
Country
United States
Oh Okay I was using them to level and for soil stability. I don’t know how to keep questions in a specific forum.
your doing it now posting on your build i would keep all your questions here in time you'll find the rest
 

YShahar

Enthusiastic duct-tape engineer
Joined
Feb 4, 2022
Messages
834
Reaction score
1,662
Showcase(s):
1
Country
Israel
Okay that makes me feel better. I did some back filling on the corners to curve at the corners. I did exactly what you guys told me. Fill tamp wet omg miracles. I was able to make the backfill dirt more compact. But I don’t the edges are level. So I still can’t lay my underlayment and liner until I try to level it. It’s higher on the pati end maybe cause the patio is there. I would have to take some dirt off that side to lower that side to be level with the other side. So it’s still a pond in progress. Haha but I’m enjoying the journey.
Welcome to the forum!

Your edges don't need to be all the same level, or even level at all, though having them slope a little bit back towards the wall will help keep your rocks from rolling into the pond. What's important is that the upper edge is completely level all around, so that you won't have liner peaking out, or low spots where water can drain out.

But as for the ledges, you can definitely have some of them deeper than others. In my pond, I wasn't able to build real ledges at all (you can read all the sordid details of why this was in my showcase). So I used rocks sitting on the bottom to hold rocks sitting on the next "level" up. Ideally, you would backfill with gravel to lock the rocks into place. You definitely don't want them tipping up on you when you step on them and pitching you into the pond!

If you want to see what the rocking-in process looks like, check out some of the photos in my showcase, linked below.

Be careful with concrete blocks, as they have sharp edges! You may want to put a lot of extra padding over them, to ensure they don't puncture your liner.

Cheers!

-Yael
 
Joined
Dec 16, 2017
Messages
13,535
Reaction score
10,658
Location
Ct
Showcase(s):
1
Hardiness Zone
6b
Country
United States
Be careful with concrete blocks, as they have sharp edges!
Your best bet is to remove the sharp edges at the top. The best way to do that is with a simple grinder and a mason wheel or scarifier. Even if you tools are limited you can even use a brick or a rock and rub the edge I also suggest removing the 90 degree angle at the base of the blocks by burning a little , concrete or even rolling up fabric while rubber can bend in a 90 easy enough. If things settle and trust me they will you don't want to make the rubber stretch it will more than likely be the first place to fail.
 

addy1

water gardener / gold fish and shubunkins
Moderator
Joined
Jun 23, 2010
Messages
44,415
Reaction score
29,205
Location
Frederick, Maryland
Showcase(s):
1
Hardiness Zone
6b
Country
United States
If you can get rock dust, it works great, compacts well, is very stable. I used it, (propane co required the use) when I dug a hole for our 500 gallon propane tank. Some of the left over I used under my two, partially buried, stock tanks, kept them from sinking and or shifting around,
 

Ask a Question

Want to reply to this thread or ask your own question?

You'll need to choose a username for the site, which only take a couple of moments. After that, you can post your question and our members will help you out.

Ask a Question

Members online

Forum statistics

Threads
30,922
Messages
510,022
Members
13,133
Latest member
Swanstud

Latest Threads

Top