Bogging in New Jersey

Joined
Aug 26, 2013
Messages
139
Reaction score
47
Location
New Jersey
Hardiness Zone
6b
Country
United States
With the temps being below freezing here today (What! This is Spring!), I got little done. But, i did manage to finish installing the perimeter drain around the bottom of the pump pit. There is an obvious amount of water that runs underground on my property, which slopes down toward the pump pit location. So I've installed this drain on the outside of the pit, at the bottom, next to the edge of the concrete slab. It drains to the sump pit inside the pump pit, and is then to be pumped by a sump pump to the rain garden -- at least thata's the theory, we shall see how it goes in reality.

The drain line is "perforated" by slots cut crosswise in the 2" pipe, much as Addy has described for the plumbing in a bog. That pipe is surrounded by gravel, and then some landscape fabric. I hope that this will give a clear flow path for the water, without too much silt.
 

addy1

water gardener / gold fish and shubunkins
Moderator
Joined
Jun 23, 2010
Messages
44,451
Reaction score
29,259
Location
Frederick, Maryland
Showcase(s):
1
Hardiness Zone
6b
Country
United States
I did something similar to direct water away from the upper edges of my ponds and stream. Most of the run off flow was controlled by sloping the land as I built the pond. But during some real heavy rain storms I found some areas that needed work. So dug a trench buried some slit piping, surrounded by gravel with fabric above. It cured the problem. Different than yours, mine was surface hard rain issues. But the system works.
 
Joined
Aug 26, 2013
Messages
139
Reaction score
47
Location
New Jersey
Hardiness Zone
6b
Country
United States
With a couple of days’ rain predicted, but a dry morning, I decided that I would move my efforts in-doors. This means working on the electricals, which will be in the garage, out of the weather.

The first part of this effort is to drill a hole for a conduit through the 18’ of clay that separates the pit and the garage. Drilling rather than trenching because there are many plants in the path, which I don’t want to disturb.

I have a tool called a Borzit for such jobs. I bought it to run a conduit under my driveway when I didn’t want to trench through the asphalt. It’s a clever device. It requires your own ½” heavy-duty drill motor, and your water hose connected to a spigot. The device is inserted into your drill and connected to the hose. The other end of the Borzit threads onto a piece of ¾” black-iron pipe, such as one uses for natural gas lines, and the far end of that pipe screws onto the drill bit, which is a crude sort of affair for boring through dirt.

In use, one turns on the water, starts the drill, and points it in the direction you want to go with the hole. Of course, if you are boring horizontally, you have to dig an access hole to stand in, and where the water will collect and soak your shoes, pants, etc.. The water runs through the drill pipe (the ¾” pipe) and spurts out of the drill bit to lubricate the effort. The used water comes back out the hole that you have drilled.

In effect, this drill compacts the earth surrounding the hole that it’s making, leaving a place to insert a conduit, if you’ve sized the conduit and drill bit correctly. Small stones get pushed out of the way. As the hole gets longer, you thread on additional sections of pipe. People report being able to drill 75’ or more with this arrangement. They must be stronger than I!

For the current effort, I wanted a 2” hole to accept a 1 ¼” conduit, as there are many wires to run through it. It turns out that a 2” bit requires a goodly amount of force to punch through what turned out to be a rock pile from constructing the garage! But eventually I got it forced through: the first of two, one for 24volt lines, and the other for 110volt lines, as required by code.

Of course, getting the conduit through the hole was not so easy. Apparently, some of the rocks would jump back into the “hole” as soon as the drill was pulled out. There followed a number of tries of re-drilling in the same hole, pulling out and disassembling the lengths of pipe, re-trying to push the conduit through, etc. Eventually, SUCCESS.

Drilling the second hole was also not so easy. I can verify that the drill bit will NOT go through old tree stumps that happen to be in your desired path. Digging, chainsaw, demolition saws, etc., followed, eventually getting the obstruction reduced enough that I could run the conduit in two sections, joining it around the stump. Ain’t nothin’ simple in these jobs.

Oh, did I mention that half way through this effort it started to drizzle? By the time I finished I was head-to-foot wet clay mud. Ugh. I’ve done many dirty jobs here; this was the worst.

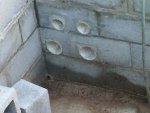
Here's the conduit going through the garage wall:
rs IMG_3422.jpg
 
Joined
Aug 26, 2013
Messages
139
Reaction score
47
Location
New Jersey
Hardiness Zone
6b
Country
United States
Inside the garage, I have mounted a circuit breaker box (subpanel), on the left, that will have 6 circuit breakers: two for redundant sump pumps, two for water circulation pumps, and two for auxiliary power, one at each of pond and bog. Not sure what these last two wil be used for, but probably heater and .... The box on the right will hold the control circuits (mostly relays) that will control when the pumps run, depending on water level, primarily, and time-of-day.

rs IMG_3413.jpg
 

addy1

water gardener / gold fish and shubunkins
Moderator
Joined
Jun 23, 2010
Messages
44,451
Reaction score
29,259
Location
Frederick, Maryland
Showcase(s):
1
Hardiness Zone
6b
Country
United States
Fantastic!

I have done that before with small areas, using a glued on nozzle end and a piece of pvc, use the water pressure to make a hole and shove the pvc through..........not a ton of rocks in the way though.
 
Joined
Aug 26, 2013
Messages
139
Reaction score
47
Location
New Jersey
Hardiness Zone
6b
Country
United States
Meanwhile, I'm continuing the concrete block work on the pump pit:

rs IMG_3416.jpg

Yesterday, I added two more complete courses of block (42 blocks). At 40 pounds a piece, that's a full day's work! So, the pit is now two rows taller than in this picture.

rs IMG_3416.jpg


The holes in the wall are where the electrical and plumbing conduits and pipes will run in and out of the pit. Each one is sleeved with a piece of PVC pipe that's the next-size-larger than the pipe that will eventually run through it. This allows me to get the pit finished without having all the trenching done and the pipes run.

Today, I will decide whether I need to add one more course of block.
 

Attachments

  • rs IMG_3417.jpg
    rs IMG_3417.jpg
    108 KB · Views: 190

addy1

water gardener / gold fish and shubunkins
Moderator
Joined
Jun 23, 2010
Messages
44,451
Reaction score
29,259
Location
Frederick, Maryland
Showcase(s):
1
Hardiness Zone
6b
Country
United States
I always have to, you are doing one fine job. Mine is so basic compared to yours lol
 
Joined
Aug 26, 2013
Messages
139
Reaction score
47
Location
New Jersey
Hardiness Zone
6b
Country
United States
Now, I have to start thinking about the cover of the pump pit. I've been considering an angle-iron frame with a sheet-copper top.

I want the top to be in two parts, each covering half the pit. The top would hinge on two opposite sides of the pit, and be raised manually. I'm concerned about the weight, and whether I'll actually be able to lift the two pieces it manually.
pit cover.jpg

I know that sometimes these pits are under decks or porches, but mine is in the yard, snuggled up next to the garage, so there's no structure above it.

The top needs to slope to shed water, but that only requires that the "ridge" of the top be a couple of inches taller.

Any ideas welcome!
Bob
 
Joined
Oct 27, 2011
Messages
1,993
Reaction score
1,786
Location
BC Canada
Any ideas welcome!
Bob
I have an idea.
Frame it up like a shed with 2x6 walls so you can get R20 insulation in the walls and then add 2" of foam insulation inside on the walls and ceiling as well for a total R value of 32. Then you can put a little space heater in there to help protect the pipes from freezing during the winter. On the outside you can side it and shingle it to match your house and garage.
You should also plumb it in such a way that you can drain and disconnect skimmer lines and reroute some plumbing so you can keep some circulation to the pond happening below the frost level during the winter months. If you have an open settling tank in the pump pit it will function as a breather hole and negate the need to try and keep a hole open in the pond ice when your pond freezes over. I am assuming of course that your weather gets that cold.

Looking good so far BTW.
 
Joined
Aug 26, 2013
Messages
139
Reaction score
47
Location
New Jersey
Hardiness Zone
6b
Country
United States
Thanks, Mucky, for your comments.

I am putting in all plumbing lines so that they can drain back to the sump in the pit: will need to drain in the winter, probably, so that's the easy way to do it. In case I'm able to keep at least some part of the system running in Winter, I'm arranging the plumbing so that I can circulate the pond without the bog. And our weather does get that cold!

Regarding the roof over the pit: I'm trying not to "make a statement" with the pit, but to make it as invisible as possible. The way I'm building, it could have a small building on top, as you suggested, which could work very well indeed. Perhaps I or the next owner would want to do so in future, but for now I'm going more minimalist.
 
Joined
Aug 26, 2013
Messages
139
Reaction score
47
Location
New Jersey
Hardiness Zone
6b
Country
United States
Over the last two days, have filled all the cells in the concrete block walls with vertical rebar and concrete: 60-plus sacks of 60# concrete mix. My trusty Harbor Freight finest-kind-Chinese mixer continues to groan along, mixing the concrete. For about $175, it's a good deal!
Next is to install treated-wood planks on top of those walls: I installed J-bolts in the concrete for that purpose.
Not sure when that will happen, as we have other obligations for the next two weeks.
 
Joined
Aug 26, 2013
Messages
139
Reaction score
47
Location
New Jersey
Hardiness Zone
6b
Country
United States
Back in the saddle again ...
After some other diversions, I'm back to working on the bog/pond/pit. I now have the pressure-treated boards attached to the top of the pump pit walls. It's here that the top will be hinged:
IMG_3509 pump pit comp.jpg


As you can see, I have pipe trenches cut in, thanks to the help of some casual laborers for four man-days worth of digging. Sure saved my back and shoulders a ton of work. Here are more shots of the trenching:
IMG_3501 3 inch house sump pit overflow line and feed to Woods sprinkler comp.jpg

The three-inch line carries water when the house roof drains overflow their catch-pit. The line will go into the pump pit and be pumped to the rain garden. This line previously terminated in an unsightly manner in the "woods", the treed area at the rear area of our property. Never did like that, but hadn't much option at the time it was done. I didn't get my trenches exactly at the correct angle, so I had to heat-bend the 3" line: not a pretty job, but it'd charred into position. Used a weed burner to heat the pipe, then it bends quite easily. If I were more experienced at doing this, I could likely get it done without the scorching.

The two smaller lines are water and valve wiring to a sprinkler valve box.
 
Joined
Aug 26, 2013
Messages
139
Reaction score
47
Location
New Jersey
Hardiness Zone
6b
Country
United States
Here's more trenching:
This one picks up the irrigation water supply at the far end and runs past the bog. The trench will also contain the 2" line bringing water uphill to the bog. You can see PVC pipes waiting to be installed, which are sitting on top of the bog walls.
IMG_3502 irrigation supply and run past bog comp.jpg


Here's the same trench continuing on towards the pond and pump pit in the background:
IMG_3504 around N side of pond comp.jpg


And here's the South side TPR trench for the pond:
IMG_3505 TPR S side of pond comp.jpg


There's more, but you get the general idea, I'm sure! Just long holes in the ground for now.
Next step is to get all the piping and wiring conduit in the trenches. There is a lot of both;
- 2 TPRs
- BD and Skimmer
- 110 Volt lines to bog and pond
- pump to bog
- pump to rain garden
- irrigation water supply
- etc.

Bob
 

Ask a Question

Want to reply to this thread or ask your own question?

You'll need to choose a username for the site, which only take a couple of moments. After that, you can post your question and our members will help you out.

Ask a Question

Members online

Forum statistics

Threads
31,003
Messages
510,939
Members
13,228
Latest member
esvenson

Latest Threads

Top