First Time Pond Builder - Will this work! And some other questions!!

Joined
Mar 5, 2014
Messages
11
Reaction score
2
Location
Kent, England
I think Waterbug hit most of the questions just as I would answer. I also agree, shower filter over trickle tower. Same design you have made, Personally, I would make it look like part of the pond build. Wouldn't be hard to make it very attractive and blend right into the design. I feel like in your case three trays will be enough. Size of each tray would more depend on what you actually decide to use for media, I would recommend at least watching the you tube video's of Deep Water Innovations, Zakki shower and get ideas from it. I'm very pleased with my system from Zac Penn and he does make already prebuilt units that would work great, but they are expensive. Just watching his video's will help understand a lot more about what you may want to think about if going DIY route. Most definitely raise the pump off the bottom, if you want to pull water from the bottom and keep it moving airstones would be a cheap way to move the water and still keep the pump up high enough that in case something happens there will still be enough water left in the pond for the fish to survive until what ever repair needs to be made is done. On the specifics of tray placement, and spacing I wish I could answer those questions better but honestly, I personally have not done enough research to be able to answer those questions comfortably. Possibly Waterbug can help more on that. I do recommend though that you look into one of two options, either use a pump that has a pre-filter foam, or better use the top tray for a media that can be used to prefilter the water and is easily able to be cleaned before the next two trays, this will greatly improve the overall effectiveness of the media trays and they wont get clogged nearly as fast.

Thanks Larkin,

Am researching trickle filters, trickle towrs and filters now to aid with my plan. Will check out Zakki towers and Zac Penn online.

You are right ref the design being able to incorporate and hide whatever I do decide to build.

Steven
 
Joined
Apr 10, 2010
Messages
3,214
Reaction score
1,297
Location
Phoenix AZ
I think the corners will be more than fine based on the amount of lumber being used and the length of the pond. Personally I wouldn't bother with the glue because what you have is so strong. I would pre-drill the top board and be careful not to overdrive the screw. But I would like a the screw length to span 2 board and just a little into the 3rd. Splitting wood is the enemy.

If you look close and think about where most of the force is you may see that no screws are needed except at the corner. Each board will not want to bow out, but will transfer stress to the corner. In the picture I posted those are 4x4s and in between is nothing, just the plywood. You could save some screws.

For the filters I think it's best to kept in mind what their purpose is. Like gravity flow from the bottom drain to a sieve type filter is great, you don't want to chop up fish poo. But for bio filters pumping water to them is fine.

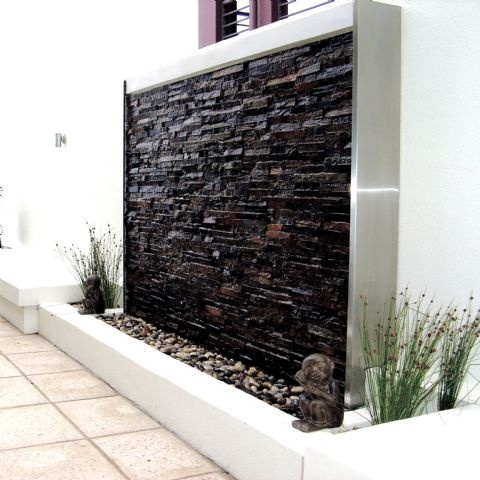
Because of the modern look your pond has you could consider a water wall as a bio filter. Basically the same as a TT, wouldn't be as good per square inch but would probably be fine for 2 Koi. Could always add a shower behind it in the future if needed.
amazing-outdoor-water-walls-5.jpg

You had a question about air and I see you said maybe replacing the TT with an air pump. The TT and Showers work so well because of the amount of O2 (actually all gas exchange) these things provide in the filter itself. They're not really for exchange within the pond. A TT and air pump would do 2 very different jobs.

Gas exchange happens at the boundary between water and air, most happens on the surface of the pond. Bubbles, water falls and crashing water isn't needed. Moving water so water at the bottom of the pond moves to the surface drives gas exchange.

Having said that and considering a bottom drain...A bottom drain requires a certain amount of water to work. Too little flow and crap just sits in the pipe. A bottom drain that's too small a diameter can clog. Most people consider 3" to be the minimum pipe size and around 1500 GPH about the right flow. For a 440 gal pond that's a lot of water movement, a lot of gas exchange.

You can add an air pump, it can even be used to move crap to the drain, your fish will love you for it. But don't think it would be required.

Given the shape of your pond you might consider a river flow layout. The drain(s) are placed at one end of the pond rather than the middle and pump output placed at the opposite end.

You can even capture the water from the water wall, TT or shower and pipe that flow to the bottom of the pond to push poo to the drain. I call this a catch basin. Looks like this:
CatchBasin.jpg

That way you get another use out of the cost of pumping water. Plus it keeps the surface of the pond still making fish viewing better. You also never have any foam on the surface of the water which I don't personally care for. People always think its soap bubbles, and it is in a way.
 
Joined
Apr 10, 2010
Messages
3,214
Reaction score
1,297
Location
Phoenix AZ
I was thinking about the insulation...the more I think about it the less need I see for it unless maybe you planning on heating water which shouldn't be needed in your climate. TT and Showers act just like water cooling towers in power plants, meaning the water picks up the air temp. I can't believe the insulation would make any difference hold temp up into the night with that kind of action. And insulation on the floor would slow transfer of heat from soil into the water. Can't think of any upside.

Not having the insulation could increase water volume by maybe 25-50 gals. Not a lot in most ponds but in your case that's about 10% more water. That's a really plus imo.
 
Joined
Mar 5, 2014
Messages
11
Reaction score
2
Location
Kent, England
I think the corners will be more than fine based on the amount of lumber being used and the length of the pond. Personally I wouldn't bother with the glue because what you have is so strong. I would pre-drill the top board and be careful not to overdrive the screw. But I would like a the screw length to span 2 board and just a little into the 3rd. Splitting wood is the enemy.

If you look close and think about where most of the force is you may see that no screws are needed except at the corner. Each board will not want to bow out, but will transfer stress to the corner. In the picture I posted those are 4x4s and in between is nothing, just the plywood. You could save some screws.

For the filters I think it's best to kept in mind what their purpose is. Like gravity flow from the bottom drain to a sieve type filter is great, you don't want to chop up fish poo. But for bio filters pumping water to them is fine.

Because of the modern look your pond has you could consider a water wall as a bio filter. Basically the same as a TT, wouldn't be as good per square inch but would probably be fine for 2 Koi. Could always add a shower behind it in the future if needed.
amazing-outdoor-water-walls-5.jpg

You had a question about air and I see you said maybe replacing the TT with an air pump. The TT and Showers work so well because of the amount of O2 (actually all gas exchange) these things provide in the filter itself. They're not really for exchange within the pond. A TT and air pump would do 2 very different jobs.

Gas exchange happens at the boundary between water and air, most happens on the surface of the pond. Bubbles, water falls and crashing water isn't needed. Moving water so water at the bottom of the pond moves to the surface drives gas exchange.

Having said that and considering a bottom drain...A bottom drain requires a certain amount of water to work. Too little flow and crap just sits in the pipe. A bottom drain that's too small a diameter can clog. Most people consider 3" to be the minimum pipe size and around 1500 GPH about the right flow. For a 440 gal pond that's a lot of water movement, a lot of gas exchange.

You can add an air pump, it can even be used to move crap to the drain, your fish will love you for it. But don't think it would be required.

Given the shape of your pond you might consider a river flow layout. The drain(s) are placed at one end of the pond rather than the middle and pump output placed at the opposite end.

You can even capture the water from the water wall, TT or shower and pipe that flow to the bottom of the pond to push poo to the drain. I call this a catch basin. Looks like this:
CatchBasin.jpg

That way you get another use out of the cost of pumping water. Plus it keeps the surface of the pond still making fish viewing better. You also never have any foam on the surface of the water which I don't personally care for. People always think its soap bubbles, and it is in a way.

Not using glue would mean it can be dismantled easier and taken with us to form part of a pond when we move. I am also rethinking the design a bit to try and reduce the amount of wood. Will post an update over the weekend if I have time.

I do like that waterfall. Saw some preformed plastic panels on the web once which look nice against my design, hmmmmm!!!!

I'll also have a think about how to approach the water filtration, am now erring back to a pump and filters with a trickle tower to aerate the water! This is due to wanting to gain the additional water depth and volume which I could achieve by removing the insulation in the bottom of the pond (from your other post). Also given the volume and size I am now concerned there may not be enough movement and the pipe could become blocked on a bottom drain!

Will also give thought to the movement of the water and where it enters back in to the pond. As it is a relatively small surface I don't want to be obscuring the view to the fish by having water entering to fast. Like the idea of having go in behind a barrier but that is with a bottom drain.

I was thinking about the insulation...the more I think about it the less need I see for it unless maybe you planning on heating water which shouldn't be needed in your climate. TT and Showers act just like water cooling towers in power plants, meaning the water picks up the air temp. I can't believe the insulation would make any difference hold temp up into the night with that kind of action. And insulation on the floor would slow transfer of heat from soil into the water. Can't think of any upside.

Not having the insulation could increase water volume by maybe 25-50 gals. Not a lot in most ponds but in your case that's about 10% more water. That's a really plus imo.

The insulation in the bottom was in the original design to allow for a bottom drain to built in. As I can't dig down it would allow me to work the pipe in to it. The insulation on the sides was really there as a cheap way to protect the liner from the boards that I'd be making the pond from. These will be rough and I have no intentions on smoothing them off (too many/much work!!). However the sides will be lined with marine ply now so I could do away with the foam as the ply will be smooth enough.

This will give me back several gallons, assuming I lose the bottom drain again!


So many (too many) options!

Steven
 
Joined
Oct 14, 2011
Messages
1,276
Reaction score
661
Location
Cedar Bluffs, Nebraska
Steven,

Barring any exceptions in variances of the dimensions you provided (for your initial pond design), I calculate a much lesser total water volume. I arrived at 250 US gallons or 950 L. The stepped forms in the pond needed to be considered when calculating the overall volume as they take up the space, too. Your initial estimate of 1,000 L was on track.

Gordy
 
Joined
Mar 5, 2014
Messages
11
Reaction score
2
Location
Kent, England
Steven,

Barring any exceptions in variances of the dimensions you provided (for your initial pond design), I calculate a much lesser total water volume. I arrived at 250 US gallons or 950 L. The stepped forms in the pond needed to be considered when calculating the overall volume as they take up the space, too. Your initial estimate of 1,000 L was on track.

Gordy


I'm dropping the steps in the pond now to gain the extra volume. Internal dimensions will be close to 1m x 2m x 1m giving me 2 cubic metres so 2,000 litres in total. The initial design was just shy of 1,000 litres though.

Steven
 
Joined
Apr 10, 2010
Messages
3,214
Reaction score
1,297
Location
Phoenix AZ
I used landscape fabric, the woven kind, between the plywood and liner. I don't think it was actually needed for EPDM, it's very tough.

Saving wood
The plywood can span some distance to hold back water. My pond the 1/2" plywood I used spanned the 3.75" between wood members and I saw no bowing or problems. The plywood was screwed to the wood members like a floor would be screwed down.

In your case that means you could skip the narrower courses and just use short spacer pieces at the corners. If you alternated the butts so you could screw thru 2 courses to hold it together.

A 3.5" wide board should be more than good enough if you wanted to scale that back.

Bottom drain
The bottom drain can be mounted upside down. Google "retrofit bottom drain". Many people new to this think gravity has something to do with drains. They want a sloped bottom and think crap falls into the drain opening. But in water crap is almost weightless so it will move up into a drain just as well as down into a drain.

This would allow you to consider a smaller diameter drain pipe because if you install it right it can be removable for cleaning in case it got a bad clog. Smaller diameter would allow for a smaller pump.

The "drain" now looks more like a vacuum cleaner fixed in place. What if instead of a rigid pipe you used a flexible hose and you could move it around? It would be exactly like a vacuum cleaner. Not useful as a bottom drain but it could be moved around to make sure the entire bottom was clean. I say this only to show a bottom drain and vacuum are very similar, or can be.

I make that point because of one other important feature for a bottom drain...once the crap goes into the drain where does it go? Sieve and drum filters remove the crap from the water 24/7 which is very helpful to water quality. Other filters like settlement tanks, bead, Skippy, bogs, etc., the crap remains in the pond water. There's no difference to pond health whether crap decomposes inside a filter or at the bottom of a pond. And fish poo decomposes fast, couple of days.

Without a filter that removes crap from the water 24/7 a bottom drain isn't really doing anything useful as far as fish health goes. So to me, unless one of those filters is used, a vacuum is a good alternative. Costs less, barely takes any more time for a small pond and looks better imo. Don't get me wrong, a well designed bottom drain system is great. But I see many pond builders only having part of a bottom drain system and think if crap is sucked into a pipe 24/7 it's cleaning the pond when it's really just moving crap from one part of the pond to another.

Another consideration is the shape of this pond really requires 2 drains, or a river flow design. Otherwise you're likely to have crap accumulate on the ends in the corners.

It's worth considering I think. A bottom drain system is only as good as its weakest point.
 
Joined
Mar 5, 2014
Messages
11
Reaction score
2
Location
Kent, England
I used landscape fabric, the woven kind, between the plywood and liner. I don't think it was actually needed for EPDM, it's very tough.

Saving wood
The plywood can span some distance to hold back water. My pond the 1/2" plywood I used spanned the 3.75" between wood members and I saw no bowing or problems. The plywood was screwed to the wood members like a floor would be screwed down.

In your case that means you could skip the narrower courses and just use short spacer pieces at the corners. If you alternated the butts so you could screw thru 2 courses to hold it together.

A 3.5" wide board should be more than good enough if you wanted to scale that back.

Bottom drain
The bottom drain can be mounted upside down. Google "retrofit bottom drain". Many people new to this think gravity has something to do with drains. They want a sloped bottom and think crap falls into the drain opening. But in water crap is almost weightless so it will move up into a drain just as well as down into a drain.

This would allow you to consider a smaller diameter drain pipe because if you install it right it can be removable for cleaning in case it got a bad clog. Smaller diameter would allow for a smaller pump.

The "drain" now looks more like a vacuum cleaner fixed in place. What if instead of a rigid pipe you used a flexible hose and you could move it around? It would be exactly like a vacuum cleaner. Not useful as a bottom drain but it could be moved around to make sure the entire bottom was clean. I say this only to show a bottom drain and vacuum are very similar, or can be.

I make that point because of one other important feature for a bottom drain...once the crap goes into the drain where does it go? Sieve and drum filters remove the crap from the water 24/7 which is very helpful to water quality. Other filters like settlement tanks, bead, Skippy, bogs, etc., the crap remains in the pond water. There's no difference to pond health whether crap decomposes inside a filter or at the bottom of a pond. And fish poo decomposes fast, couple of days.

Without a filter that removes crap from the water 24/7 a bottom drain isn't really doing anything useful as far as fish health goes. So to me, unless one of those filters is used, a vacuum is a good alternative. Costs less, barely takes any more time for a small pond and looks better imo. Don't get me wrong, a well designed bottom drain system is great. But I see many pond builders only having part of a bottom drain system and think if crap is sucked into a pipe 24/7 it's cleaning the pond when it's really just moving crap from one part of the pond to another.

Another consideration is the shape of this pond really requires 2 drains, or a river flow design. Otherwise you're likely to have crap accumulate on the ends in the corners.

It's worth considering I think. A bottom drain system is only as good as its weakest point.

Hi Waterbug,

See V2 of the pond design. Having seen your earlier post with the pond pictured in it and your comments I have the following...

Overall View
Pond Cross 3D View V2.JPG

Front view
Pond Cross Front View V2.JPG


I have narrowed off the sides to be near enough 4 inch widths on the boards and have omitted the narrower boards. Instead i am going to paint the marine ply backing black for the relief. The corners will be alternate by colour and crossed over each other. Screws will go though 2 and half pieces to tie it all together as well.

Am still giving thought as to how to move the water to prevent the accumulation of crap in the corners, without a bottom drain!

Steven
 

Ask a Question

Want to reply to this thread or ask your own question?

You'll need to choose a username for the site, which only take a couple of moments. After that, you can post your question and our members will help you out.

Ask a Question

Members online

Forum statistics

Threads
30,940
Messages
510,366
Members
13,177
Latest member
davidwat

Latest Threads

Top