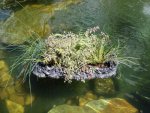
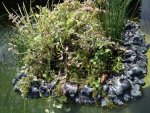
I am so pleased with my floating island I made. It was so easy. And the cost for the materials was about $25 (Foam and 2 baskets) from Lowes/Homedepot.
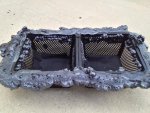
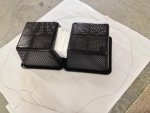
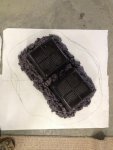
To start I got 2 aquatic baskets and tied them together with plastic ties as seen in one of the pictures. Then turned the baskets upside down on wax paper and drew out the shape I was "hoping" to get out of the one 12oz can of foam. (That didn't happen) You can see in the picture the lines I drew. I put under each corner a very small spacer to raise the baskets up just a tiny bit so the foam will spread under when drying. I put only 1 piece of white styrofoam in the middle between the baskets. I know the picture shows 3 but I removed 2 before I sprayed in the foam. I started in the middle making sure the foam went into the holes in the basket for a strong hold. Then I went all the way around the lip and up the sides just a little way. Save a little of the foam in your can I tell you what to do with that in just a minute.
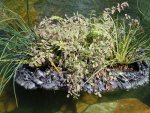
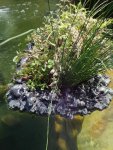
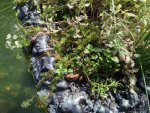
Let it dry for 1.5 hrs. (I did this in my basement at 71 degrees). I then turned it over and removed the wax paper slowly. Some of the foam did stick to the paper but it wasn't much. I then sprayed in quarter to fifty cent piece globs around the top, then took a painters stir stick and spread out the globs in shapes that look like rocks instead of the globs. Removed the spacers from the corners carefully and let dry for 24 hrs. Filled with aquatic plant soil and filled with my favorite plants and placed it in my pond. You can see in one of the photoes I already have a toad living on my island. Keep in mind the bigger or heavier your baskets the more foam you will need. My island size is about 25x15. Have fun!
To start I got 2 aquatic baskets and tied them together with plastic ties as seen in one of the pictures. Then turned the baskets upside down on wax paper and drew out the shape I was "hoping" to get out of the one 12oz can of foam. (That didn't happen) You can see in the picture the lines I drew. I put under each corner a very small spacer to raise the baskets up just a tiny bit so the foam will spread under when drying. I put only 1 piece of white styrofoam in the middle between the baskets. I know the picture shows 3 but I removed 2 before I sprayed in the foam. I started in the middle making sure the foam went into the holes in the basket for a strong hold. Then I went all the way around the lip and up the sides just a little way. Save a little of the foam in your can I tell you what to do with that in just a minute.
Let it dry for 1.5 hrs. (I did this in my basement at 71 degrees). I then turned it over and removed the wax paper slowly. Some of the foam did stick to the paper but it wasn't much. I then sprayed in quarter to fifty cent piece globs around the top, then took a painters stir stick and spread out the globs in shapes that look like rocks instead of the globs. Removed the spacers from the corners carefully and let dry for 24 hrs. Filled with aquatic plant soil and filled with my favorite plants and placed it in my pond. You can see in one of the photoes I already have a toad living on my island. Keep in mind the bigger or heavier your baskets the more foam you will need. My island size is about 25x15. Have fun!