DutchMuch
Lord Of The Aquascapes!

Thought I'd post this up here, I took pics just for you all <3
This is a small How To, In making your own Raised Garden bed. It is made for organic growing purposes, making it easier for the plants to grow, and faster. For reasons I will state later on.
This is a small How To, In making your own Raised Garden bed. It is made for organic growing purposes, making it easier for the plants to grow, and faster. For reasons I will state later on.
How To Make Your Own Raised Garden Bed For Free!
Equipment Needed:
Pitchfork (optional, this item isn't free however lol)
Old Hay (or new)
Pallet(s)
Card Board Boxes
Topsoil
The Texts under the images (like this) are meant for the Above Images!
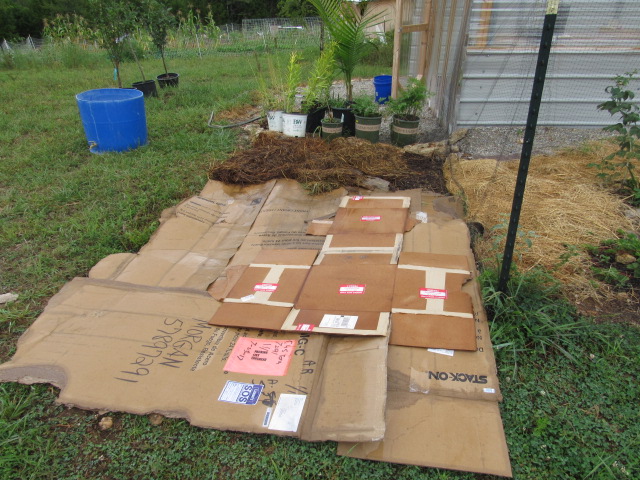
Cardboard is Commonly thrown out, by basically every store you go to.
Walmart
Lowes
Home Depot
Dollar General
Shoe Stores
You name it, its shipped to them in cardboard.
You can ask the shop(s) owner or manager, for the cardboard and they will be more than happy to give it to you!
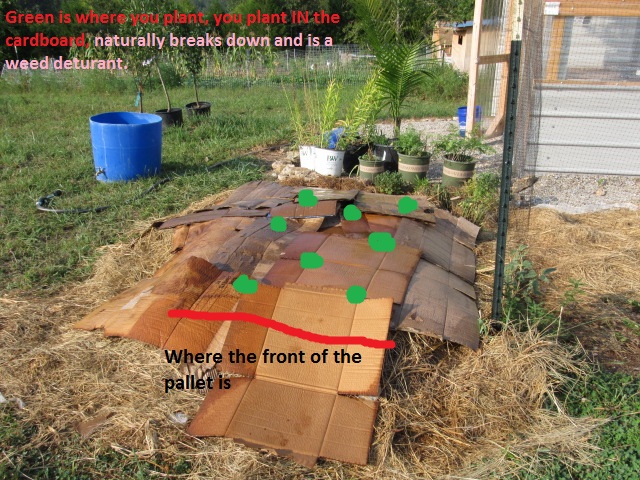
When You get the cardboard, use it like you would a pond liner (good example right) and line out where you want your garden bed to be located at.
Flattened is usually better, and I recommend this.
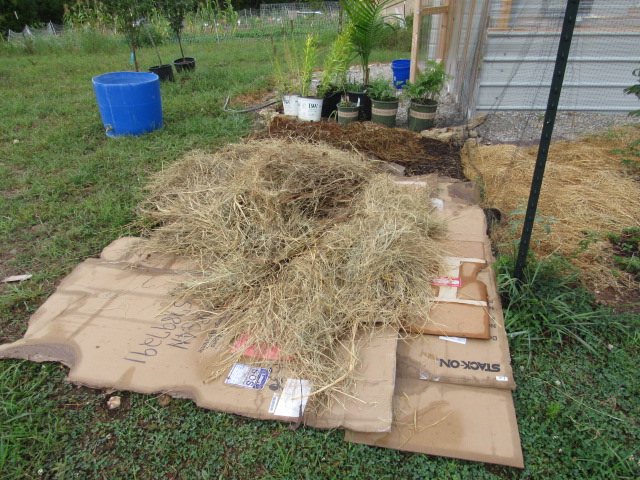
Old Hay is commonly thrown out by farmers (including us) because it collects molds and fungus and is unwanted for feed usually.
You can get Hay at a local farm or hay harvesting, place, this is just harvested by us so we "made it" but we used to get the free old hay back a while before we could harvest it, (and we still usually buy it, this is one from a while ago).
Throw the hay on there!
Once you threw the hay on there, go ahead and smooth it out, OVER LAYERING the grass or dirt outside the cardboard outline by about a foot, no need to be exact.
After you laid the hay on there, if it puffs up, use water from a hose, or however you can, to layer it down flat and wet.
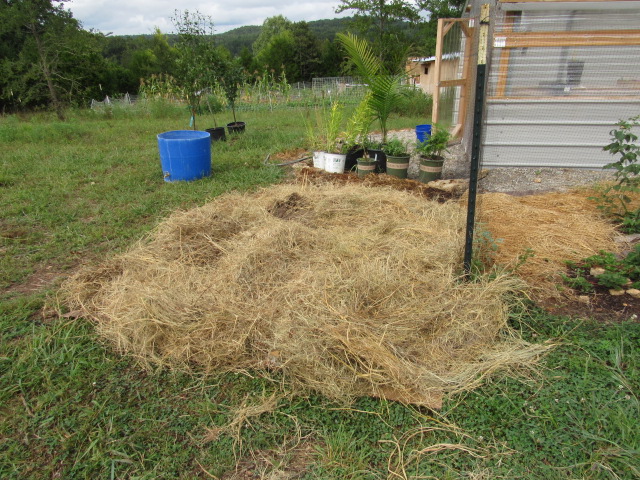
Ok I will admit, I forgot some pics... Like major pics but hey you cant blame me for working in a fun way! lol!
These are the Layers in this order before I explain more (bottom [ground] to top)
1st layer above ground: Cardboard wetted down
2nd Layer: Hay wetted down
3rd layer 1 Pallet or however many you need/want
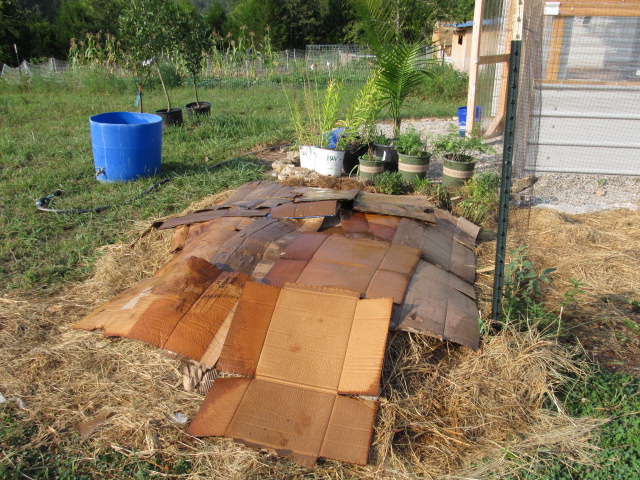
4th layer: Cardboard wetted down
5th Layer: Hay wetted down
6th Layer: Cardboard wetted down
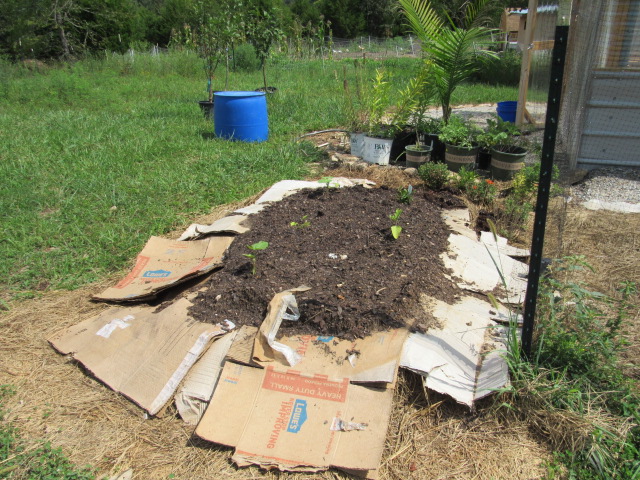
7th Layer: Topsoil
Pallets are kind of hard to find nowadays, Lowes saves them because it costs them $ if given away, and walmart doesn't give them away either. I find that local garden centers usually give them away, I got mine from a local GC. called Kellys Nursery.
Topsoil is pretty self explanatory.
Pallets create an air pocket within the hay, so when the plants are planted, the roots dangle down and go past (later on) the pallet layer, into the ground. The air Helps the roots for various reasons, but I wont get into the specs unless you want me to.
The cardboard quickly (well imo, takes a few weeks.) deteriorates, and make a good substrate within those layers, also provides various nutrients to the plants.
The pallets create a pocket of air, so when the plants are planted
Hay is a marvelous substitute for thinning and weeding. Instead of pulling unwanted plants out of the ground, and disturbing the roots of others, I bend the weeds flat and pull hay over them. But with hay this thick, you shouldn't even have weed growth, especially with the cardboard assistance.
Also when hay decomposes, it creates (imo) a Fantastic, substrate for plant growth. This however does take time.
Any questions PLEASE ask!
Hope you enjoyed this Garden How To!
Equipment Needed:
Pitchfork (optional, this item isn't free however lol)
Old Hay (or new)
Pallet(s)
Card Board Boxes
Topsoil
The Texts under the images (like this) are meant for the Above Images!
Cardboard is Commonly thrown out, by basically every store you go to.
Walmart
Lowes
Home Depot
Dollar General
Shoe Stores
You name it, its shipped to them in cardboard.
You can ask the shop(s) owner or manager, for the cardboard and they will be more than happy to give it to you!
When You get the cardboard, use it like you would a pond liner (good example right) and line out where you want your garden bed to be located at.
Flattened is usually better, and I recommend this.
Old Hay is commonly thrown out by farmers (including us) because it collects molds and fungus and is unwanted for feed usually.
You can get Hay at a local farm or hay harvesting, place, this is just harvested by us so we "made it" but we used to get the free old hay back a while before we could harvest it, (and we still usually buy it, this is one from a while ago).
Throw the hay on there!
Once you threw the hay on there, go ahead and smooth it out, OVER LAYERING the grass or dirt outside the cardboard outline by about a foot, no need to be exact.
After you laid the hay on there, if it puffs up, use water from a hose, or however you can, to layer it down flat and wet.
Ok I will admit, I forgot some pics... Like major pics but hey you cant blame me for working in a fun way! lol!
These are the Layers in this order before I explain more (bottom [ground] to top)
1st layer above ground: Cardboard wetted down
2nd Layer: Hay wetted down
3rd layer 1 Pallet or however many you need/want
4th layer: Cardboard wetted down
5th Layer: Hay wetted down
6th Layer: Cardboard wetted down
7th Layer: Topsoil
Pallets are kind of hard to find nowadays, Lowes saves them because it costs them $ if given away, and walmart doesn't give them away either. I find that local garden centers usually give them away, I got mine from a local GC. called Kellys Nursery.
Topsoil is pretty self explanatory.
Pallets create an air pocket within the hay, so when the plants are planted, the roots dangle down and go past (later on) the pallet layer, into the ground. The air Helps the roots for various reasons, but I wont get into the specs unless you want me to.
The cardboard quickly (well imo, takes a few weeks.) deteriorates, and make a good substrate within those layers, also provides various nutrients to the plants.
The pallets create a pocket of air, so when the plants are planted
Hay is a marvelous substitute for thinning and weeding. Instead of pulling unwanted plants out of the ground, and disturbing the roots of others, I bend the weeds flat and pull hay over them. But with hay this thick, you shouldn't even have weed growth, especially with the cardboard assistance.
Also when hay decomposes, it creates (imo) a Fantastic, substrate for plant growth. This however does take time.
Any questions PLEASE ask!
Hope you enjoyed this Garden How To!
") !
!