New pond construction!

Joined
Nov 17, 2020
Messages
41
Reaction score
32
Showcase(s):
1
Country
Australia
Hello all,

Thanks for all your valuable help and advice in previous threads, and to the extremely valuable threads and resources throughout this site. I've now pretty much completed the base construction of my pond and thought I'd share pics (since everyone keeps saying they like to see pictures!)

These first two pictures show what the garden looked like when we moved in around July. Basically one massive weed patch. Fun times.
 

Attachments

  • IMG_2175.JPG
    IMG_2175.JPG
    436.4 KB · Views: 94
  • IMG_2176.JPG
    IMG_2176.JPG
    441.6 KB · Views: 94
Joined
Nov 17, 2020
Messages
41
Reaction score
32
Showcase(s):
1
Country
Australia
These two show initial layout and the start of construction.

Because the pond is on the top of a retaining wall made of loose stones I did not want to dig down deep as that would potentially put pressure on the inside of the retaining wall and weaken the entire area. If the pond pushes the retaining wall out then we have big problems. So half the depth, or more, comes from building mud embankments.
 

Attachments

  • IMG_3083 (Copy).JPG
    IMG_3083 (Copy).JPG
    154.1 KB · Views: 97
  • IMG_3120.JPG
    IMG_3120.JPG
    477.8 KB · Views: 86
Joined
Nov 17, 2020
Messages
41
Reaction score
32
Showcase(s):
1
Country
Australia
These images show the ongoing construction, installation of the liner, and the setup of the home made pump vault and intake bay box. Plus the first test fill and start of the manifold for the bog.
 

Attachments

  • 1.jpg
    1.jpg
    94.1 KB · Views: 105
  • 2.jpg
    2.jpg
    100 KB · Views: 103
  • 3.jpg
    3.jpg
    106.8 KB · Views: 96
  • 4.jpg
    4.jpg
    87.8 KB · Views: 96
  • 5.jpg
    5.jpg
    88.7 KB · Views: 102
  • 6.jpg
    6.jpg
    67.9 KB · Views: 100
  • 7.jpg
    7.jpg
    85.9 KB · Views: 97
  • 8.jpg
    8.jpg
    96.6 KB · Views: 106
  • 9.jpg
    9.jpg
    115.1 KB · Views: 107
Joined
Nov 17, 2020
Messages
41
Reaction score
32
Showcase(s):
1
Country
Australia
This is the (so far) finished build. It's got rocks around the outer edges of the liner (apart from some gaps where I am going to plant flower beds). It's been a big weekend. Every single part of my body aches.
  • The embankments have hessian weed matting pinned over them, to keep them in place until the plants I will plant between the rocks get in there with their roots, and while the clay and dirt they are made of settles.
  • There is thick white underlay under the Firestone GeoGard EDPM liner (GeoGard is the slightly thicker one than the usual PondGard, since there are so many stones in the yard I thought it best to go the thicker one).
  • The pump vault is a strong plastic tub from the hardware, with a strong plastic carry basket punched into it. it has a rock wall foamed in around it then loads of big river pebbles to make an intake bay. It seems to work (fingers crossed), though the lid of the tub is under pebbles so will be hard to get to unfortunately (fingers and toes crossed it just keeps going).
  • The bog is filled with 20-30mm gravel around the 2 inch PVC manifold, then 10mm river gravel on top. It's about 25cm deep in the middle of the bog section.
  • The pump is 4900L per hour and handles up to 8mm (0.3 inch) pieces of debris. When I emptied it out after the test fill it took a bit over an hour to empty, so it should easily cycle within 2 hours. I think the total volume is around 6000-7000L (1500-1800G), but I'm not really sure exactly.
There are some shots of what you see when standing on the ground in front of the retaining wall. At that point it looks like an infinity pond, you can't even see the water if you're short. The higher shots are looking down are from the upper deck and the living room, so when you look out from the house that is what you see. Then some shots are from the rear of the pond looking towards the house.

I think it came together alright! Fingers crossed it all works, and doesn't fall apart and collapse.

I still need to find myself a ton of rocks to do the last wall of the pond, although I am considering just leaving that section black liner. Then I think I will also fill the bottom of the pond with river sand or 10mm gravel, though I think I'll need to vacuum it periodically due to the gumnuts falling in there so perhaps not. I am undecided on those yet. It's possible the plants and shadows will make it unnecessary.

Now to plant out the bog, get some lovely bacteria going, and get some fish (the kids are very excited about that last one).

Bring on the frogs!

And thanks again to all for all your help. Hopefully this works and I won't need to spam you too much more. Cheers!
 

Attachments

  • 1.jpg
    1.jpg
    128.2 KB · Views: 108
  • 2.jpg
    2.jpg
    108.8 KB · Views: 115
  • 3.jpg
    3.jpg
    124.6 KB · Views: 109
  • 4.jpg
    4.jpg
    151.8 KB · Views: 108
  • 5.jpg
    5.jpg
    123.1 KB · Views: 105
  • 6.jpg
    6.jpg
    107.4 KB · Views: 108
  • 7.jpg
    7.jpg
    90.1 KB · Views: 104
  • 8.jpg
    8.jpg
    115.1 KB · Views: 109
  • 9.jpg
    9.jpg
    93.9 KB · Views: 107
Last edited:

TheFishGuy

( Insert something funny )
Joined
Jul 9, 2020
Messages
1,356
Reaction score
937
Location
Colorado
Showcase(s):
1
Hardiness Zone
4b or 5a
Country
United States
Very nice pond, and glad we could be of help!

Can’t wait to see it all planted and fished up:love:
 
Joined
Mar 5, 2014
Messages
2,541
Reaction score
3,036
Hardiness Zone
7b
This is so much fun to see!!!!! It makes me want to get out in my yard and work! Your pond is beautiful and will be even more so when all the plants are established -- WOW! Keep sharing pictures!
FYI - don't be surprised if your fish are extremely shy after you introduce them into your pond. Get your kids mentally prepared to not see them for a while. Once they feel "at home" though, they will come to say hello when they know you are outside!
Congratulations!
 

j.w

I Love my Goldies
Joined
Feb 1, 2010
Messages
33,106
Reaction score
20,364
Location
Arlington, Washington
Showcase(s):
1
Hardiness Zone
USDA 8a
Country
United States
Wow that turned out great and it's so big and look at all those beautiful plants!
 
Joined
Dec 16, 2017
Messages
13,562
Reaction score
10,689
Location
Ct
Showcase(s):
1
Hardiness Zone
6b
Country
United States
I was looking at the first photos and when the liner went in seeing the angled sides was leading me to think it' was going to be a chore to get it covered and have it look natural but you knocked it out of the park NICE JOB!!
 
Joined
Jul 12, 2009
Messages
3,990
Reaction score
2,685
Location
Mount Pocono, Pennsylvania
Hardiness Zone
6a
Gorgeous!
All that hard work paid off.
When I added on my bog this past Spring, I too was aching all over, especially my lower back. My wife ran out and got me an electric heating pad. That thing was the best!
 
Joined
Oct 28, 2013
Messages
13,105
Reaction score
13,456
Location
Northern IL
Showcase(s):
1
I was thinking the same as @GBBUDD - I thought we'd be sharing how to alter the edges to make it possible to finish and then BAM! You took a very unique approach to edge work. Share more details of that if you don't mind. And the pictures are GREAT! Beautiful pond!
 

cas

Joined
Apr 20, 2015
Messages
2,270
Reaction score
3,051
Location
NE Ohio
Showcase(s):
1
Hardiness Zone
6a
Country
United States
How pretty! Thanks for taking the time to share the pictures.
 
Joined
Nov 17, 2020
Messages
41
Reaction score
32
Showcase(s):
1
Country
Australia
Hi Lisak,

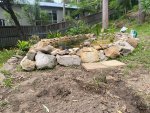
Regarding the edge work, basically this pond is mostly made up of embankments. It's on a slope going downhill towards the stone retaining wall. So rather than dig out a deep hole, I mostly had to dig down and then bank the dirt up in a big embankment mound at the lower part of the hill.

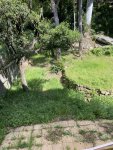
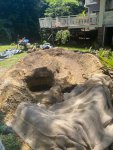
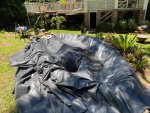
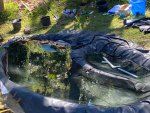
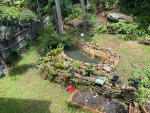
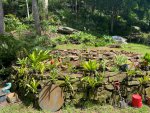
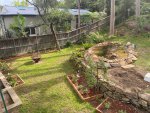
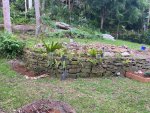
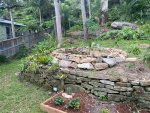
I just kept digging out and mounding up the dirt I had dug out until the main lower embankment was level with the much smaller mound further up the top of the hill. I also piled some rubble into the base of the embankments and the dirt I was digging up was largely clay, which helped turn it into a solid mound. Then I pinned down some hessian over the top of the mound and wet it all with a hose, so the clay would run together and form a solid lump. That was the structural basis for the pond. In image 5 below you can see the angles of the hill, and the angles of the pond embankments.

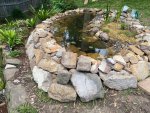
However, that meant that when I put the liner in I had a big 2 foot+ rounded mound at the bottom edge by the wall, and a small half foot mound at the top. So to cover all that up I just got a huge amount of bush rock and laid it both inside and outside the embankments, inside and outside the pond, leaning on the embankments themselves to add additional weight on the embankment to keep them in shape over time. It took a lot of rock. And I had to carry each piece down 4 storeys of stairs to get it into the backyard. I do not recommend that to anybody.

It looks pretty good though I think. At the front of the lower embankment I left a foot or two for a garden bed, and planted it out with birds nest ferns, bromeliads, and fuscias. Still very much a work in progress. Unfortunately the tree ferns don't seem to be taking but that's the fun of plants I guess. I'm also going to fill in lots of the holes between the rocks on the pond with plants that can root into the embankments and give it some added strength there.

Since last update I've rocked in the last wall of the pond so it's all rocked up now. There's also a few more bog plants, though still a lot more to come in there.

In the images below:

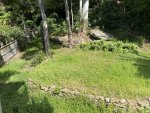
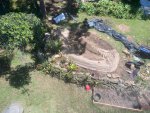
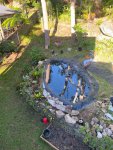
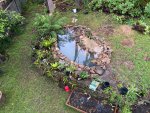
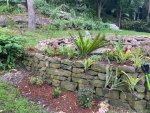
1- Garden, you can see the upper level of the garden where the pond is etc
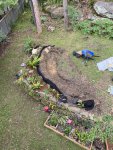
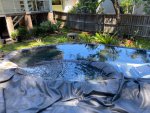
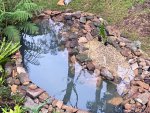
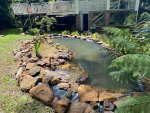
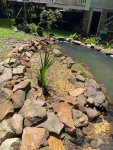
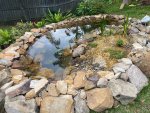
4 and 5 - You can see the angle of the embankments
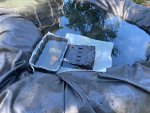
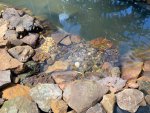
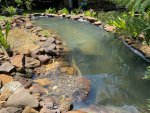
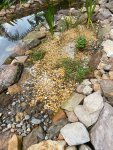
7 - This is the intake bay. The pump is under those pebbles, in a 100L plastic tub that's buried in the ground being a pump vault. There's an upside down plastic crate with holes cut into the bottom forming most of the surface area of the bay, then the rocks around it are foamed in to hold them in place. That's the only area that is foamed up, the rest of the rocks are just stacked up.
8 - The bog has a single 2 inch PVC pipe going down the middle of it, with a couple of short offshoots. There's a flush cap on the end buried just under the gravel. It still needs a bag or 2 of gravel though, the water is half an inch over the top of the gravel.
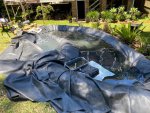
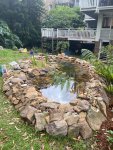
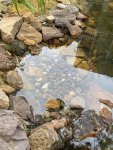
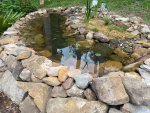
10-12 show the pond from the lower garden.

You can still see the plastic liner at the bottom, but I'm hoping that when I get a few good established aquatic plants going, and matting up on the top a bit, then the bottom liner will be hidden. Otherwise I will just pour a few bags of river sand on the bottom. I'd like to avoid the river sand if possible though as it would make cleaning the huge amount of leaves that will fall off the mammoth gum tree above more difficult.

If you want to see a video there's one at this link. You can see heaps of the baby fish in the video, which I couldn't get shots off unfortunately. There are hundreds of them. I bought 10 little native fish (that grow to like 1 inch size) and in a week they bred and now there are hundreds of babies everywhere. :) You can also see the flow out of the bog, and the massive gum tree above.


Attachments

  • 1.jpg
    1.jpg
    400.4 KB · Views: 67
  • 3.jpg
    3.jpg
    356.7 KB · Views: 64
  • 4.jpg
    4.jpg
    376.5 KB · Views: 61
  • 5.jpg
    5.jpg
    409.2 KB · Views: 62
  • 6.jpg
    6.jpg
    371.9 KB · Views: 61
  • 7.jpg
    7.jpg
    318.2 KB · Views: 62
  • 8.jpg
    8.jpg
    394.6 KB · Views: 57
  • 9.jpg
    9.jpg
    347.4 KB · Views: 60
  • 10.jpg
    10.jpg
    417.3 KB · Views: 59
  • 11.jpg
    11.jpg
    439.3 KB · Views: 66
  • 12.jpg
    12.jpg
    425.9 KB · Views: 57
Last edited:

Ask a Question

Want to reply to this thread or ask your own question?

You'll need to choose a username for the site, which only take a couple of moments. After that, you can post your question and our members will help you out.

Ask a Question

Members online

Forum statistics

Threads
30,934
Messages
510,275
Members
13,167
Latest member
Emergency Dentist Katy Te

Latest Threads

Top