You are using an out of date browser. It may not display this or other websites correctly.
You should upgrade or use an alternative browser.
You should upgrade or use an alternative browser.
Pondless Waterfall Build Questions
- Thread starter msr0459
- Start date

- Joined
- Jun 25, 2023
- Messages
- 333
- Reaction score
- 28
- Country

OK, another day of planning and more questions for the experienced waterfall people.
As mentioned earlier, I'm planning on having two streams going into the one basin and one pump. First, regarding the 2nd stream, I have two options for where it gets the water.
Method #1: after the first water drop from the main spillway, I can have a small pooling area, and off the (in this case) left side I could dig out for the 1' tributary stream, making sure there's enough drop for the water to do it's thing. My issue with this method is that perhaps there wont be enough pressure to create any kind of rushing water effect,.. it would just leave the pooling area and start downhill, but that about it.
Method #2: I could put a Y adapter before the main spillway, one flex pipe goes into the 22" spillway, and I then send another flex pipe to a smaller, 12" spillway, placed just off to the other side, maybe facing a bit to the left, which would feed the 2nd, smaller stream. I could also put a valve of some kind before the smaller spillway, in order to throttle back the pressure, since it's a smaller stream. This is quite a bit more expensive,.. another spillway purchase, and additional rocks, valve, etc.
Which of these two methods (or any other methods I'm missing) do you guys think would work best in order to create the 2nd stream?
- Joined
- Jun 25, 2023
- Messages
- 333
- Reaction score
- 28
- Country
I was just re-reading your response regarding collection area. I'm curious though, on your example, if you have 4' of extra liner outside of the stream, how do you landscape that? I mean, rocks and such will be closer to the stream bed,.. you wouldn't be able to plant on top of that 4' of liner on each side.You want to build from the bottom up if possible and that liner should get brought up the hill I'll go with a foot or more.
then the stream starts a foot below or more from the top of the basins liner . Laying on top of the basins liner . I myself would seam it just because I can.
. Or possibly just caulk it. The only reason for this is to insure something doesn't move while building around it. Like that never happens.
then if you have a waterfall or a biofalls that ultimately should be the same liner but if it needs to be a third then the stream liner gets placed VERTICALY ABOUT A FOOT HIGHER THAN THE LINER FROM THE BIO FALLS.
the biofalls liner then gets placed overlaping the streams liner .
if my waterfall is say for foot wide then I will try to make a collection area that is also 4 feet wide off to both sides
why would I do such a large area because I am cheap when it comes to water. And that will be a constant drain on the pond. If the wind blows and you have a say three foot drop on the waterfall or even a foot . With the right wind it can blow the water right of of the containment.
now you can use character stones/ large boulders of to each side of the falls and out Infront of the falls a bit making a horse shoe. This too can stop the wind from blowing the water out of containment.
Forgive the questions, I really need to order the liner, but, as you know, for my size project that's VERY expensive, so just making sure I understand everything.
- Joined
- Sep 18, 2020
- Messages
- 3,010
- Reaction score
- 3,204
- Location
- Pacific NW
- Hardiness Zone
- 8b
- Country
OK, another day of planning and more questions for the experienced waterfall people.
As mentioned earlier, I'm planning on having two streams going into the one basin and one pump. First, regarding the 2nd stream, I have two options for where it gets the water.
Method #1: after the first water drop from the main spillway, I can have a small pooling area, and off the (in this case) left side I could dig out for the 1' tributary stream, making sure there's enough drop for the water to do it's thing. My issue with this method is that perhaps there wont be enough pressure to create any kind of rushing water effect,.. it would just leave the pooling area and start downhill, but that about it.
Method #2: I could put a Y adapter before the main spillway, one flex pipe goes into the 22" spillway, and I then send another flex pipe to a smaller, 12" spillway, placed just off to the other side, maybe facing a bit to the left, which would feed the 2nd, smaller stream. I could also put a valve of some kind before the smaller spillway, in order to throttle back the pressure, since it's a smaller stream. This is quite a bit more expensive,.. another spillway purchase, and additional rocks, valve, etc.
Which of these two methods (or any other methods I'm missing) do you guys think would work best in order to create the 2nd stream?
Would really have to see the space to understand it, but option 2 gives you a lot more flexibility. Also, you don’t need any special spillway. You can simply dig out the area of the headwaters inside of the liner and fill it with gravel or an upside down milkcrate with gravel over top and drop your supply pipe into it.
That said, a horseshoe falls will look more natural if you grade it properly and take all the water from a single headwaters.
Lots of ways to do it, though. And once you have plants in, it’ll look good either way. Always best to disguise your headwaters as much as possible.
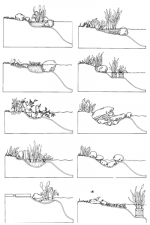
sure you can and everything on this site particularly from myself is a guide not a must if you look at the example fourth down on the right the the rock splitting the water could be the edge of the falls or stream and the water level could be completely hidden by plants that love there feet wet like taros or a host of others . The whole area doesn't need to immediately bring the water back you can tie it in any where at any time even make a little spring OUTSIDE the main falls area . That will get more attention then you could ever imagine.
in the video below you can see how far the liner is outside the water channel at 7:15 this is a pro build and while they did use some large boulders and needed to be that far out. having that extra liner can give artistic freedom as well as function.

Just remember if you do create these planting areas to have a thick protective geofabric/ underlayment the weed barriers at the depot are very this in comparison to what you can and should be buying .
i put this together below as a lessons learned it is long but i feel it has all kinds of tips that are helpful in any build https://www.gardenpondforum.com/showcase/12-000-gallon-koi-pond-full-build.141/
in the video below you can see how far the liner is outside the water channel at 7:15 this is a pro build and while they did use some large boulders and needed to be that far out. having that extra liner can give artistic freedom as well as function.
Just remember if you do create these planting areas to have a thick protective geofabric/ underlayment the weed barriers at the depot are very this in comparison to what you can and should be buying .
i put this together below as a lessons learned it is long but i feel it has all kinds of tips that are helpful in any build https://www.gardenpondforum.com/showcase/12-000-gallon-koi-pond-full-build.141/
Attachments
No offence intended but i would do more homework into pondless building before you start buying stuff . YOU HAVE A FANTASTIC POTENTIAL IN THAT SLOPE build it once with a wealth of knowledge. and an effective plan.

 www.gardenpondforum.com
Some very impressive pond builds
https://whttps://www.youtube.com/watch?v=1TOMbsvXjX8 ww.youtube.com/watch?v=Hc36HtktJD0
- Joined
- Jun 25, 2023
- Messages
- 333
- Reaction score
- 28
- Country
Sorry for the delay, I hadn't realized you responded again. No offense at all my friend.. I'm researching like crazy still. Really need to order the liner so I'll be ready when the excavation guy is here. That way he can (hopefully) help me place the large rocks up on that hillside.
Looking at your examples, the liner on the outside is basically filled with dirt, with plants on top? Then the liner beyond that is curved back in and back filled, or rocked, to trap any potential water?
Thanks so very much for taking the time to help!
Marc
Looking at your examples, the liner on the outside is basically filled with dirt, with plants on top? Then the liner beyond that is curved back in and back filled, or rocked, to trap any potential water?
Thanks so very much for taking the time to help!
Marc
- Joined
- Jun 25, 2023
- Messages
- 333
- Reaction score
- 28
- Country
GBBUDD, my last post was a direct response to your previous one,... that said, I'm now getting some varying input on what mil liner to purchase. I was set on getting 45 mil, but have another person saying I need to to go with 60 mil, for better durability. This of course is much more expensive, and wouldn't 60 mil be way more difficult to maneuver the edges, etc. ? Which do you suggest?No offence intended but i would do more homework into pondless building before you start buying stuff . YOU HAVE A FANTASTIC POTENTIAL IN THAT SLOPE build it once with a wealth of knowledge. and an effective plan.
Some very impressive pond builds
https://whttps://www.youtube.com/watch?v=1TOMbsvXjX8 ww.youtube.com/watch?v=Hc36HtktJD0
45 mil is what they use for ponds I use to use 60 on all my roofs . While it is thicker with ponds the UNDERLAYMENT is where I found was the practical way to get the durability and reliability. Take my word for it if you place say a 12 oz non woven geo textile your liner and than a seconcond layer on top of you 45 mil liner. It is sandwiched and would be very difficult to damage the liner.
Yes 60 is considerably heavier
Yes 60 is considerably heavier
j.w
I Love my Goldies
- Joined
- Feb 1, 2010
- Messages
- 33,156
- Reaction score
- 20,395
- Location
- Arlington, Washington
- Showcase(s):
- 1
- Hardiness Zone
- USDA 8a
- Country
I used 60 on my first pond and it was fine. It was from a roofing company. 45 tho is just great too for my second larger pond. I put plenty of underlayment under both. We have sandy soil and not many rocks or roots but I just wanted to be safe rather than sorry!
- Joined
- Jun 25, 2023
- Messages
- 333
- Reaction score
- 28
- Country
I'm still vacillating between the 10' or 7.5' wide liner for the main stream. If in fact the stream winds up being mostly on 2', with perhaps a couple of pooling areas spanning 3' or so,... then it would seem the 10' would be way overkill, except for the extra area to catch stray water sprays or whatever. No more than I'll be turning the main stream back and forth, it seems that the 7.5' would suffice. And of course the 7.5 is about 60 bucks cheaper than the 10'.45 mil is what they use for ponds I use to use 60 on all my roofs . While it is thicker with ponds the UNDERLAYMENT is where I found was the practical way to get the durability and reliability. Take my word for it if you place say a 12 oz non woven geo textile your liner and than a seconcond layer on top of you 45 mil liner. It is sandwiched and would be very difficult to damage the liner.
Yes 60 is considerably heavier
As I'm sure you're aware, these project costs start adding up BIGTIME! Lol I have a budget, but do need to save here and there in any way possible. Just don't wanna shoot myself in foot wishing I'd gone wider. Ugh, decisions decisions!
- Joined
- Jun 25, 2023
- Messages
- 333
- Reaction score
- 28
- Country
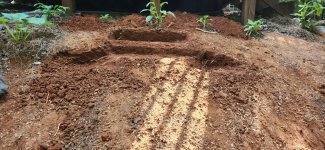
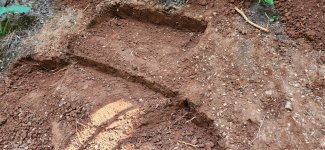
I've started digging out for the spillway and the first few rocks. I quickly discovered my difficulty (aside from standing on a freaking 70 degree hill) will be placing very large rocks there. I fully realize that there's experimentation involved, but this slope is so steep, I'm having to cut into the hillside to give them a footing, so they don't roll down hill. I can't afford to have a guy with excavator here all day while I have him place it,.."nope, hang on while I peel back the liner and dig out some more",.. etc., etc. I somehow will have to have some rocks measured first, decide on which ones, and once he drops in in place that's it.
I've attached a couple of pics of what I've dug out thus far. The second one is from in front, down the hill about 4 feet. The top section is of course for the spillway. I'll need to find around a 10" high rock, with a flat top in order for it to sit higher than the lip of the spillway.
My vision is to have rock looking as if they're poking out of the earth.
Am I on the right track?
Attachments
- Joined
- Sep 18, 2020
- Messages
- 3,010
- Reaction score
- 3,204
- Location
- Pacific NW
- Hardiness Zone
- 8b
- Country
Liner shrinks quickly once you start making twists and turns. Everyone's finances are different, but I would not hesitate to pay $60 for the extra insurance. Makes it a lot easier to fix any problems that crop up as you build.
Lets take your small pools And be stingy, The pool is just under a foot deep you want the stream to be 2 feet wide with 10 to 12" rocks. so on average if the rock is 10" tall it's close to that in width so 24 inches wide with two verticals of 12" and the 10" to 12" wide boulders on each side . 24+12+12+12+ thats five feet of liner, now subtract that from 7.5' 1.25 feet on each side thats straight down the hill no nothing as far as even the slightest turn. i have no idea what you picture in your stream but if it was my build i would probably go with a 12 or 15 wide MIN so i could be creative with stream branching off.
my waterfall at my bog is a little over 3 feet high but is easily 6 to 7 feet wide with another 2 to 3 feet of liner to catch splash .
you can learn to seam and add on where you need to but the wider though a pain to ma handle can make the end result much nicer
my waterfall at my bog is a little over 3 feet high but is easily 6 to 7 feet wide with another 2 to 3 feet of liner to catch splash .
you can learn to seam and add on where you need to but the wider though a pain to ma handle can make the end result much nicer
Ask a Question
Want to reply to this thread or ask your own question?
You'll need to choose a username for the site, which only take a couple of moments. After that, you can post your question and our members will help you out.
Similar Threads
Forum statistics
Latest Threads
-
Lotus Question
- Started by alikanoel
-
Want to slow down water flow
- Started by rjhernan
-
SAN MARCOS TX AREA POND TOUR UPDATE!
- Started by Abby
-
Big open place on side of orange Koi
- Started by Flymac1
-
Can a Clogged Filter Break a new Pump?
- Started by dbalaciano
-
Finally ID'd a dragonfly
- Started by Hound Heaven
-
Is our inherited pond beyond repair?
- Started by Fraggle
-
Sturgeon owner with two goldfish
- Started by Janet.
-
New Member and New (First and Only) Pond Build
- Started by Charlie Brown
-
Country Theme Pond
- Started by jhenkel