first of all 4000 gph in a 30,000 gallon pound is like a flea on a saint bernard. it may sound like a lot but the rule is to turn over a pond 1 to 1.5 times and hour . Now when you do get to a larger pond that number can be reduced as you have a lot more volume .and space for nitrafying bacteria to grow and is harder to to pollute. I am about half your pond size and i have a 10 x18 aqua block bog pushing 12,000 gph Heres a huge pond build but it is easier to see the processes
You are using an out of date browser. It may not display this or other websites correctly.
You should upgrade or use an alternative browser.
You should upgrade or use an alternative browser.
Will this homemade pond filter design work?
- Thread starter Hop-frog
- Start date
- Joined
- Jun 22, 2011
- Messages
- 4,684
- Reaction score
- 3,764
- Hardiness Zone
- 5b
- Country

surface area is what you're looking at; typically, 30% of the pond's surface area should be your target. Depth should be minimal at 12" of 3/8 pea gravel. You can go deeper. Typically, most don't but this is what I did; 12" of large round stone followed by 12" of 2" cobble stone and then 12" of pea gravel. Your pipe manifold(s) lays beneath all of this, in a trench and pitched to a low point for any cleanout purposes. My bog is roughly 20' x 3' x 3' depth. And I ONLY have 7k gallons in my pond. So, you see you should try for as much as you can get but if you don't plan on heavy stocking, you can do with less. Volume in your bog can be advantageous too as the more volume, the more pea gravel surface for your good bacteria to colonize, which is the main point of a bog. That and the plants you place on top.What dimensions am I looking at needing for this bog to support the pond? I have minimal space remaining, but there is kind of a 10x15 ft space in the corner, and then a 3x20 ft space between the pond and fence that could be used.
To support the 30k+ gallon size, which dimensions are most important to consider? Does the bog filter need more depth? Surface area? Volume? Will the 4000 gph flow rate through it be too fast for it to function properly, or will a larger size of bog counteract that?
And don't pull water from the pond bottom but instead, higher up; your bog will thank you.
I'd suggest you have more than one pump in case one fails. Treat the bog as supplemental. I have 2 pumps and each has a tee on it; I send one part to a water fall and one to the bog. So I probably have 4K gallons per hour, give or take, being sent to my bog. Slower tends to be better re bog filtration so you don't need a huge amount of flow/gallons. You're working with a lot larger pond, so you may have to start and add if necessary. If you lean this way, provide a few bog inlets to manifolds down below, to future proof. Look at the various bog building threads here to familiarize yourself and see if such an idea is beneficial for you.
Can the bog function backwards? I mean...pump water from under the bog into the main pond, and a waterfall returns water back into the bog? The reason I ask, is I have limited remaining space for an elevated bog...really struggling to figure out where to put it in the design.
- Joined
- Jun 22, 2011
- Messages
- 4,684
- Reaction score
- 3,764
- Hardiness Zone
- 5b
- Country
not nearly as effective if at all; if you 'pour' water onto the top of your bog and wait for it to trickle down where the pump below pulls it down and then pushes it to your pond, you'll find the top of your bog will clog quickly and water will find ways out of your bog. Forcing water to the bottom and letting it rises naturally is the way to do it. If you have any room at all, you can create a box higher walled than your pond. Fit the liner inside as part of the whole piece. This ties both together. You route your pipe from your submersible pump in the pond to over the top and down into your bog. Cover with pea gravel, etc. The return then is gravity, which works well to also help aerate your pond. Win win.Can the bog function backwards? I mean...pump water from under the bog into the main pond, and a waterfall returns water back into the bog? The reason I ask, is I have limited remaining space for an elevated bog...really struggling to figure out where to put it in the design.
Doing it your way will also increase wear and tear on your pump, which now is at the bottom of your bog, and also, what if you have to maintain the pump? Digging out gravel isn't fun--trust me, I've done it twice.
The way I've outline is proven and works well. Just figure out how to elevate the bog walls higher than your pond and include the necessary liner as part of your overall pond liner cost.
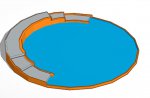
Okay, here is my adjusted design, making room for a large bog that also serves to create six 4" high waterfalls, and hopefully some interest effects with water rushing through the rocks in the stairway-like areas.

The vertical dimension is exaggerated in this illustration.
Orange = brick wall, with metal reinforcement
Grey = bog
Blue = water level in main pond

Basically the bog ends up taking up space within the pond itself. The pond liner is laid inside and the inner walls built on top of the pond liner, creating 5 chambers (the back large is one, then two smaller ones on each side). I'm not sure if that is feasible, as usually I put water in the pond liner immediately, otherwise the wind will take it away...it is big enough to completely cover someone's house.
The back elevated part is already on a hill, with this staircase-like design, the pond wall somewhat matches the incline of the slope of the group (in 40 ft it rises 20").
Unfortunately this design seems to nearly double the cost of the pond, between bricks, aquablocks, and probably 5-10 tons of rock needed.
The vertical dimension is exaggerated in this illustration.
Orange = brick wall, with metal reinforcement
Grey = bog
Blue = water level in main pond
Basically the bog ends up taking up space within the pond itself. The pond liner is laid inside and the inner walls built on top of the pond liner, creating 5 chambers (the back large is one, then two smaller ones on each side). I'm not sure if that is feasible, as usually I put water in the pond liner immediately, otherwise the wind will take it away...it is big enough to completely cover someone's house.
The back elevated part is already on a hill, with this staircase-like design, the pond wall somewhat matches the incline of the slope of the group (in 40 ft it rises 20").
Unfortunately this design seems to nearly double the cost of the pond, between bricks, aquablocks, and probably 5-10 tons of rock needed.
Attachments
- Joined
- Jul 12, 2009
- Messages
- 3,990
- Reaction score
- 2,698
- Location
- Mount Pocono, Pennsylvania
- Hardiness Zone
- 6a
I'm also a proponent of bog filtration.
You will not regret building a bog.
Crystal clear water, no cleaning of filter media, no UV lights necessary. Pretty much maintenance free.
Grow your plants directly in the bog gravel.
I share your concern about the possibility of a leak in any exterior plumbing. That's why all my plumbing is within the pond/bog. None of my plumbing is outside the liner.
I have black 1-1/2" flex PVC from my submersible pump to the 2" bog manifolds.
The bog is a bit higher than the pond.
The only exposed part of that flex PVC is where it goes over the wall between the pond and bog. I surrounded the exposed part with rocks to hide most of it.

 www.gardenpondforum.com
You will not regret building a bog.
Crystal clear water, no cleaning of filter media, no UV lights necessary. Pretty much maintenance free.
Grow your plants directly in the bog gravel.
I share your concern about the possibility of a leak in any exterior plumbing. That's why all my plumbing is within the pond/bog. None of my plumbing is outside the liner.
I have black 1-1/2" flex PVC from my submersible pump to the 2" bog manifolds.
The bog is a bit higher than the pond.
The only exposed part of that flex PVC is where it goes over the wall between the pond and bog. I surrounded the exposed part with rocks to hide most of it.
My add-on bog build
I finally did it! I joined the bog club! The bog is approximately 14 feet by 5 feet and about 12 inches deep. I know my 1600+ gallon pond has been overpopulated due to my fish reproductive rates! Last year the water never cleared up to my liking. I figured my two pressure filters and my...
- Joined
- Jun 22, 2011
- Messages
- 4,684
- Reaction score
- 3,764
- Hardiness Zone
- 5b
- Country
I like the new design; very innovative. Should be neat to see the cascades. There might be a problem though; the water will probably not reach as high as the center portion of your bog and therefore, won't cascade there. Water will take the path of least resistance and that center part, and the couple steps down, are going to provide a lot of resistance. I believe most of your water will be forced onto the lowest two steps and in effect, you're going to lessen bog efficiency by a lot.Okay, here is my adjusted design, making room for a large bog that also serves to create six 4" high waterfalls, and hopefully some interest effects with water rushing through the rocks in the stairway-like areas.
View attachment 135493
The vertical dimension is exaggerated in this illustration.
Orange = brick wall, with metal reinforcement
Grey = bog
Blue = water level in main pond
View attachment 135492
Basically the bog ends up taking up space within the pond itself. The pond liner is laid inside and the inner walls built on top of the pond liner, creating 5 chambers (the back large is one, then two smaller ones on each side). I'm not sure if that is feasible, as usually I put water in the pond liner immediately, otherwise the wind will take it away...it is big enough to completely cover someone's house.
The back elevated part is already on a hill, with this staircase-like design, the pond wall somewhat matches the incline of the slope of the group (in 40 ft it rises 20").
Unfortunately this design seems to nearly double the cost of the pond, between bricks, aquablocks, and probably 5-10 tons of rock needed.
This is what I'd suggest; create a flat bog where all your water gets a chance to rise. Dig out a center portion where you KNOW the water will pool. Place a secondary, probably less powerful, pump there. You can camoflage this pump by making a rock roof, which you can tie into the same rocks I'd suggest you put as 'step edge' rocks for your design. This secondary pump then takes the risen water pooling in the middle and you direct it to a top 'fake bog' that lies on top of the rock bridge. You'll have to get a bit creative re camoflaging but I can see it as a definite plan. In essence, what you'rd doing is taking the filtered water, sending it up higher to where you have plants (just as you would in this 'pooling' center part down below) and then letting it fall to either side and step its way down.
It wouldn't take much to put some thin, probably no more than 5" rocks in front of your pump #2 and make it look like a part of your 'elevated' rock pile with plants on top. I can see this working just fine, then. The bog works as it should and you get your creative waterfall steps. I'd love to see the build pics of this if you do it. You will have to work out how much water can pour over the bog wall and that which you'll be pumping up to the wfall step formation. You could eliminate this if you wanted to use a tee on your main pump and direct water to this 'raised rock wall step wfall' and just let the bog water overpour into the pond.
As I noted, your step edges would look great if you edge each drop with natural stone and use the same for your middle raised rock/wfall pile.
A word re doubling your cost; this is what I'd do and I don't see the cost as being horrific.
When you dig, make your bog shelf the same 12" depth below pond surface level as I did. This means your circular pond has a half moon shelf that is higher than your pond bottom. Create the wood box as mentioned earlier so you have the height you need/want for your wfall steps. This box goes on the shelf you dug and rises up above your pond height.
When you put your liner in, you'll start at the back of your bog, wrap it down and in and back up your bog box. FRom there, you overlap the front box wall and then down into your pond proper. This keeps all your water in ONE place by one liner.
Do as I did and keep at least a 6" shelf of dirt in front of where your bog box will sit. This is so you can camoflage the bog-pond wall with whatever you want. If you want a thicker facia, make the shelf the size of whatever you choose. I only needed the 6" because I was stacking 4" ledge stone.
A word re the cost; I didn't use aquablox and wouldn't just because of the price. What I did was use large 8-10" stone as my first layer (creating something similar to aquablox, though with less obvious open space for settling), then a layer of 2" cobble, then the pea gravel. If you price the volume of stone you'd need for this, I think you'll see a big cost savings. And you only really need the 12" of pea gravel to make your bog work.
If you want something like a vault and cleanout stack, consider a heavy duty plastic garbage can at the lowest point. They run about 36" depth, which is how deep my bog is. I cut out holes in the bottom lower sides so water can enter and (important!) make sure the top is at least 8" above your pea gravel. This is so water will be forced to flow all through your gravel and not up the diy cleanout stack/vault. I put some flag iris in mine and they can easily be removed should I ever need to clean out the bog.
Many don't even need/want this cleanout, so you could ignore this suggestion/cost, too.
So you should not need a separate liner for this; just one large one.
You will need something to make the bog box; I used ground contact pt 4x4s.
To get your step effect, you'll need another pump of lesser power.
To save money, consider rocking your bog all the way like I did.
Other than that, everything else should be the same.
I'll attach a drawing to better illustrate what I'm suggesting;
Attachments
Last edited:
The pond liner is laid inside and the inner walls built on top of the pond liner, creating 5 chambers (the back large is one, then two smaller ones on each side). I'm not sure if that is feasible, as usually I put water in the pond liner immediately, otherwise the wind will take it away...it is big enough to completely cover someone's house.
Interesting design, but this part confuses me. You're building a 30,000 gallon pond with the appropriate sized liner and you think the wind could blow it away? Have you ever checked the weight of an EPDM liner? And when you say "the inner walls built on top of the pond liner" what does that mean?
I like the new design; very innovative. Should be neat to see the cascades. There might be a problem though; the water will probably not reach as high as the center portion of your bog and therefore, won't cascade there. Water will take the path of least resistance and that center part, and the couple steps down, are going to provide a lot of resistance. I believe most of your water will be forced onto the lowest two steps and in effect, you're going to lessen bog efficiency by a lot.
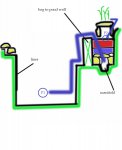
Will this addition of walls (marked in red) force the water into cascades?
Water is pumped from the main pond into the bottom of C. C is basically the bog, and A, B, D, and E probably can't function as true bogs, so they'll be filled 95% with dirt, a small plastic liner placed on top, then a shallow layer of river rocks for them to flow through.
The lowest red wall is 4" above water level, forming chamber A. Then chamber B has walls 4" higher than chamber A, though the walls marked in orange are slightly higher still, forcing the water to spill over the red wall.
Interesting design, but this part confuses me. You're building a 30,000 gallon pond with the appropriate sized liner and you think the wind could blow it away? Have you ever checked the weight of an EPDM liner? And when you say "the inner walls built on top of the pond liner" what does that mean?
My meaning is, this pond has many inner walls:
First, I'd built the outer wall, then lay down the pond liner (50 ft x 50 ft). Then the seven inner walls are built on top of that pond liner. I don't know if pond liners are designed to have heavy weight applied on top of them like this.
Additionally, I usually put in a pond liner, then add water which helps me to shape it nicely. In this case, I'd be spending several days adding the interior bricks before I can add water to the liner, so I'm not sure if that will cause a problem with the shaping of the liner, the wind and weather, etc.
Epdm is not light enough for the wind to blow it around, especially a 50’x50’, it probably weighs over 700lbs.My meaning is, this pond has many inner walls:
View attachment 135497
First, I'd built the outer wall, then lay down the pond liner (50 ft x 50 ft). Then the seven inner walls are built on top of that pond liner. I don't know if pond liners are designed to have heavy weight applied on top of them like this.
Additionally, I usually put in a pond liner, then add water which helps me to shape it nicely. In this case, I'd be spending several days adding the interior bricks before I can add water to the liner, so I'm not sure if that will cause a problem with the shaping of the liner, the wind and weather, etc.
Yes the liner can handle heavy weight put on it, but I would use a layer of underlay down as usual first then the liner then another layer of underlay under your walls and bog over top of the liner. Also use the heavier 8oz non woven material the stuff is tough as nails. I wouldn’t take a chance of what you are using to build the walls cutting the liner by laying it directly on it.
Many of us on here have bogs with many feet of rock and gravel pushing down on the liner protected by underlay, as well as rocks that weigh 3000lbs or more.
- Joined
- Jun 22, 2011
- Messages
- 4,684
- Reaction score
- 3,764
- Hardiness Zone
- 5b
- Country
if you eliminate A and B from being bogs, i.e. there is no way for water to get from C to them except via the surface of C, then yes, it will work as you wish. I'd not use dirt but rater, fill A and B with more pea gravel. This way, the water will flow through as in C, but sideways and give you at least some bog like action. Also, your plants will be more functional as the only ingredients they'll get is pond water and not some from the dirt.Will this addition of walls (marked in red) force the water into cascades?
Water is pumped from the main pond into the bottom of C. C is basically the bog, and A, B, D, and E probably can't function as true bogs, so they'll be filled 95% with dirt, a small plastic liner placed on top, then a shallow layer of river rocks for them to flow through.
View attachment 135496
The lowest red wall is 4" above water level, forming chamber A. Then chamber B has walls 4" higher than chamber A, though the walls marked in orange are slightly higher still, forcing the water to spill over the red wall.
- Joined
- Jun 22, 2011
- Messages
- 4,684
- Reaction score
- 3,764
- Hardiness Zone
- 5b
- Country
agree with jhn; I'd not put anything with sharp edges against my main liner. That's why I suggested you build your walls and cover over with one piece liner. Plus, the cost is going to go up if you use a lot of brick. Not that it can't be done but you'd probably have to lay more liner (extra pieces) under your brick and on top of your pond liner to make it more secure. Your above bog structure can all be made from 4x4s and used by one liner; just have to consider how to camouflage the face of the bog--that's why I suggested the shelf in front of the bog structure.My meaning is, this pond has many inner walls:
View attachment 135497
First, I'd built the outer wall, then lay down the pond liner (50 ft x 50 ft). Then the seven inner walls are built on top of that pond liner. I don't know if pond liners are designed to have heavy weight applied on top of them like this.
Additionally, I usually put in a pond liner, then add water which helps me to shape it nicely. In this case, I'd be spending several days adding the interior bricks before I can add water to the liner, so I'm not sure if that will cause a problem with the shaping of the liner, the wind and weather, etc.
I'd suggest the same - build your structure and then use one piece of liner to cover the whole thing. It would not be fun to build that whole thing and then realize you MIGHT have created a tear under one of those walls.
And I also agree - unless you are pumping water separately to each of those chambers (which you can certainly do), you won't get water past the first level.
And I also agree - unless you are pumping water separately to each of those chambers (which you can certainly do), you won't get water past the first level.
And I also agree - unless you are pumping water separately to each of those chambers (which you can certainly do), you won't get water past the first level.
Won't the water pumped into C overflow spilling into the two lower chambers, B and D, then from there into the still lower ones, finally spilling into the main pond itself?
Ask a Question
Want to reply to this thread or ask your own question?
You'll need to choose a username for the site, which only take a couple of moments. After that, you can post your question and our members will help you out.
Forum statistics
Latest Threads
-
Fungus?
- Started by Ana
-
He attacks again!
- Started by Chumley
-
Magnolia Bokeh
- Started by RobAmy
-
Spring has sprung in Tennessee -pic heavy
- Started by Hound Heaven
-
Whats next
- Started by Run91
-
Rapid change in "surface" algae
- Started by chibae
-
Pond Waterfall Setup Help
- Started by Acedink
-
Plant suggestions
- Started by Chumley
-
Possible use for creeping jenny?
- Started by chibae
-
Lotus plants
- Started by Parrot lady