Help w/Streams

Joined
Apr 14, 2022
Messages
27
Reaction score
5
Country
United States
Good afternoon.

I built a pond a few years ago with 2 streams coming from above, leading to it.

My problem with them is that no matter what I do, very little water comes down the streams. I’ve added more pond pumps and even just held my garden hose up top to see what would happen and no matter what, only a little bit of water will just softly go underneath the rocks.

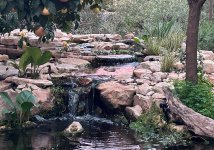
I’m trying to post a picture, but it keeps saying that the file is too large. I will try to reply with the picture to see if that works. In the picture, you can see that the top of the rocks are completely dry and the small amount of water that is going into the pond.

When I first planned this project, I envisioned the streams being filled with water rather than just trickling. I currently have two 1,200gph pumps going roughly 6 feet up to provide water to it. My only theories are that I need a much more powerful pump or I need to build the streams on a higher slope.

Any advice would be appreciated. The ponds been beautiful the way it is, so I haven’t messed with it, but this year I finally want to make the streams more what I initially envisioned.
 
Joined
Apr 14, 2022
Messages
27
Reaction score
5
Country
United States
IMG_7650.png
 
Joined
Apr 14, 2022
Messages
27
Reaction score
5
Country
United States
I had to make the photo really small for it to fit; sorry for the low quality image. Also ignore the exposed pond liners, this image is from years ago.
 
Joined
Jun 29, 2020
Messages
147
Reaction score
93
Location
Buzzards Bay, MA
Hardiness Zone
6b
Country
United States
I'm guessing you need a bigger pump. My setup uses a 4000 gph pump. I only have one stream but the waterfall is slightly higher than yours and I get plenty of flow. It's also split off to a decorative "spitter" into the pond and smaller side waterfall (no stream feeding to that one).
 
Joined
Apr 14, 2022
Messages
27
Reaction score
5
Country
United States
Joined
Apr 14, 2022
Messages
27
Reaction score
5
Country
United States
I'm guessing you need a bigger pump. My setup uses a 4000 gph pump. I only have one stream but the waterfall is slightly higher than yours and I get plenty of flow. It's also split off to a decorative "spitter" into the pond and smaller side waterfall (no stream feeding to that one).
After reading the article that JRS commented with, I think you’re both absolutely correct. I’m likely going to purchase a 5,000gph pump from Menard’s to power both streams this spring. I appreciate the help!
 
Joined
Dec 16, 2017
Messages
13,609
Reaction score
10,741
Location
Ct
Showcase(s):
1
Hardiness Zone
6b
Country
United States
i see nothing about waterfall foam or bib liners . this says to me your water is simply running under the rocks. more to come
 
Joined
Apr 14, 2022
Messages
27
Reaction score
5
Country
United States
i see nothing about waterfall foam or bib liners . this says to me your water is simply running under the rocks. more to come
Considering I have no idea what you’re talking about, you are correct about not seeing anything. lol. What do you mean? I’m supposed to use waterfall foam on the rocks?
 
Joined
Dec 16, 2017
Messages
13,609
Reaction score
10,741
Location
Ct
Showcase(s):
1
Hardiness Zone
6b
Country
United States
Welcome to the forum.

first thing to consider is how mother nature creates a stream / waterfall. It's hard to see in your photo but it doesn't look like the stream is dug/ cut into the hill side by too much. By doing so this helps to control the water in the stream. it alows us to have sides high enough to wrap the liner up behind a rock along the edge hiding the liner. and also helps catch some splash and directing it back into the stream.

Secondly every water fall or drop in a stream usually does so by landing in a little pooling area. Trying to make the water drop from rock to rock to rock is 1. not easy to control. 2 usually CREATES LOTS OF SPLASHING 3 OR MAKES FOR SO MANY ARES TRYING to run down stream you need more water to look like there's any there at all. Attached is an example of how many gph show when the fall over a waterfall . i think you'll see even 5000 gallons per hour is not a massive waterfall.


now every time you place a boulder at best your probably going to get 2/3 the water you are pumping to show over the rock while you loose a 1/3.... under or off to the side. this is where bib liners and water fall foam come into play. Think of bib liners like a window louver. start at the bottom of the stream or falls and create your rock area and at the top of the falls you'll want to make a little pooling area. you can do a easy way and a better way . easy way is when you go to set the rock you use waterfall foam / expandable foam under the rock filling in any voids between the rock and the liner. Now your probably thinking cool i'm all set . this is the secrets. well unfortunately it's only part, waterfall foam is not water proof. what is does do is slow down the water drastically. ISTEAD OF ALOWING A FLOW OF WATER TO GET THROUGH IT ONLY ALOWS A WEEPING AMOUNT OF WATER.

Now one thing i have done is to take sand and gravel small small stuff and once the foam just starts to skin over throw the sand on it so it sticks to the foam making it look like like a stream bed. Now if you want to control even more of the water then one thing i have done is before the i throw the sand on the foam i'll let the foam set and then coat it with caulking a fish friendly caulking this can make it water proof or close to it.

Then you have a the bib liner and what that is is , ONCE YOU HAVE CRERATED YOUR FALLS AND POOLS. you can then cut a new piece of liner and close up a lot of the gaps that are now blobs of water fall foam. you can even have the liner come up onto the lower areas where you want the water to drop over next and hide it with the foam and sand . go on youtube and lok up videos on pondless water falls and you'll find some sooner or latter that will show you what i am talking about.
 
Last edited:

YShahar

Enthusiastic duct-tape engineer
Joined
Feb 4, 2022
Messages
834
Reaction score
1,666
Showcase(s):
1
Country
Israel
Streams are a great addition to the pond! Not only do they add more color, places to plant, and great sound, but they also oxygenate the water for the residents of the pond. Besides the advice you've already gotten, here are a few things that have helped me:

First, think of the stream as a series of small ponds. You can control the amount of water flowing from one section to the other simply by raising the sides a bit, so that water pools up higher before spilling into the next section. Here's a view of my main stream out of the bog to illustrate what I mean:

stream_looking_toward_seating_area_January_2024.jpg


(By the way, the forum allows images up to 1000 px on the longest side, as far as I know). In this photo, you see how there are two sections that are almost flat, but with one a bit lower than the other. The sides are fairly high, so that a lot of water piles up before going over the stone between the sections.

Here's what this looks like from the other side:

falls_and_stream_7January_2024.jpg


As you can see, the drop isn't all that great: about 8 cm from one level to the other and about 20 cm down from the stream to the pond. The trick is to think in terms of a staircase, with a very subtle slope from one stair to the next. That way, the water won't be in too great a hurry to flow down, but will pile up behind your spillway stones. Even if your pump isn't super-powerful, so long as each pool is water-tight, the water won't spill over into the next pool until it reaches a certain height.

Which brings us to the next issue: as @GBBUDD said, the secret to getting the water to go over, rather than under, the rocks is to make bib liners!

Since I can't get waterfall foam where I live (Israel), and construction foam doesn't work as well, I used underlayment to make my bib liners. I covered the entire stream bed with underlayment before placing any rocks, then put my edging rocks in. Then I put another piece of underlayment on the bottom of the stream and cut it so that the edges came up about 2-3 cm in front of the edging rocks. I put a lot of pea gravel and river rock on top of it to hold it in place, then backfilled with sand and clay kitty litter between this piece of underlayment and the edge rocks, and used chopsticks to push the sand up underneath any voids under the rocks.

Over time, the sand and kitty litter silted up so thoroughly that it formed a water-resistant barrier around and under the edge rocks. This is similar to what would happen in a stream in nature, and the nice thing is that it works better over time.

One other trick to making your stream look natural is to angle the edge rocks just a bit inward. In the photo above, you can see that the left-hand side of the stream looks a bit more natural than the right-hand side, due to the angle of the rocks. Next time I do any tinkering, I'll work on the right-hand side to get the same effect.

Happy ponding!

-Yael
 

Attachments

  • stream_and_falls_from seating_area_January_2024.jpg
    stream_and_falls_from seating_area_January_2024.jpg
    822.6 KB · Views: 11

YShahar

Enthusiastic duct-tape engineer
Joined
Feb 4, 2022
Messages
834
Reaction score
1,666
Showcase(s):
1
Country
Israel
Considering I have no idea what you’re talking about, you are correct about not seeing anything. lol. What do you mean? I’m supposed to use waterfall foam on the rocks?
In most builds, waterfall foam is used underneath and around the rocks in order to direct the water where you want it to go. The main goal is to get the water going over the rocks, rather than under them. Bib liners are a way to do the same thing, but with less foam (or, in my case, without any foam, as where I live it isn't available).

The goal of both is to make every section of the stream watertight, so that you can let water accumulate in each section until it reaches the height needed to fall into the next section. Ideally, you want it set up such that when you turn of the pump, the water sits in each section of the stream and doesn't drain out between or under the rocks.

Done right, you can have a fairly full stream, even with a low-powered pump, as the water doesn't spill out of any one stream section until enough accumulates to push it over the edge.
 
Joined
Apr 14, 2022
Messages
27
Reaction score
5
Country
United States
Streams are a great addition to the pond! Not only do they add more color, places to plant, and great sound, but they also oxygenate the water for the residents of the pond. Besides the advice you've already gotten, here are a few things that have helped me:

First, think of the stream as a series of small ponds. You can control the amount of water flowing from one section to the other simply by raising the sides a bit, so that water pools up higher before spilling into the next section. Here's a view of my main stream out of the bog to illustrate what I mean:

View attachment 161695

(By the way, the forum allows images up to 1000 px on the longest side, as far as I know). In this photo, you see how there are two sections that are almost flat, but with one a bit lower than the other. The sides are fairly high, so that a lot of water piles up before going over the stone between the sections.

Here's what this looks like from the other side:

View attachment 161697

As you can see, the drop isn't all that great: about 8 cm from one level to the other and about 20 cm down from the stream to the pond. The trick is to think in terms of a staircase, with a very subtle slope from one stair to the next. That way, the water won't be in too great a hurry to flow down, but will pile up behind your spillway stones. Even if your pump isn't super-powerful, so long as each pool is water-tight, the water won't spill over into the next pool until it reaches a certain height.

Which brings us to the next issue: as @GBBUDD said, the secret to getting the water to go over, rather than under, the rocks is to make bib liners!

Since I can't get waterfall foam where I live (Israel), and construction foam doesn't work as well, I used underlayment to make my bib liners. I covered the entire stream bed with underlayment before placing any rocks, then put my edging rocks in. Then I put another piece of underlayment on the bottom of the stream and cut it so that the edges came up about 2-3 cm in front of the edging rocks. I put a lot of pea gravel and river rock on top of it to hold it in place, then backfilled with sand and clay kitty litter between this piece of underlayment and the edge rocks, and used chopsticks to push the sand up underneath any voids under the rocks.

Over time, the sand and kitty litter silted up so thoroughly that it formed a water-resistant barrier around and under the edge rocks. This is similar to what would happen in a stream in nature, and the nice thing is that it works better over time.

One other trick to making your stream look natural is to angle the edge rocks just a bit inward. In the photo above, you can see that the left-hand side of the stream looks a bit more natural than the right-hand side, due to the angle of the rocks. Next time I do any tinkering, I'll work on the right-hand side to get the same effect.

Happy ponding!

-Yael
Thank you for the help and your stream is beautiful!

My biggest worry with making my streams having “stairs” is that your stream is so much larger than mine, that I’m nervous about it looking way too unnatural on mine.

But if I do add the stairs, what would be the best technique considering my streams are already built? Tear it all up and do it again? That’s fine if that’s what I have to do, I’m planning for an extensive fix on my pond this spring.

Also, thanks for the explanation on the foam and bib liners. After seeing the replies about it, I just went and watched a video and it makes a lot of sense. I’ve only used foam in the initial stages of building to prevent leaks.

Thanks again.
 
Joined
Apr 14, 2022
Messages
27
Reaction score
5
Country
United States
Welcome to the forum.

first thing to consider is how mother nature creates a stream / waterfall. It's hard to see in your photo but it doesn't look like the stream is dug/ cut into the hill side by too much. By doing so this helps to control the water in the stream. it alows us to have sides high enough to wrap the liner up behind a rock along the edge hiding the liner. and also helps catch some splash and directing it back into the stream.

Secondly every water fall or drop in a stream usually does so by landing in a little pooling area. Trying to make the water drop from rock to rock to rock is 1. not easy to control. 2 usually CREATES LOTS OF SPLASHING 3 OR MAKES FOR SO MANY ARES TRYING to run down stream you need more water to look like there's any there at all. Attached is an example of how many gph show when the fall over a waterfall . i think you'll see even 5000 gallons per hour is not a massive waterfall.


now every time you place a boulder at best your probably going to get 2/3 the water you are pumping to show over the rock while you loose a 1/3.... under or off to the side. this is where bib liners and water fall foam come into play. Think of bib liners like a window louver. start at the bottom of the stream or falls and create your rock area and at the top of the falls you'll want to make a little pooling area. you can do a easy way and a better way . easy way is when you go to set the rock you use waterfall foam / expandable foam under the rock filling in any voids between the rock and the liner. Now your probably thinking cool i'm all set . this is the secrets. well unfortunately it's only part, waterfall foam is not water proof. what is does do is slow down the water drastically. ISTEAD OF ALOWING A FLOW OF WATER TO GET THROUGH IT ONLY ALOWS A WEEPING AMOUNT OF WATER.

Now one thing i have done is to take sand and gravel small small stuff and once the foam just starts to skin over throw the sand on it so it sticks to the foam making it look like like a stream bed. Now if you want to control even more of the water then one thing i have done is before the i throw the sand on the foam i'll let the foam set and then coat it with caulking a fish friendly caulking this can make it water proof or close to it.

Then you have a the bib liner and what that is is , ONCE YOU HAVE CRERATED YOUR FALLS AND POOLS. you can then cut a new piece of liner and close up a lot of the gaps that are now blobs of water fall foam. you can even have the liner come up onto the lower areas where you want the water to drop over next and hide it with the foam and sand . go on youtube and lok up videos on pondless water falls and you'll find some sooner or latter that will show you what i am talking about.
Thank you so much for the advice. I did go watch some videos explaining bib liners and replied to YShahar about it and my questions about it. With what you said, I’m sort of confused on “it doesn't look like the stream is dug/ cut into the hill side by too much.” What do you mean by that? I’m planing on doing an extensive redo on my pond/streams this spring and just want to have everything planned and perfect, so any help is really appreciated.

Thanks again.
 

YShahar

Enthusiastic duct-tape engineer
Joined
Feb 4, 2022
Messages
834
Reaction score
1,666
Showcase(s):
1
Country
Israel
My biggest worry with making my streams having “stairs” is that your stream is so much larger than mine, that I’m nervous about it looking way too unnatural on mine.

I think with a bit of work, you could make it look far more natural than it does at present. The trick is to dig back into your slope, making some twists and turns along the way. Instead of thinking in terms of building rocks up, think in terms of water digging a channel into the hillside. I'll post a potential rebuild of your pond below (using your original photo) to show you what I mean.
But if I do add the stairs, what would be the best technique considering my streams are already built? Tear it all up and do it again? That’s fine if that’s what I have to do, I’m planning for an extensive fix on my pond this spring.

One thing that helped me to finally visualize the process is to forget about building "a stream" and instead, to dig the soil out exactly as I would if I were building a staircase. Think of carving out a landing, then a step up in one direction, another landing, a step up in another direction. Curve the stream around and out of sight. At the very top, you'll have your bog filter or bio filter, or, in the case of pond without fish, you could just have the pipe feed into a shallow pool.

Here's a visual for you:
herzog-drew-remodel.jpg


This is your pond, but with a shallow staircase zig-zagging into the hillside above the pond. The total elevation is the same as before, but it's been divided up into several stairs and landings. None of the steps is very large -- maybe 8-10 cm max -- but by using a few large stones, rather than a bunch of small ones, the overall look is more natural.

This also has the advantage of having plenty of little pools for your dog to play in!

Also, thanks for the explanation on the foam and bib liners. After seeing the replies about it, I just went and watched a video and it makes a lot of sense. I’ve only used foam in the initial stages of building to prevent leaks.

Thanks again.

There are some great videos out there! Here's one that gave me a lot of inspiration on stream building:


Happy ponding!
 

Ask a Question

Want to reply to this thread or ask your own question?

You'll need to choose a username for the site, which only take a couple of moments. After that, you can post your question and our members will help you out.

Ask a Question

Members online

No members online now.

Forum statistics

Threads
30,966
Messages
510,602
Members
13,194
Latest member
Deanna

Latest Threads

Top