Wisconsin Pond Build

addy1

water gardener / gold fish and shubunkins
Moderator
Joined
Jun 23, 2010
Messages
44,414
Reaction score
29,205
Location
Frederick, Maryland
Showcase(s):
1
Hardiness Zone
6b
Country
United States
So pretty jw!

herzausstahl
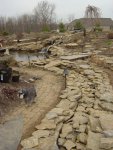
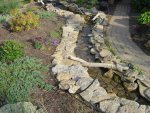
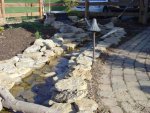
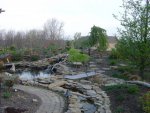
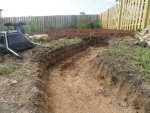
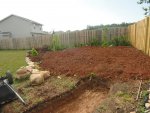
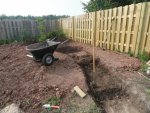
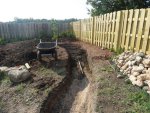
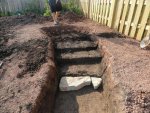
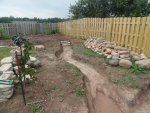
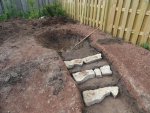
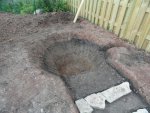
Looking good! I was going to do a straight down the hill stream, but as my honey pointed out, we have about a 15-20 foot drop before we get to the pond. So with his input we made it meander back and forth, with drops at each turn and a mini pond at each turn. Some of the areas I had to attach rocks to the stream liner to keep them there, the water wanted to push them down hill.

I started out with a 85 foot one piece stream liner, but it needed to be cut to make all the turns, some of them are 20-45 degree turns.

Your build is great! That will be wonderful when you are done, I like ever greens, have been planting a lot of those on the slope.

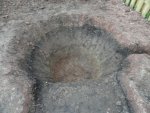
I have used the foam in a lot of areas, but also the black pl roofing stuff, that makes a great .........hey water go this way...........sealant. On some trouble spots, taken a rock gooped it up and stuck it down, no more issues, with some of my drops had water meandering the wrong way lol.
 

taherrmann4

Tmann
Joined
Mar 3, 2011
Messages
3,142
Reaction score
702
Location
Louisville KY
Hardiness Zone
6
Country
United States
herzausstahl your stream looks similar to what I put in last year it varies from 2-3 feet wide. I only dug out about 8-10" b/c I had some restrictions as to where it had to enter the main pond. I put rocks in the bottom of the stream, smaller flat rocks about the size of your hand and directed the water flow with them either by adding more rocks or stacking them up. You can create streams or flow however you want and the possibilities are endless. Keep in mind that when you add rocks to the sides it will reduce your width of your creek, mine is anywhere from 12" to 18" wide in most places. That will also depend on the size of the rocks you use.
 

Attachments

  • s starting to look like something.jpg
    s starting to look like something.jpg
    96.2 KB · Views: 542
  • Misc pond (3).jpg
    Misc pond (3).jpg
    124.5 KB · Views: 598
  • New Creek II.jpg
    New Creek II.jpg
    105.9 KB · Views: 652
  • Sidewalk View.jpg
    Sidewalk View.jpg
    98.1 KB · Views: 598

herzausstahl

herzausstahl
Joined
Jul 2, 2011
Messages
790
Reaction score
363
Location
Northeast Wisconsin Zone 4a/5b
Hardiness Zone
4a
99SRXMAN,
I'm just outside of Green Bay pretty close to UWGB.

J.W.,
I agree that some pics from further away will help to determine slope and the layout of your property. Do you have kids that play around the pond/zoning laws that you have the little wire fencing? I like it and agree that in the front of the house is a good idea. So far the only thing I could see would be to start it on the left side of the house and have it meander around the corner where your current waterfall is (is it a waterfall weir? could always move it to be stream head). That way you would see/hear it from your front porch, but it would give the illusion that it begins somewhere else on the property when you are looking at the pond head on. I forget where I read this, but the idea was to make the water feature look as natural as possible so that it appears like it was always there and you built your house around it. Also for that reason I think you would be best off using the approach of a 1" grade change over 10' of stream to keep it looking natural in your yard (which appears to be flatter), hope the ideas help! Should have more when I see the other pics.

Addy,
With your site I think you guys did it the right way, it looks natural and I can only imagine the speed the water would have picked up if you built it like mine. Your hubbie was right as the ponds at each turn should help slow down the water I would think. And any roads/trails you see on steep grades always switchback up the slope for easier travel. Mostly I like the evergreens since we have many in the woods in Wisconsin and that they retain their color year round so the winter months aren't as depressing with them, plus it is a cool site when they get snow on the branches. I think I should only need the PL sealant for the liners and the foam for the stream to direct waterflow, but I wont know for sure till I start to do it.

taherrmann4,
As I was getting ready to design/build my stream/pond yours was one that I looked at a lot for the stream. The dimensions you have are what I expect to end up with when I am done, the only difference being I will have more rounded stones (since that is what I can get for free around here). I was going to get small river stone for the bottom to get a more natural effect to mimic the streams we have around here (plus some I collected myself) and then add larger stones in the flow of the stream for effects. I totally agree with your statement that the possibilities are endless, in fact that is one thing I like about it, every pond is unique because we all have our own perspective on it. I was planning on using smaller to medium sized rocks so I will end up with 12-18" of stream.

Finished digging the stream today and cut out the steps for the stepped falls area. I decided against adding a collecting pool af the base of the falls as it will easily empty in the stream. I began digging the header pool. I think I will plumb the tubing from the pond directly into the bottom of the header pool and put an elbow on the end of it (with a screen on the end of course) hoping that this way maybe I will get a bubbling effect from the water to give the impression that the upper pool is spring fed. I will post progress pics tomorrow.
 

addy1

water gardener / gold fish and shubunkins
Moderator
Joined
Jun 23, 2010
Messages
44,414
Reaction score
29,205
Location
Frederick, Maryland
Showcase(s):
1
Hardiness Zone
6b
Country
United States
Like the idea of your header pond bubbling, you are doing fantastic.

One thing I found out, or to me looked better, a lot of small stones with some big stones, looks a lot more natural.

Keep us updated!
 

j.w

I Love my Goldies
Joined
Feb 1, 2010
Messages
33,087
Reaction score
20,350
Location
Arlington, Washington
Showcase(s):
1
Hardiness Zone
USDA 8a
Country
United States
Yep Herz, that's the only place I could run the stream from and yes we are on flatter than a pancake land. I'll have to think it out and look at the area and see what we can come up w/ when I get the energy urge to do it. The waterfall is a stainless steel set up that my hubby made for me and yes it can be moved. Would have to get a bigger pump........it's too small anyways for what I have now. Just get more flex tubing, hook it together and voila, new stream...........oh yes and all the digging of course :lol:

Oh and no little kids here, just the Great Blue Heron...........that's what the fence is for among all the other contraptions, fish line, wind chimes, talk radio set to come on from dawn to dusk etc. :rolleyes:
 

herzausstahl

herzausstahl
Joined
Jul 2, 2011
Messages
790
Reaction score
363
Location
Northeast Wisconsin Zone 4a/5b
Hardiness Zone
4a
J.W.,
You wouldn't necessarily have to move the waterfall, but it would probably be best so that it looks natural. I would pick a spot on the side of the house that looks good for a beginning point, and then map your stream from there. I would only make the top of the stream 3-6" above ground at the beginning (or less depending on how long you want to make it) and then run it to the stream with the minimalist downgrade you can so that the whole stream stays as close to ground level as possible. That way it shouldn't look out of place for the surrounding area. So you would only really have to dig the 6-12" for the stream bed, and of course all the sod. Good luck if you decide to try it! I will be using a 5000 gal pump with 2" flex PVC so after its up and running I will have a better idea of how well it all works!

Addy,
I was going to run the flex PVC down the side of the pond and connect it to a 90 degree elbow to it and letting the water flow out of there but after thinking about it I might want to add a foot rigid PVC to that so it will definitely give the bubbling effect of a natural spring. Yup, I was gonna mix all the stones together so it would look normal as possible. I've been lucky to see a few good ones on our local garden walks here so that helps. I was gonna lay my biggest stones first and slowly fill in around them after that. Luckily I have cousins who own farms so if I run short on rocks I can get their field stones that they pick each year. When you sealed your liners, what order did you go in? Did you put down the PL sealant, then the double sided seam tape, and the the single tape over the lip? I picked up the double sided tape kit today, but won't be using it till friday. Was gonna try to go without, but figured $40 was worth a reduction in head ache if it did leak because I didn't use it. Is there any trick for sealing the 5' wide stream liner to the larger ones? Especially for dealing with any folds? Or did you make sure the parts that sealed together were flat before you conformed them to the pond/stream shape? Sorry for all the ?s, just want to do it right the first time.
 

herzausstahl

herzausstahl
Joined
Jul 2, 2011
Messages
790
Reaction score
363
Location
Northeast Wisconsin Zone 4a/5b
Hardiness Zone
4a
Here are more pics. These will be the last ones I have until Friday when I get a sitter and can try to install all of my liners and begin laying rock. I think I will lay down all the liners in order and seal them after they are in place. I will be digging my plumbing trench after due to the fact that my stone pile is really close to where it will go. I plan to bury it about 6-12" down and a foot away from my stream so I don't have to worry about collapsing the stream. Due to all the dirt and the fact that all my rocks are in the garden for the most part, I will be finishing the pond/stream first and then slowly landscaping the surrounding area. I also had the idea tonight to create a little offshoot feeder stream about 3' long to the side of the main stream that will look like a dry creek bed in summer, but act as my water entrance in winter. I will take pics when I get there so the idea will be clearer then (I plan to keep posting pics of the landscaping after the pond itself is done).

The first pic is again the upper part of the stream before i dig the stepped falls in the stream. The second pic shows the upper half of the garden. The third pic is the beginning of the header pool and stepped falls in the stream. The fourth pic shows the stepped falls taking shape. This part of the stream is not as deep because I will be using flat rocks as the bottom so the water will only be an inch or so deep as it flows over them because the span will be about 3' wide here, and at any rate the liner should overlap the sides of the stream. I will leave a lot of excess liner here in case I would have to build up the sides at this part later to avoid water loss.
 

herzausstahl

herzausstahl
Joined
Jul 2, 2011
Messages
790
Reaction score
363
Location
Northeast Wisconsin Zone 4a/5b
Hardiness Zone
4a
ok, hit wrong upload button, lets try this one more time. the sad part is I am somewhat tech savy...lol
 

Attachments

  • DSC03120.jpg
    DSC03120.jpg
    155.6 KB · Views: 410
  • DSC03121.jpg
    DSC03121.jpg
    139 KB · Views: 472
  • DSC03123.jpg
    DSC03123.jpg
    155.5 KB · Views: 499
  • DSC03130.jpg
    DSC03130.jpg
    155.8 KB · Views: 440

herzausstahl

herzausstahl
Joined
Jul 2, 2011
Messages
790
Reaction score
363
Location
Northeast Wisconsin Zone 4a/5b
Hardiness Zone
4a
The first pic shows the stepped falls part of the stream. The rocks shown in the picture are there simply to keep the steps in place so they don't erode away until I can lay down the liner. That is the type of rock I will be using for the falls (and waterfall foam with pea gravel probably to cover it and fill cracks, or I might just leave the foam and let it get covered in algae). The second pic is the stream as a whole. The third is of a Robin that decided to pic worms out of the upper pool as I was digging it. I walked away and he jumped all the way down in to look for them. Its good to see the pond attract wildlife even before its completed. The last pic is the progress of the upper pool and the completed steps area.
 

Attachments

  • DSC03131.jpg
    DSC03131.jpg
    156.4 KB · Views: 402
  • DSC03136.jpg
    DSC03136.jpg
    153.5 KB · Views: 421
  • DSC03152.jpg
    DSC03152.jpg
    157.2 KB · Views: 478
  • DSC03154.jpg
    DSC03154.jpg
    153.7 KB · Views: 460

herzausstahl

herzausstahl
Joined
Jul 2, 2011
Messages
790
Reaction score
363
Location
Northeast Wisconsin Zone 4a/5b
Hardiness Zone
4a
Here are the last pics I will have for awhile until I lay the liner in place on friday. I did cover the stream and ponds with landscape fabric to protect them if we get any heavy rains this week as a result of the hot temps (to think 6-7 months from now it will literally be about 80-90 degrees colder outside without the wind chill). The first pic is the header pool. The trench on the right is for the PVC tubing to come out of the ground and enter the pond. I plan to cover/stabalize it with rocks in the pool. And the last pic is a close up of the upper pool. It is about 2 1/2' deep so it shouldn't freeze solid in winter. Not sure if I will try to keep smaller fish in here or not, but if I do I will run an air line up to it to keep an opening in the ice and would build a cold frame to cover it to keep the water warmer inside. Plus if I designed the cold frame to hold the snow on top of it, it should create a nice insulation blanket (guessing would be a matter of a sturdy enough frame and a strong enough plastic). I will post more pics after I get the liner in place. Again this is my first pond build so if any of you experienced ponders spot rookie mistakes along the way, please let me know!
Nathan
 

Attachments

  • DSC03157.jpg
    DSC03157.jpg
    150.8 KB · Views: 367
  • DSC03164.jpg
    DSC03164.jpg
    126.1 KB · Views: 387

addy1

water gardener / gold fish and shubunkins
Moderator
Joined
Jun 23, 2010
Messages
44,414
Reaction score
29,205
Location
Frederick, Maryland
Showcase(s):
1
Hardiness Zone
6b
Country
United States
That is looking great, looks like you have a nice dirt berm keeping rain water etc from entering.

My small ponds are all fishless, keep them with plants, tadpoles and whatever moves in by itself. I figure two ponds well soon to be three, with fish is enough.
 

taherrmann4

Tmann
Joined
Mar 3, 2011
Messages
3,142
Reaction score
702
Location
Louisville KY
Hardiness Zone
6
Country
United States
It's really looking good. I am not sure I would put fish in the small upper pond, you may have some end up in there anyway. I have fish end up in my slow moving creek by taking the roller coaster of a ride through the pump. Try to fish out every fall but can't get them all too many places to hide.

For the pvc pipe that is going to be going into the pond are you going to be going through the liner or just up, over and into the pond?

Can't wait to see it with running water.
 

fishin4cars

True friends just call me Larkin
Joined
Mar 23, 2011
Messages
5,195
Reaction score
1,599
Location
Hammond LA USA
Hardiness Zone
8a
Looking really good! Very professional looking dig and I like that your taking your time to get what you want instead of just digging a hole and throwing the liner in. If you have the liner I think I would go a little bigger on the top pond. A small upper pond will limit what you can do and although I think it's big enough for your install in some builds a small upper pond can limit your flow from your pump as it ends up just being a rushing roll of turbulent water If you can go a little bigger around not so much deep that will make a great area to grow some nice plants that will aid greatly in bio-filter along with nitrate removal. And yes once you start having fish spawning your going to end up with it being a nursery for fry, want it to be or not. Really does look nice!
 

addy1

water gardener / gold fish and shubunkins
Moderator
Joined
Jun 23, 2010
Messages
44,414
Reaction score
29,205
Location
Frederick, Maryland
Showcase(s):
1
Hardiness Zone
6b
Country
United States
My stream ponds are around 6 feet wide or so, Almost, notice the almost, wish they were a little bigger, they are full of plants. Bigger is always better to a point lol
 

Ask a Question

Want to reply to this thread or ask your own question?

You'll need to choose a username for the site, which only take a couple of moments. After that, you can post your question and our members will help you out.

Ask a Question

Members online

Forum statistics

Threads
30,922
Messages
510,003
Members
13,129
Latest member
Sarahckt444

Latest Threads

Top