Here we go -- FINALLY! A pond for wildlife...

YShahar

Enthusiastic duct-tape engineer
Joined
Feb 4, 2022
Messages
834
Reaction score
1,662
Showcase(s):
1
Country
Israel
I'm just taking a break to go to confession. I did it again. I pulled back the liner and carved out the end of the pond some more. I keep looking at all that liner and thinking "I can go bigger!" :p I didn't do a ton - but there was an area that was bugging me. Also, I am avoiding rocking some of the problem areas. I think my go-to stress coping mechanism is digging holes.:LOL:
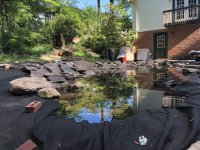
I'm in the same boat! I've been wondering how exactly to finish up the edging on the west side of the pond, which is quite shallow. As I was preparing to cut off some of the excess liner, I thought: wait a minute! If I just dig out a bit of the berm here, I'll have some iris beds! So that's what I'll be doing next week as I try to get things finished up.

Gives a whole new meaning to the expression "I really dig this!"
 
Joined
Mar 5, 2014
Messages
2,535
Reaction score
3,016
Hardiness Zone
7b
those three birds are lucky they are in your yard waiting for the pond to get fired up and not elsewhere....
Last year I learned that flycatchers belly flop into ponds to bathe! It is the craziest thing to see! I sure hope these birds do stay and enjoy the pond. Mama bird was hanging out with me the other day when I was digging - coming very close to get the grubs and worms I unearthed.
 
Joined
Mar 5, 2014
Messages
2,535
Reaction score
3,016
Hardiness Zone
7b
Here is a photo update. Lots of progress but it is slow work. I was very excited that this weekend, I got the bottom wall done - I made it all the way around! My disclaimer is - I know it doesn't look very natural but it is the best I can do with the rocks that I have (and my level of strength.) I got the big rocks in by flopping end over end or by "driving" them like a huge, awkward wheel along the shelves. I am trying to not be such a perfectionist and remembering that once I fill in the voids with rocks and gravel, it will look better. And once there are plants, it will be great!
I know have 14 of the big flat boulders left and 13 of the smaller gray flat rocks. I used an entire bulldozer scoop bag of gravel in the bog!
I am sure I will need another bag of gravel, another bag of egg rock, and probably a half pallet of those big edger boulders.
It's coming along!
IMG_3896.jpg
 
Joined
Mar 5, 2014
Messages
2,535
Reaction score
3,016
Hardiness Zone
7b
Also - I am not loving the rock on a roll (to the left of the blue plastic mat.). But I will add a few more rocks and try to remember that that area should be covered with juniper at some point in the future.
 
Last edited:
Joined
Sep 18, 2020
Messages
2,993
Reaction score
3,164
Location
Pacific NW
Hardiness Zone
8b
Country
United States
Hey, go easy on yourself. I think it looks great. I think it's hard to know just what the final look will be until you have water and algae growing on it. I think it's going to be great and can't wait to see the water flowing. I've never used rock on a roll, but I've heard it doesn't look good until the pond is full and established, then it kind of disappears, which I guess is the point. Keep it up!

Also, do I spy some Harbor Freight pads? Those are my kneepads of choice.
 
Joined
Mar 5, 2014
Messages
2,535
Reaction score
3,016
Hardiness Zone
7b
Hey, go easy on yourself. I think it looks great. I think it's hard to know just what the final look will be until you have water and algae growing on it. I think it's going to be great and can't wait to see the water flowing. I've never used rock on a roll, but I've heard it doesn't look good until the pond is full and established, then it kind of disappears, which I guess is the point. Keep it up!

Also, do I spy some Harbor Freight pads? Those are my kneepads of choice.
They might well be from Harbor Freight! The colorful ones were in our kids' rooms and since I never throw anything out, they have been reused. They do make a great knee-saving pad!
And thank you!
 

YShahar

Enthusiastic duct-tape engineer
Joined
Feb 4, 2022
Messages
834
Reaction score
1,662
Showcase(s):
1
Country
Israel
Looking great!

I think I would be tempted to preserve those incredible big flat rocks for your upper level, using them to form a stair-step from the top edge back into the landscape. You could put some just below the water level, with a few staggered to be at and above water level. I've found that a lot of visible horizontal rock makes the pond edge look stable and relaxing, while angled or on edge rock makes it look precarious and exciting. If you don't have enough, you could take some off the horizontal shelves and just put gravel in their place. Once it's underwater, it's not going to be all that visible anyway.

Your method of moving rock sounds a lot like mine: much "pinwheeling" and "end-over-end-ing" to get it where I want it!

Keep the updates coming!
 
Joined
Mar 5, 2014
Messages
2,535
Reaction score
3,016
Hardiness Zone
7b
@YShahar - yes, that is the plan! Not to mention the giant rocks are hard to move and it is much easier to get them just to the edge of the pond, vs. trying to get them down to lower shelves!
Since I probably have to have more rock delivered, I am even considering getting a REALLY big one that I could put in the landscape next to the pond. Since the delivery guy has to unload them with a little forklift skid-steer thingie, he might as well deposit it right where I need it!
We will see how much a rock like that would cost, though.
 

addy1

water gardener / gold fish and shubunkins
Moderator
Joined
Jun 23, 2010
Messages
44,413
Reaction score
29,201
Location
Frederick, Maryland
Showcase(s):
1
Hardiness Zone
6b
Country
United States
I know it doesn't look very natural but it is the best I can do with the rocks that I have
It looks great! Never apologize for your work! Beauty is in the eye of the beholder.

Not all of us have the equipment, the patience, the desire to get tons rocks and do like some here have done. Beautiful ponds.

Mine has liner here and there that has shown up as land has shifted, snow has fallen, critters have walked on it. I am slowly working on covering those areas. Does it bother me, not really. Guess that is having a 11 year old pond that functions great. And mine runs on one pump, not multiple, which I prefer.
 
Joined
Mar 5, 2014
Messages
2,535
Reaction score
3,016
Hardiness Zone
7b
I hope I can get these pictures to download. Or upload. Or whatever they do! We had a lot of rain and decided it would be helpful to finish filling it up to get an idea of the waterline. I am happy! Heading to the rock place tomorrow to order some more. The finish line is getting closer! Next step will be to determine the overflow point - I think it will naturally overflow where I want it to. Then I will drain and finish rocking. I'm going to put more pea gravel in the bog. I'll finish edging all around the pond and edge the bog. Gravel will go on the shelves and in the bottom.
Then I get to decide where to use the wood that I have.
One of the last steps before filling will be to fill in voids with smaller rocks and to use waterfall foam all over the place where needed.
The very last thing will be doing the waterfall. I am excited to use bib liners and try some techniques I've watched Atlantis Water Gardens use.
Progress!!!!!
 

Attachments

  • pond 1.jpg
    pond 1.jpg
    240 KB · Views: 36
  • pond 2.jpg
    pond 2.jpg
    302.7 KB · Views: 36
Last edited:

Ask a Question

Want to reply to this thread or ask your own question?

You'll need to choose a username for the site, which only take a couple of moments. After that, you can post your question and our members will help you out.

Ask a Question

Members online

Forum statistics

Threads
30,915
Messages
509,953
Members
13,123
Latest member
mochosla

Latest Threads

Top