Let's talk Edging a Liner pond.

Joined
Dec 16, 2017
Messages
13,612
Reaction score
10,742
Location
Ct
Showcase(s):
1
Hardiness Zone
6b
Country
United States
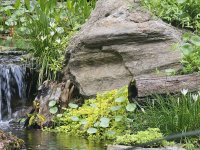
That right there was a master class in edging if I've ever seen one.

One of the hardest things to do is make a pond look natural. Anyone can dig a hole, line it, and fill it with water. Blending it into the surrounding landscape so it looks like it belongs is where the artistry happens.

When we built our pond we knew we wanted very low edges - which can be challenging, but I think make for a more interactive, approachable pond than one with big rocks lining the edge. We were mostly successful, but we did have to do some adjusting over the years as edges do have the tendency to sink even lower and plants do love to jump the liner from either side when it's low.

I'd hardly call it a master class . this was my first build after all. I'd do many things a tad differently.

@Pablo
Well that's what happ ens when you put white collar folks out in the woods . Bees don't get out of your way , did you drink the water as well while you were in the woods. ? Just do us both a favor and stay away from the white striped kitty cat in the woods.

There are some sites online where you can order moss and tree stumbs limbs etc..

But your off to a good start, you found some nice pieces. Trust me I didn't find everything with one trip out in the woods.
My favorite moss I found on a dirt trail at my buddies in west virginia. Got a small sample and grew it to where it is today.

I'll be on a ride on the motor cycle and see an overflow with liver wart on it. I've been collecting over the years. And trust me as you go you'll find your not happy with one area and you'll rework a few times. To me that's half the fun.

Hobbit falls had three transformations. First there was just plants growing on the little hill side. Then it became a small waterfall , then it morphed to the log you see today.
Then the base was just gravel , then a bib liner with a shallow stream that then became a tiny pond that overflowe'd the rock. If you pay attention to mother nature she'll tell you if your placement onstage will work or not.

YOU'VE BEEN BIT.
 
Last edited:
Joined
Sep 20, 2022
Messages
389
Reaction score
534
Location
MA
Hardiness Zone
6b
Country
United States
I'd hardly call it a master class . this was my first build after all. I'd do many things a tad differently.

@Pablo
Well that's what happ ens when you put white collar folks out in the woods . Bees don't get out of your way , did you drink the water as well while you were in the woods. ? Just do us both a favor and stay away from the white striped kitty cat in the woods.

There are some sites online where you can order moss and tree stumbs limbs etc..

But your off to a good start, you found some nice pieces. Trust me I didn't find everything with one trip out in the woods.
My favorite moss I found on a dirt trail at my buddies in west virginia. Got a small sample and grew it to where it is today.

I'll be on a ride on the motor cycle and see an overflow with liver wart on it. I've been collecting over the years. And trust me as you go you'll find your not happy with one area and you'll rework a few times. To me that's half the fun.

Hobbit falls had three transformations. First there was just plants growing on the little hill side. Then it became a small waterfall , then it morphed to the log you see today.
Then the base was just gravel , then a bib liner with a shallow stream that then became a tiny pond that overflowe'd the rock. If you pay attention to mother nature she'll tell you if your placement onstage will work or not.

YOU'VE BEEN BIT.
The bee must have been attracted to my caviar and chardonnay lunch;) It was a good day even if not a ton was done. Delayed me getting to the pump set up which I have not been looking forward to.
 
Joined
Dec 16, 2017
Messages
13,612
Reaction score
10,742
Location
Ct
Showcase(s):
1
Hardiness Zone
6b
Country
United States
We have a few old cedar trees that have come down through the years. The moss covered branch was actually an old fence railing that was lying in the woods, had to take out some large old spikes. The tree stump was an old pear tree we took down a few years back. The wagon wheel was in another garden, just threw it up there to see how it may look. The cedar tree in the pond will probably cut down a little, it was just to get an idea of how it would look. Wife wants turtles now to go on that branch, lol.
The bee must have been attracted to my caviar and chardonnay lunch;) It was a good day even if not a ton was done. Delayed me getting to the pump set up which I have not been looking forward to.
Why are you dreading that?
 
Joined
Sep 20, 2022
Messages
389
Reaction score
534
Location
MA
Hardiness Zone
6b
Country
United States
Why are you dreading that?
When it comes to plumbing I have never had high confidence. Electrical work I am much more comfortable with. The pump will be fine, it is just being nervous I have everything positioned right with the pipes, valves, etc. I know when I am done I will be like that was a lot easier than I thought.
 
Joined
Dec 16, 2017
Messages
13,612
Reaction score
10,742
Location
Ct
Showcase(s):
1
Hardiness Zone
6b
Country
United States
One tip for you when it comes to gluing pvc pipe . Dry fit the pipe to start set it up as it would be when your done. Then take a sharpie and make at least a 1 inch line across both pieces and number them both 1. next pieces 2 . This is your can't go wrong marks . MAKE SURE TO USE PRIMER / CLEANER. so many say ah you can skip thar step and for may fittings they can be right but then on that one fitting that fails there goes your pump and fish.
II also recomend the HD stuff for a buck more why not. Clean the fittings both ends to be glued and slip them together but with your marks off from each other just a little like an inch and as you slip them together twist them so the line is now aligned. Hold them together for 10 seconds and your done.
I will recomend ball valves on everything this way you can regulate flow going where and how much.
Unions on both sides of the pump if you don't already from the pump manufacturer.
They sell a strap wrench for larger fittings like the unions I suggest you get one.
And if your pumping up to a waterfall or bog you'll need something to break the siphone when the power goes out I suggest a vacuum breaker. But a simple hole in the pipe just below of pointing at the surface can work as well but becareful it doesn't get clogged.
The only other question is circulating jets the jets that have directional nozzles are well worth the money.
 
Joined
Sep 20, 2022
Messages
389
Reaction score
534
Location
MA
Hardiness Zone
6b
Country
United States
One tip for you when it comes to gluing pvc pipe . Dry fit the pipe to start set it up as it would be when your done. Then take a sharpie and make at least a 1 inch line across both pieces and number them both 1. next pieces 2 . This is your can't go wrong marks . MAKE SURE TO USE PRIMER / CLEANER. so many say ah you can skip thar step and for may fittings they can be right but then on that one fitting that fails there goes your pump and fish.
II also recomend the HD stuff for a buck more why not. Clean the fittings both ends to be glued and slip them together but with your marks off from each other just a little like an inch and as you slip them together twist them so the line is now aligned. Hold them together for 10 seconds and your done.
I will recomend ball valves on everything this way you can regulate flow going where and how much.
Unions on both sides of the pump if you don't already from the pump manufacturer.
They sell a strap wrench for larger fittings like the unions I suggest you get one.
And if your pumping up to a waterfall or bog you'll need something to break the siphone when the power goes out I suggest a vacuum breaker. But a simple hole in the pipe just below of pointing at the surface can work as well but becareful it doesn't get clogged.
The only other question is circulating jets the jets that have directional nozzles are well worth the money.
Thank you for the tips. I like that idea of marking the pieces, had not seen that before. I did have practice putting fittings together for the bog setup, I did not even know people could put pvc together without the primer, lol, so I am good there. For the bog I used your idea of screw on caps for the clean out pipes, was able to find those fittings online, seems much better then just a pressure fitting. I also put a breather valve like ozponds did, little one inch valve that I can control, which is right at the top level of the bog gravel.
For the pump I got three true union valves, one for the input and two for output as I will have a wye fitting. I think you and others mentioned before it is good to have a wye so you can control the flow to the bog, so there will be one pipe supplying the bog and then other pipe that will just go to the top of the bog so I can have more water for the stream and waterfall area. Went with the true union valves because I at first got the 2 inch ball valve and saw how hard they were to turn, thought I had a defective one and then looked it up and realized that is a common issue. I know there are ways to loosen them but for a little more money the union valves seem a better choice.
I guess I am more concerned about the future rather than just putting the pump together, ie what if there is a change to the setup in the future. I don't know if there are any tips for the connections, like having a certain length of pipe to the input or output that if you have to cut off a connection to install a new one you do not have to re-do everything. A little hard to explain but maybe someone has tips about how they may have wished they had done the connections differently in the beginning. But that is off topic of this thread.
 
Joined
Dec 16, 2017
Messages
13,612
Reaction score
10,742
Location
Ct
Showcase(s):
1
Hardiness Zone
6b
Country
United States
Thank you for the tips. I like that idea of marking the pieces, had not seen that before. I did have practice putting fittings together for the bog setup, I did not even know people could put pvc together without the primer, lol, so I am good there. For the bog I used your idea of screw on caps for the clean out pipes, was able to find those fittings online, seems much better then just a pressure fitting. I also put a breather valve like ozponds did, little one inch valve that I can control, which is right at the top level of the bog gravel.
For the pump I got three true union valves, one for the input and two for output as I will have a wye fitting. I think you and others mentioned before it is good to have a wye so you can control the flow to the bog, so there will be one pipe supplying the bog and then other pipe that will just go to the top of the bog so I can have more water for the stream and waterfall area. Went with the true union valves because I at first got the 2 inch ball valve and saw how hard they were to turn, thought I had a defective one and then looked it up and realized that is a common issue. I know there are ways to loosen them but for a little more money the union valves seem a better choice.
I guess I am more concerned about the future rather than just putting the pump together, ie what if there is a change to the setup in the future. I don't know if there are any tips for the connections, like having a certain length of pipe to the input or output that if you have to cut off a connection to install a new one you do not have to re-do everything. A little hard to explain but maybe someone has tips about how they may have wished they had done the connections differently in the beginning. But that is off topic of this thread.
The one thing I had done differently is not try to make the pump area compact. I succeeded thier . If your pump has a 3 inch intake make the pipe going to the pump as long ss possible so you can always cut in more fittings down the road. Such as when I added dead pool and the negative edge I wanted to tap in a 3 inch line but I had no length in the pipe so I failed there. I had to go with 2 inch. The big thing is always leave 2 or 3 inches between fitting or so that way if there's a failure or you need to tap in you don't need to change all the fittings. Expecialy around union ball valves. They get pricey the last thing you want is to have to replace those because there's no pipe or way to tap into it. Thoughni have cut the male out from within a female fitting and glue them together
 
Joined
Sep 20, 2022
Messages
389
Reaction score
534
Location
MA
Hardiness Zone
6b
Country
United States
The one thing I had done differently is not try to make the pump area compact. I succeeded thier . If your pump has a 3 inch intake make the pipe going to the pump as long ss possible so you can always cut in more fittings down the road. Such as when I added dead pool and the negative edge I wanted to tap in a 3 inch line but I had no length in the pipe so I failed there. I had to go with 2 inch. The big thing is always leave 2 or 3 inches between fitting or so that way if there's a failure or you need to tap in you don't need to change all the fittings. Expecialy around union ball valves. They get pricey the last thing you want is to have to replace those because there's no pipe or way to tap into it. Thoughni have cut the male out from within a female fitting and glue them together
Perfect that is exactly what I was looking for. I had a sense some length should be left, was not sure how much. I have the external PerformancePro so 2inch input/output.
 
Joined
Dec 16, 2017
Messages
13,612
Reaction score
10,742
Location
Ct
Showcase(s):
1
Hardiness Zone
6b
Country
United States
I have performance pro as well but I have 3 in and out
 
Joined
Sep 20, 2022
Messages
389
Reaction score
534
Location
MA
Hardiness Zone
6b
Country
United States
Back to the topic of the thread. When you were building your pond where did you get ideas for edging? Was there anything that surprised you from your initial idea of a pond to what you ended up with? Just curious.
 
Joined
Sep 20, 2022
Messages
389
Reaction score
534
Location
MA
Hardiness Zone
6b
Country
United States
Got a nice anniversary present from wife and daughters today. You will see in the picture they made some bricks with the various pieces of glass and china we found as we dug out the pond. That of course is a tiny fraction of what we found, we have a large collection. Nice to add these to the edging, pretty cool to have the date also for future owners.
 

Attachments

  • 20230828_172552.jpg
    20230828_172552.jpg
    258.2 KB · Views: 15
Joined
Dec 16, 2017
Messages
13,612
Reaction score
10,742
Location
Ct
Showcase(s):
1
Hardiness Zone
6b
Country
United States
Many things evolved. The character stones that I though were huge and plenty large to be focal points for instance . Once they were set in only 8 inches of water got lost very quickly. So the idea was to put the character stone onto a wall/ Platform of stone built up below it with large flat rocks. Or a old fashioned stone wall. Which I still like the idea of. But hobbit falls took over the space.
That never came to be as you can see. I came up with the idea, if roots can grow through weed barrier why not use a trickle of water to keep the fabric moist and see how plants would do. making it look like erosion had exposed some of the rock and soil was around it yet not. So even the creeping jenny two mountain laurels, and the fairy lilies are all effectively are like a bog they get all they need from water trickling down the little hill. So the entire area in the photo is not your traditional edging detail where the fabric and liner come up behind the rock and get folded over and buried. But the liner and fabric come up a foot above water level from the main pond. Angles back about three feet to the upper pond. There the same liner creates the upper pond, above the main falls. It is the same liner as the pond it's all one piece. So the liner and fabric are right at the water level to the upper pond . And in this area the fabric was intentionaly allowed to wick water over the edge and thus keeping the hill side constantly wet .This keeps the creeping jenny, Fairy lilies and two small mountain lorels and moss in the picture below constantly moist. They also only have the water to keep them alive there is no soils. Effectively making a bog on the side of a small hill.
20230828_172527.jpg
Behind the log is the same with the exception of a low edge to alow even more water to drain through the log, aka hobbit falls. So if I had done the standard edging I never could have achieved what you see in the pictures. The fairy lilies "white flowers are growing in pea stone only. Though the area appears to be out of the pond and is in the landscaping, It is not . . All the penny wart above in the back is all in the upper pond with the exception of a few trailers that need to be yanked out.

If I had cut the fabric I would have had to seem this in order to have made what you see in the picture. Not that seeming is all that hard but it is a mechanical seem and they can fail.

I had no idea if any of this would work I had never done anything like pending before with the exception of fish tanks.
 

Attachments

  • 20230828_172357.jpg
    20230828_172357.jpg
    446.7 KB · Views: 7
Joined
Dec 16, 2017
Messages
13,612
Reaction score
10,742
Location
Ct
Showcase(s):
1
Hardiness Zone
6b
Country
United States
Got a nice anniversary present from wife and daughters today. You will see in the picture they made some bricks with the various pieces of glass and china we found as we dug out the pond. That of course is a tiny fraction of what we found, we have a large collection. Nice to add these to the edging, pretty cool to have the date also for future owners.
Creative. Build them right into a wall. . All I have is the previous owners hand prints of his and two boys in my concrete walk way.
 
Joined
Oct 28, 2013
Messages
13,105
Reaction score
13,463
Location
Northern IL
Showcase(s):
1
SOMETIMES you need to cut SOME of your liner... I've posted the picture here before of the ridiculous amount of excess liner we had to trim back. Every time I see it I just laugh and laugh.
 
Joined
Sep 20, 2022
Messages
389
Reaction score
534
Location
MA
Hardiness Zone
6b
Country
United States
SOMETIMES you need to cut SOME of your liner... I've posted the picture here before of the ridiculous amount of excess liner we had to trim back. Every time I see it I just laugh and laugh.
Lol, I hear you. My wife cannot stand all the extra liner, I have had to hold her back from cutting, telling her everyone says dont cut it. I totally understand the reasoning behind not cutting. But like you said sometimes you do have to. I actually did listen to all of you when I read post after post saying to make your pond bigger then you think you want. So I did maximize the size of the pond with the initial build. I realistically do not have space to expand much more because of trees, old cess pool (another story) or expanding further into the yard that might interfere with the existing septic system.
 

Ask a Question

Want to reply to this thread or ask your own question?

You'll need to choose a username for the site, which only take a couple of moments. After that, you can post your question and our members will help you out.

Ask a Question

Members online

Forum statistics

Threads
30,966
Messages
510,627
Members
13,195
Latest member
PLI Landscape and Irr

Latest Threads

Top