You are using an out of date browser. It may not display this or other websites correctly.
You should upgrade or use an alternative browser.
You should upgrade or use an alternative browser.
Newbie here. Building a red-slider turtle pond from scratch. HELP!
- Thread starter bootsies_mom
- Start date
As @GBBUDD said ask away on any questions you have about my enclosure or how I did anything. Some things learned the hard way as turtles are escape artists and can climb much better than you may think. I have multiple species of turtles in the enclosure around 8 Diamondback terrapins, a wood turtle and 2 box turtles.
- Joined
- Sep 7, 2022
- Messages
- 17
- Reaction score
- 10
- Country

Thank you so much!!!! I appreciate all the helpHey there! more answers below...
Typically, you need only a single pump. The idea is to put it in the intake bay (in a perforated container of some sort to keep debris out) and to run the hose from the pump to the bog. Think of the intake bay / pump area as the "heart" of your water system and the bog as the "kidneys" that clean the water.
Some people also add jets and smaller pipes splitting off the main pipe to get different effects. For example, you could cut the main hose, insert a T connector and add a small hose to make a secondary water fall, or just shoot water out of a corner of the pond that otherwise might not get much circulation.
I built mine based on watching youtube videos. Search for "intake bay" and you'll find a ton of things out there. In fact, the main issue is information overload! To make things simple, I would watch the recent videos by Ozponds, as he's recently built a small pond with an intake bay and stream, with a good explanation of how and why he made certain choices.
Here are a couple of photos of my set up, just to give an idea of what a DIY build might entail.
Here, I've started digging the intake bay in an area off the patio (the main viewing area):
View attachment 153938
Here's how this area relates to the main pond. At the far end will be the stream and waterfall, and eventually the bog area. The prevailing wind in our area blows toward the house, so that will help blow debris into the intake bay. Since it's close to the house, it will be convenient to net out the stuff that blows in there.
View attachment 153939
Here, I've laid down underlayment in the intake bay, topped off with fine sand, due to all the rocks in my soil (I later removed most of the sand, after finding that I hadn't dug deep enough to include that much sand.
View attachment 153940
Once the liner was in the hole, I added more underlayment, and then my milk crates and pump vault:
View attachment 153941
Then, I folded the liner over the inside, backfilled with sand, and started adding rocks:
View attachment 153942
Here's what it looked like soon after filling the pond and turning on the pump...
View attachment 153943
And here's what it looks like today...
View attachment 153944
Hopefully, this gives some idea of what's involved. It isn't all that complicated, but does involve some work in the digging stage.
I would definitely skip the preformed liner altogether! With EPDM and underlayment, you can make your pond any size and shape you want, with a lot less hassle than trying to make a preformed liner do what you want it to. You can even add new sections later on (by seaming more liner onto your existing liner).
In my case, the liner was .60 mil roofing liner (as here in Israel, the fishsafe stuff was super expensive, I took the chance that the roofing material would be safe once washed down). It was really, really heavy, so getting it into the hole wasn't easy! If you aren't digging quite such a big pond, and you use the .45 mil standard EPDM, you may be able to add the liner without help, though it's much easier with two people. So if you can draft a friend once your hole is dug, that will make quick work of adding the liner.
Cheers!
-Yael
")
I have a few other questions that I would love your input on:
- For the hose, just the water supply in general, how often should I turn it on? Or I'm assuming if I build everything correctly, there should be a semi constant supply of water all the time minus evaporation?
- Where should the water flow start from? I'm thinking of having a waterfall way at the top, then creating a sort of riverbed/stream that connects to the pond, then the pond connecting to the intake bay, and the bog somewhere on the side? I'm guessing that the if I have the hose pumping water from the waterfall, it will go "downstream" into the pond, then go into the intake bay, swirl around, and then travel back up to the waterfall via pipes and such. Is this a correct assessment?
-Did you calculate how much water is necessary in order to create water motion? I was watching a YT video by Modern Design Aquatics, and it was regarding the calculation of water in motion. It seemed super complicated to me. The guy was talking about Length of stream x width of water x depth of water. And then talking about cubic water etc. So, is this overkill or is this something many people do?
-The biological filter is also known as the bog, correct?
-Realistically, how deep should a pond be?
I don't know why this is hard for me to comprehend. I think it's just my nature and the kind of person I am. I am always so focused on understanding how things work, so I can then understand the bigger picture. But sometimes understanding how things work is difficult for me, so I really appreciate your patience. I will be drawing up a plot plan soon and sharing it on here for input
- Joined
- Sep 7, 2022
- Messages
- 17
- Reaction score
- 10
- Country
I was thinking something like this? Water starting from the waterfall, down a steepish stream/river bed, maybe another waterfall with the water falling into the pond, going to the intake bay, then from the bay going to the bog on the side, and then from the bog going back up? the stream and into the waterfall? See, this is where physics and fluid mechanics throws me off. I don't know if this is actually correct. Thank you!!!!!Hey there! more answers below...
Typically, you need only a single pump. The idea is to put it in the intake bay (in a perforated container of some sort to keep debris out) and to run the hose from the pump to the bog. Think of the intake bay / pump area as the "heart" of your water system and the bog as the "kidneys" that clean the water.
Some people also add jets and smaller pipes splitting off the main pipe to get different effects. For example, you could cut the main hose, insert a T connector and add a small hose to make a secondary water fall, or just shoot water out of a corner of the pond that otherwise might not get much circulation.
I built mine based on watching youtube videos. Search for "intake bay" and you'll find a ton of things out there. In fact, the main issue is information overload! To make things simple, I would watch the recent videos by Ozponds, as he's recently built a small pond with an intake bay and stream, with a good explanation of how and why he made certain choices.
Here are a couple of photos of my set up, just to give an idea of what a DIY build might entail.
Here, I've started digging the intake bay in an area off the patio (the main viewing area):
View attachment 153938
Here's how this area relates to the main pond. At the far end will be the stream and waterfall, and eventually the bog area. The prevailing wind in our area blows toward the house, so that will help blow debris into the intake bay. Since it's close to the house, it will be convenient to net out the stuff that blows in there.
View attachment 153939
Here, I've laid down underlayment in the intake bay, topped off with fine sand, due to all the rocks in my soil (I later removed most of the sand, after finding that I hadn't dug deep enough to include that much sand.
View attachment 153940
Once the liner was in the hole, I added more underlayment, and then my milk crates and pump vault:
View attachment 153941
Then, I folded the liner over the inside, backfilled with sand, and started adding rocks:
View attachment 153942
Here's what it looked like soon after filling the pond and turning on the pump...
View attachment 153943
And here's what it looks like today...
View attachment 153944
Hopefully, this gives some idea of what's involved. It isn't all that complicated, but does involve some work in the digging stage.
I would definitely skip the preformed liner altogether! With EPDM and underlayment, you can make your pond any size and shape you want, with a lot less hassle than trying to make a preformed liner do what you want it to. You can even add new sections later on (by seaming more liner onto your existing liner).
In my case, the liner was .60 mil roofing liner (as here in Israel, the fishsafe stuff was super expensive, I took the chance that the roofing material would be safe once washed down). It was really, really heavy, so getting it into the hole wasn't easy! If you aren't digging quite such a big pond, and you use the .45 mil standard EPDM, you may be able to add the liner without help, though it's much easier with two people. So if you can draft a friend once your hole is dug, that will make quick work of adding the liner.
Cheers!
-Yael
Attachments
YShahar
Enthusiastic duct-tape engineer

- For the hose, just the water supply in general, how often should I turn it on? Or I'm assuming if I build everything correctly, there should be a semi constant supply of water all the time minus evaporation?
If you can fill the pond with clean rainwater (that hasn't run through lawns and picked up chemicals) then that's ideal. Where I live, we get rain only during the winter months, so I rely on mains water. If your water has chlorine and chloramine added, then you'll need to add a water conditioner (Prime gets good reviews on this forum) to neutralize the chloramine. Chlorine will evaporate on its own, but chloramine wont.
So yes, once it's filled, you let the system run for a while to start building the base of the food chain in the pond. Then, in the first week or two you add plants (can be earlier, but they won't do as well, since there's no food source in the water yet). Then, after things are going well and you have some algae, you can add fish. This is known as "cycling" the pond, and is a necessary part of getting the ecosystem running.
You'll need to add water from time to time due to evaporation, but this can be done using a float valve. I just run the hose into it once a week, adding only a little at a time. The smaller the pond, the more careful you need to be with this.
- Where should the water flow start from? I'm thinking of having a waterfall way at the top, then creating a sort of riverbed/stream that connects to the pond, then the pond connecting to the intake bay, and the bog somewhere on the side? I'm guessing that the if I have the hose pumping water from the waterfall, it will go "downstream" into the pond, then go into the intake bay, swirl around, and then travel back up to the waterfall via pipes and such. Is this a correct assessment?
It's a cycle: the pump in the intake bay pumps water up to the bog, where it goes under the gravel and slowly filters up (losing any solid debris that made it past the gravel in the intake bay in the process). Then the water flows over a low edge of the bog into your stream, picking up oxygen along the way, and down to the pond. From there, back to the intake bay to start all over again.
Typically, you'd want a pump that turns over the entire pond once per hour, though for a really big pond, less turn-over is OK. The main thing is to keep the water cycling through the system on a continual basis. So if your pond is 1,000 liters, you want a pump that can deliver 1,000 liters per hour even after losses to friction and the height of your bog. The pump will have a chart that helps you calculate this. So my pond is something along the order of 13,000 liters. My hose runs about 17 meters from intake bay and the head of my stream is about 50 cm high. I chose a pump that delivers 16,000 liters/hour to run the pond.-Did you calculate how much water is necessary in order to create water motion? I was watching a YT video by Modern Design Aquatics, and it was regarding the calculation of water in motion. It seemed super complicated to me. The guy was talking about Length of stream x width of water x depth of water. And then talking about cubic water etc. So, is this overkill or is this something many people do?
Think of the pond as a slightly deeper zone in a mountain stream, only you supply the artificial "snow melt" that keeps the stream running.
Yes, although "biological filter" is a broader term, and includes all sorts of filters that aren't bogs. So while a bog is one type of biological filter (and the simplest), there are also other types.-The biological filter is also known as the bog, correct?
-Realistically, how deep should a pond be?
A lot depends on whether you get freezes where you are. If the water freezes over at the top, then you'll want a deeper pond to allow your fish to hibernate in. If you don't, then you can opt for shallower water. That said, the depth of the pond is also very important in hot climates, and the deeper your pond, the greater the volume, and the more stable your water temperature will be. So if you can go down 70 cm to a meter, that's excellent.
Just as an aside, I live in a fairly hot climate (no freezes, and winters are getting more and more mild the past few years). We're at the end of a hot summer, and I expected the water in the pond to be fairly warm. But this past weekend, I took a dip in there and found that in the deep zone (80 cm deep and about a meter in circumference) the water was actually fairly cold. So that's a good advertisement for going as deep as you reasonably can!
For your turtles, you'll also need a fair bit of shallow water and gradual entries into the pond, so there's plenty of ways to create different zones. I tend to think of my deep zone as the reservoir of the pond and its thermostat, and the shallow zones as the plant habitat, where I can put pots of lilies and little graveled areas to put bare root plants.
I don't know why this is hard for me to comprehend. I think it's just my nature and the kind of person I am. I am always so focused on understanding how things work, so I can then understand the bigger picture. But sometimes understanding how things work is difficult for me, so I really appreciate your patience. I will be drawing up a plot plan soon and sharing it on here for input
No worries! One of the great things about building a natural pond is that you can experiment and see how things work!
YShahar
Enthusiastic duct-tape engineer
I was thinking something like this? Water starting from the waterfall, down a steepish stream/river bed, maybe another waterfall with the water falling into the pond, going to the intake bay, then from the bay going to the bog on the side, and then from the bog going back up? the stream and into the waterfall? See, this is where physics and fluid mechanics throws me off. I don't know if this is actually correct. Thank you!!!!!
Sounds like a good start! Only the bog should be at the highest point, since you'll be pumping water up there and letting it flow downhill again to the pond.
Can you share a photo or two of your yard, preferably showing the slope of the ground? That might give us some ideas!
YShahar
Enthusiastic duct-tape engineer
Just as an example, here is a schematic of my design. It's gone through a lot of changes along the way. I had originally intended to place the bog on the other side of the garden wall. But then as I was looking at that area, I realized that the land there isn't stable enough to hold the weight of water and rocks, and that the whole thing could easily slide right down the hill. So I've relocated the proposed bog area to where my original--much smaller--pond used to be. As you can see, besides the main stream that already exists, I'll be building a really small stream that helps to push water out of a "dead zone".
Another feature of the pond is that there's an overflow area. When the rains start here, we can get a huge amount in a short time. So it was important for me to be able to control exactly where excess water is going to go during a heavy rainstorm. I've built a dry creek bed behind the pond, such that overflow will get spread out towards the garden.
The units below are in meters and the measurements aren't all that exact.
One other point to note is that I've kept all of my plumbing inside the pond. In professional videos, you'll usually see them burying the hose in such a way as they get the shortest possible run of hose (and thus, lose less water pressure to friction). However, since I would only save about a meter of distance if I were to bury it, I prefer to keep the whole length of the hose inside the pond so that if there are any leaks, they stay in the pond. So the hose is "buried" under the first row of rocks on the top shelf. I can still get to it, although as the plants take hold, that will require more work. Had I to do it over again, I probably would have put in a second hose, just in case I wanted to run another pump in the vault later on.
try this as a starting pointI was thinking something like this? Water starting from the waterfall, down a steepish stream/river bed, maybe another waterfall with the water falling into the pond, going to the intake bay, then from the bay going to the bog on the side, and then from the bog going back up? the stream and into the waterfall? See, this is where physics and fluid mechanics throws me off. I don't know if this is actually correct. Thank you!!!!!
Honored and Proud to have been chosen Aquascapes DIY pond of the year for 2023. 12,000 Gallon Koi Pond, Full Build
Large KOI pond with a Wetland filter, Negative edge and an intake bay. Start to finish, Building, Maintaining and expanding / seaming . https://www.facebook.com/watch/live/?ref=watch_permalink&v=687652723148180
bog / waterfall/ stream / no stream / small pond/ or to a big pond/ skimmer or negative edge or intake bay pump back to the bog
you go granny , no lack of 21st century in you . what program are you using ?And here's a cross section of the intake bay, showing its depth relative to the pond:
View attachment 154066
YShahar
Enthusiastic duct-tape engineer
That was done in Indesign. I also use Illustrator, but since I do a lot of book layout these days, I'm more comfortable with Indesign. I really wish I could afford Autocad!you go granny , no lack of 21st century in you . what program are you using ?
- Joined
- Sep 7, 2022
- Messages
- 17
- Reaction score
- 10
- Country
Thank you so much, again! This has been really helpful. Here are a few pictures of our current pond (which I will be using for the bog), and the rest of the area that we will be converting into a pond.Sounds like a good start! Only the bog should be at the highest point, since you'll be pumping water up there and letting it flow downhill again to the pond.
Can you share a photo or two of your yard, preferably showing the slope of the ground? That might give us some ideas!
So, this is an overview of the area on the side closest to the patio
This picture here is of the same area, just on the opposite side (so if I'm taking the picture from the patio)
This area here is the same area where the bench is on the picture above
This picture is of the old pond, which I think would be perfect for the bog. Obviously replacing everything, minus the plants and trees
Here is an unclose of the area
and here is an overview
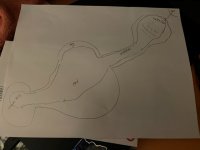
So, essentially, this is what I am thinking
Intake bay at the end there, then a peninsula area where the turtles can get out and walk, then a basking area/hiding/beach/shallow planting zone, (ignore the original planting zone noted on there), and then the deep zone.
See, here is the shallow planting area, then the bog, and from the bog there can be a small riverbed with a waterfall and another stream leading into water, maybe like a smaller waterfall....and I put walking path/negative edge but I can't remember if it is called negative edge...? I did put the overflow area by the bog. That area is perfect because it leads to the other side of our front yard where there is a bunch of gravel. There is also a hole in the wall where the hose can be connected from the from yard to the pond.
So, what do you think
feel free to finagle. I can't wait to see your vision YShahar
Enthusiastic duct-tape engineer
Looks great! It's going to be very cool having the pond and turtle habitat right off your patio, where you can really enjoy it!
You'll want to make sure your overflow goes into an area where it can drain away into the garden, rather than flow back under your liner.
If I have time later on, I'll try converting this into a simply sketch (just for the fun of it!).
You'll want to make sure your overflow goes into an area where it can drain away into the garden, rather than flow back under your liner.
If I have time later on, I'll try converting this into a simply sketch (just for the fun of it!).
- Joined
- Sep 7, 2022
- Messages
- 17
- Reaction score
- 10
- Country
Thank you so much! Yes, only if you have time. I've already taken up much of your time as it isLooks great! It's going to be very cool having the pond and turtle habitat right off your patio, where you can really enjoy it!
You'll want to make sure your overflow goes into an area where it can drain away into the garden, rather than flow back under your liner.
If I have time later on, I'll try converting this into a simply sketch (just for the fun of it!).
For the overflow area, can it be located anywhere? Say, next to the intake bay?
Sending good vibes your way!
-Paola
YShahar
Enthusiastic duct-tape engineer
Well, I did indeed run out of time today. Let's see how it goes after Shabbat (26-hour long day offline time starting Friday night at sunset). I did download some textures to use this morning, just for fun. As you can probably tell, I love playing with possibilities!Thank you so much! Yes, only if you have time. I've already taken up much of your time as it is
For the overflow area, can it be located anywhere? Say, next to the intake bay?
Sending good vibes your way!
-Paola
Yes, the overflow can be pretty much anywhere. I put mine at the far end of the pond just because I've got a downward slope toward some shrubs in that area. Some people attach a pipe inside their pump vault that goes off into the garden or to a drain or something. Since it rains only for a couple of months of the year here, I didn't need anything terribly elaborate -- just a low spot where water can run off if the pond gets too high.
Cheers!
-Yael
Ask a Question
Want to reply to this thread or ask your own question?
You'll need to choose a username for the site, which only take a couple of moments. After that, you can post your question and our members will help you out.
Forum statistics
Latest Threads
-
Dichondria
- Started by Fishie Mom
-
Hello from north Wales
- Started by HuwP
-
Pond cleanup and dragonflies?
- Started by davidwat
-
Hello from Texas
- Started by davidwat
-
Creeping Jenny
- Started by Newhope
-
Building pondless feature so it has several inches of standing water
- Started by catski717
-
Waterfall pipes
- Started by pondfixer
-
Pet goose swimming in pond kill fish
- Started by Enchanted Oaks
-
Quarantine for new Koi
- Started by Gordo33
-
Frogs in pond
- Started by wonderboynj