Where do I drill holes for my mechanical filter?

Joined
May 10, 2011
Messages
114
Reaction score
31
Location
NJ
Hardiness Zone
7a
I am attempting to make my mechanical filter out of a truck bed box. Picture attached. Before I make the thing non returnable I'm looking for some help on where to drill the holes.

Should the inflow come in from the top right or the right hand side of the box?

The inside measure 26*12*12''

If the inflow is on the side should I drill the hole as close to the top as possible?

Where should I drill the return to the pond? in the middle or near the top? Its only 12 inches high and my matala is 12 inches high.

Do I need and overflow? Because an overflow would be inline with some of the filter media?

I have an inpond tetra 1900 GPH pump. I plan on using electrical conduits male/female for a bulkhead.

General comments and criticisms are welcome.

Thanks
Travis
 

Attachments

  • mechanical filter.jpg
    mechanical filter.jpg
    97 KB · Views: 349

HTH

Howard
Joined
Jun 10, 2011
Messages
1,571
Reaction score
788
Location
Oklahoma Panhandle USA
Can you find a taller box ?

There are several right ways to do this. First the output from the box is not under pressure so it needs to handle the water at a much lower speed then the input from the pump. 1.5" might work but I would go with 2".

I would put the input about 1/3 the way down the side of the box. I would put the output near the bottom of the box with an elbow inside the box facing up. A pipe in this elbow will determine the water level in the box You can fine tune the length of this pipe to get the water level right

If you extend the pond liner out and under this box you do not need an overflow.
If you can't extend the liner T the input pipe just prior to the tub. The bottom leg of the T attaches to the tub. One arm of the T is the input and the other goes back to the pond. Twist the T so water flows into the box until the box is full then overflows out the other arm of the T (now higher due to twisting) and back to the pond. Either do this adjustment prior to cutting the output hole or cap it.

Using the adjustable pipe on the outflow (by cutting pipe )and the T for overflow (by twisting) gives you control over the water level independent of the actual location of the holes on the box.
 
Joined
May 10, 2011
Messages
114
Reaction score
31
Location
NJ
Hardiness Zone
7a
I've tried to find a taller box but then they also get wider. Which would leave water flowing around the matting. It would solve the fairly close tolerances I have now. I might check one more place just to be sure.

I like both of those ideas and would have never thought of them. Thanks so much for your reply. I suppose there is nothing other than aesthetics keeping from putting the whole thing on a pond shelf in the pond. With the added bonus it has a cup holder when you shut the lid. I couldn't extend the liner.

I definitely understand the outflow pipe. I think I understand the inflow T. I suppose the overflow end of the T line needs to be lower than the maximum water level you would want in the box. I also assume that the twisting of the T depends on spa flex pipe.
 

Attachments

  • Filter diagram.jpg
    Filter diagram.jpg
    24.8 KB · Views: 321

HTH

Howard
Joined
Jun 10, 2011
Messages
1,571
Reaction score
788
Location
Oklahoma Panhandle USA
You could make the taller box narrower with a partition or gluing in a big chunk of styrofoam.

This is an easier way to think about the input T but it does the same thing. Instead of twisting the T you just adjust the height of the top T to set the water level.
filter.jpg
 
Joined
May 10, 2011
Messages
114
Reaction score
31
Location
NJ
Hardiness Zone
7a
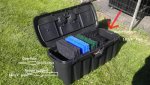
HTH, Well it looks like I found the wrong way to do this. After reading your post I thought I really should find a taller box. I go out and find a storage box that reads, crack free, gtd for life, unbreakable box and with more appropriate dimensions. Actually I bought two of them. Well the first one I filled up with water just to see how much it would bow under water pressure. It was a lot but after you mentioned extending the pond liner. I thought well I will just put it in the pond and that would solve the overflow problem and I really wouldn't have to worry about leaks. I thought the pressure from being in the pond would reduce the pressure on it enough that I wouldn't have to worry about how flimsy it felt. I dumped all but about two inches of water out of it. Reached down to pick it up and it tore. I thought well I can just return it good thing bought two of them. So much for unbreakable. These were about $8 compared to the truck box was about $40.

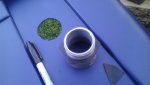
Went to the plumbing supply place where the guy behind the counter tries to sell me a brass connection to go from the 1'' on the pump to 1&1/2 pipe. Two plumbers who were in there suggested to go from a galvanized thread to a pvc bushing? this was about $8. I was slightly worried I could overtighten the galvanized pipe but it seemed to work ok.

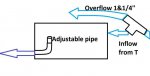
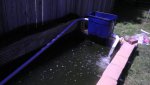
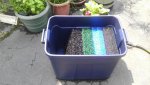
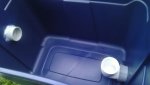
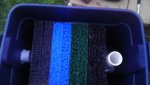
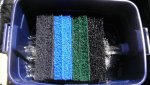
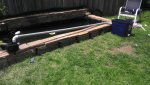
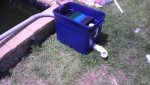
Drilled a hole in the box, heated up a knife, warmed the box a little and it cut like butter. Cut my pipes to length and a 2'' outflow with the pipe inside to set the height of the water as you mentioned. Hooked it all up and it promptly began to overflow the entire top of the container right back into the pond in a perfect waterfall. The outflow was working but not fast enough. Of course the sides bowed out so most of the water flowed around the matting. I have pictures of most things attached but I did not get a picture of this as I was pretty disgusted at that moment. Well I had just enough left over pipe that I raised it up out of the pond and set it on the side. Then I removed the length of pipe inside to set the water height and just left the elbow. The extra length of pipe and height reduced the water flow enough that it wasn't coming over the top of the container. However the volume of water returning to my pond looked like a hot tub. My fish were entertained and I let it run for an hour or so when I was out in the yard to clear the water up some because the old filter had been disconnected for a couple of days. I certainly didn't trust this set up enough to be left alone. Anyway I put it back in the pond with a much smaller older pump maybe 600 GPH. The design works but I was pretty set on using my new pump. So any suggestions. I was thinking either a bigger outflow. Or adding a second outflow. Or spitting part of the flow off before the input? Or using a bigger box and styrofoam like you suggested earlier? Lots of pictures attached. Thanks in advance for anyone input.
 

Attachments

  • 10 (1).jpg
    10 (1).jpg
    44.8 KB · Views: 301
  • 10 (2).jpg
    10 (2).jpg
    71 KB · Views: 350
  • 10 (3).jpg
    10 (3).jpg
    60.8 KB · Views: 332
  • 10 (4).jpg
    10 (4).jpg
    25.5 KB · Views: 388
  • 10 (5).jpg
    10 (5).jpg
    21.4 KB · Views: 323
  • 10 (6).jpg
    10 (6).jpg
    36.8 KB · Views: 381
  • 10 (7).jpg
    10 (7).jpg
    77.9 KB · Views: 315
  • 10 (8).jpg
    10 (8).jpg
    81.2 KB · Views: 374
  • 10 (9).jpg
    10 (9).jpg
    84.6 KB · Views: 317

HTH

Howard
Joined
Jun 10, 2011
Messages
1,571
Reaction score
788
Location
Oklahoma Panhandle USA
This is the learning part. Where nature teaches us physics.

I was thinking either a bigger outflow. Or adding a second outflow. Or spitting part of the flow off before the input? Or using a bigger box and styrofoam like you suggested earlier?
All of these would work. A second outflow would be a cheap thing to try.and it would not reduce the flow through the filter.

You can spread the return out over some lenght of the pipe by drilling holes in it. Obviously the holes are best when over the pond!
 

Ask a Question

Want to reply to this thread or ask your own question?

You'll need to choose a username for the site, which only take a couple of moments. After that, you can post your question and our members will help you out.

Ask a Question

Members online

Forum statistics

Threads
30,922
Messages
510,003
Members
13,129
Latest member
Sarahckt444

Latest Threads

Top