Expand my pond

Joined
Dec 16, 2017
Messages
13,544
Reaction score
10,678
Location
Ct
Showcase(s):
1
Hardiness Zone
6b
Country
United States
look at the blog on seaming closely it shows you all you need to know . The first thing i would do i take a piece of scrap and try seaming that first before you go for the pond seam place 2x12 or similar under the rubber flatten it out as best as you can .... CLEAN WELL ....wait until the rubber is completely dry use a hair dryer if necessary. Apply the Firestone seaming adhesive WAIT UNTIL IT IS COMPLETELY DRY TO THE TOUCH . apply the seam tape repeat and use a roller to work the seam tight together. caulk the edges . Where you are nervous about the seam. double seam your joint. place the 2 over the old pond close to the joint. pull the rubber from the new pond and flip it into the old pond. EXPOSING THE SEAM AND REPEAT. caulk the seam and you now have 6 barriers to keep the seam from leaking.
 
Joined
Dec 16, 2017
Messages
13,544
Reaction score
10,678
Location
Ct
Showcase(s):
1
Hardiness Zone
6b
Country
United States
I should have stressed not to stretch the rubber work out your wrinkles but do so without stretching
 
Joined
May 22, 2020
Messages
47
Reaction score
14
Country
United Kingdom
I should have stressed not to stretch the rubber work out your wrinkles but do so without stretching
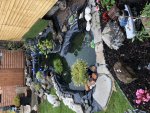
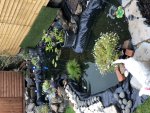
Well it’s done , I’m 90% happy with it . My biggest problem was I was joining an area of 75cm but the pond was 2 metres wide , hard to describe, just to say the pond is a figure 8 shape and the join was right in the middle of the 8 . Here are some photos
 

Attachments

  • C8EC80B8-052F-4374-A0B6-B09460921A45.jpeg
    C8EC80B8-052F-4374-A0B6-B09460921A45.jpeg
    88.2 KB · Views: 90
  • B66BD2CE-B845-4468-8B20-816ACF6C2C43.jpeg
    B66BD2CE-B845-4468-8B20-816ACF6C2C43.jpeg
    84.6 KB · Views: 114
  • 36B9BC8A-036E-49AF-B107-6DE410A86853.jpeg
    36B9BC8A-036E-49AF-B107-6DE410A86853.jpeg
    87.3 KB · Views: 93
Joined
May 22, 2020
Messages
47
Reaction score
14
Country
United Kingdom
I tried lifting the liner in the old part of the pond so I could join the new part but even with it semi drained I still couldn’t lift it high enough to get a straight line, it was more a semi circle joining a straight line, but hey no leaks the join on the LHS is not as high as I wanted, so the water height is limited .
 
Joined
Sep 7, 2021
Messages
1
Reaction score
0
Country
United States
Hi Frankie...We added on to our pond 22 years ago... We made it level with the existing pond
so that the fish would have an expanded swim area. After we dug the hole for the new pond,
we dropped the water in the existing pond about 18” this way the fish could stay in the water
while we were bonding the two liners together.
It’s hard to explain without pictures, but we attached the two lines only at a section that is
about 3 feet wide...

If you’re interested in how we did it, I’ll try and give you as much guidance as I can...
Also, think about making it level with the existing pond for extra room for the fish...

Please provide a pic of your pond, it would help in design ideas.
Hi I have a pond that is about 8 years old. The guy who built it cut the liner too small and the liner edge is close ti water line. I bought seam tape kit but wasnt sure how to do with the water in pond. I know I have to lower water level but wonder if you could suggest how to seam a seperate piece of liner along edge that is about 3 to 5 inches near water? It is pretty staight edge. I know i will have to use a board to work on. Any suggestions to make it go easier?
 

Jhn

Joined
Jul 3, 2017
Messages
2,215
Reaction score
2,262
Location
Maryland
Showcase(s):
1
Hardiness Zone
7b
Country
United States
@Pats pond you are better off starting your own thread for a question like this.

Anyhow, there is a stickier thread at the top of the pond construction forum by @GBBUDD on how to seam liners together. Step by step, with attached videos

Having just seamed two liners together this past spring myself,, you are going to need to lower the water level in your pond so it is much lower than 3-5 inches below your work area or unless you have a foot of extra liner above that area. You want to be able to clean the old liner using gasoline, to get it like new and you obviously don’t want that gas getting in the pond or getting the liner wet while you are seaming.
 
Joined
Dec 16, 2017
Messages
13,544
Reaction score
10,678
Location
Ct
Showcase(s):
1
Hardiness Zone
6b
Country
United States
I believe i left out of the sticky about trying to hold back water . Like @Jhn said you want the wstrr level lower then your work area but also be careful if you take out the soils behind the liner the weight a pteszire adds up very quickly and its very easy to get hurt trying to hold back thewater
 

Ask a Question

Want to reply to this thread or ask your own question?

You'll need to choose a username for the site, which only take a couple of moments. After that, you can post your question and our members will help you out.

Ask a Question

Members online

No members online now.

Forum statistics

Threads
30,924
Messages
510,109
Members
13,137
Latest member
Maria dyke

Latest Threads

Top