did you see my drawing of the dumb waiter? for getting rocks down into the pond? In short have fabric so long that it is say 4 feet on the grade surface pile some rocks on it leaving you a place to stand so now you have your weight and the extra of the rocks. the fabric continues into the pond where it can reach the bottom with a loop from the fabric as the rest of the fabric is coming up to your hands where you slowly lower the rocks down into the pond >>. your above the rocks not below. safe! and the fricktion of the fabric will slow the rocks decent. just make sure you don't have any sharp edges that might cut anything . wish i could find that drawingWow! That's looking great! I love the way you've got everything fitting neatly together. Looks solid!
You've inspired me to get out and get rocking tomorrow (assuming no lingering ill effects from today's dust storm). Here too, the summer weather is moving in, so best rock while the rocking is good! I've really been dreading moving all those heavy boulders, but I think I've come up with an idea for a slide to get them into the pond, from whence I can roll them from place to place as needed.
You are using an out of date browser. It may not display this or other websites correctly.
You should upgrade or use an alternative browser.
You should upgrade or use an alternative browser.
Here we go -- FINALLY! A pond for wildlife...
- Thread starter bagsmom
- Start date

- Joined
- Apr 22, 2021
- Messages
- 603
- Reaction score
- 727
- Location
- Tampa, FL
- Hardiness Zone
- 9b/10a
- Country

It's such a smart, safe solution. Thanks for sharing.Found it
YShahar
Enthusiastic duct-tape engineer

Brilliant! I was doing something a bit like this earlier today, but your idea of putting some rocks on the fabric to hold it down is perfect! I wish I'd seen this earlier, as it would have saved me some work.did you see my drawing of the dumb waiter? for getting rocks down into the pond? In short have fabric so long that it is say 4 feet on the grade surface pile some rocks on it leaving you a place to stand so now you have your weight and the extra of the rocks. the fabric continues into the pond where it can reach the bottom with a loop from the fabric as the rest of the fabric is coming up to your hands where you slowly lower the rocks down into the pond >>. your above the rocks not below. safe! and the fricktion of the fabric will slow the rocks decent. just make sure you don't have any sharp edges that might cut anything . wish i could find that drawing
SO SORRY .... i have not used that exact method myself for boulders but it's a cross of another project we had done in the past it worked for me then so thought it might help man handle boulders.
Hello there! I have finally been able to get out and start rocking the pond! As YShahar described her work - it is slow going. Lots of slowly getting the rocks to the pond - and then even more slowly thinking about how they can best be positioned. But it is happening.
Meanwhile, I have been thinking about the bog. There are so many options for plumbing and set-up -- from the very simple, like Addy1's, to a more complex centipede/snorkel arrangement, like the Aquascape folks use.
I will share some of my thoughts and y'all can weigh in.
The pond is intended for my entertainment (looking at goldfish and watching the wildlife who will come to drink.) The footprint is larger than my front yard pond. This one will be 30 (ish) long by 15 (ish) across - not counting the bog. The water volume won't be crazy. Half the pond will be pretty shallow (1 foot to 18" with a deeper end around 2 1/2 to 3 feet. There are many shelves for stability.
Water will be drawn into an intake bay. I have a 3000 gph pump in a pump vault (rated for up to 4000 gph) pulling through two large aqua blocks.
I do have a check valve on the pump but we are also going to install a "breather pipe" in the bog - suggested by Ozponds. It will allow a suction-breaker in case the check valve fails. It will also allow me to adjust the flow of water to the bottom of the bog and will let me play with movement on the surface of the bog.
The bog is 10 1/2 by 5 1/2 feet at the widest point. But it is sort of elliptical and also bowl shaped. (This is because I was digging with a shovel and pickaxe through caliche and there are large oak roots running through the area. This was all I could do without creating major problems.) It is a little over 2 feet deep.
Here is my dilemma: what shall I do with plumbing?
I know the magic of the filtration happens because of all the bacterial growth on the gravel. The more gravel, the more surface area for bacterial colonization. My bog is a fine size for the pond - but it isn't enormous. For this reason, I think the simplest method of just having the PVC with slots cut in it will allow for the greatest amount of gravel.
I have been considering a DIY version of the centipede and snorkel, using some 14" culvert pipe. But this would reduce the amount of gravel I can have. Is the settling space really needed? It mostly serves to allow sediment to fall to the bottom, right?
I was reading somewhere else on here - I forget who posted - that they have a clean out pipe on their more simple arrangement. They unscrew the cap on the top and put a piece of flexible PVC over the top to use like a directional nozzle. They spray the nasty black water on their garden till the water runs clear. That is intriguing. If the water is black, that says a periodic clean out is probably a good idea.
Sooooooo. More thinking. Depending on the plumbing and set up method, it seems like the slots in the pipe would go in different directions? Maybe?
If using a settling chamber, the slots probably face up?
If you are ever sticking a hose down in anywhere to try to sluice out the main pipe, would you want them facing down? Does hosing/sluicing out the pipe just shoot all that sediment and nastiness into the gravel?
If slots are on the bottom, and sediment falls right out to the bottom of the liner, isn't there potential for buildup and clogging of the slots?
Is there any benefit to having alternating slots on the sides? Rather than the top or bottom?
Even if I go with the simple PVC pipe, should I make some sort of clean out snorkel? Somewhere to drop a small submersible pump and suck out sludge? I do have the bottom with a subtle slope to encourage gunk to move down to one end.
I am trying to come up with sort of a happy medium to allow me the most gravel (and filtration) space - but I also want to think this through and do the best thing. It is easier to do it correctly now rather than undo it and start over a few years later.
Again - the bog size is what it is - no room to enlarge.
Help me decide what to do!
In the meantime, I will go out and play with my rocks! Thanks, gang!
we don't call them breathers in the U.S we call them Vacuum Breakers. IF WE ARE TALKING THE SAME ANIMAL i don't visit oz ponds. It's a reverse check valve. check valves have a spring tha shuts a flap once the power goes out thus blocking most flow to back flowing . but they also need head pressure pushing down on it to keep it tight. a vacuum breaker is held closed when the water is being pumped. Once the power goes out the flap springs open letting in air thus breaking the back syphon .going to install a "breather pipe" in the bog
- Joined
- Sep 18, 2020
- Messages
- 3,434
- Reaction score
- 3,771
- Location
- Pacific NW
- Hardiness Zone
- 8b
- Country
Here is my dilemma: what shall I do with plumbing?
I think you can probably do anything you want and it'll work pretty well!
As for the standpipes pipes on a pvc bog, I think it's @poconojoe that talks about his setup with that a lot. Seems useful for cleaning sludge that develops in the pipes, but wouldn't do anything for sludge in the gravel. You'd also have to use the manifold design an put a stand pipe on each leg of piping. Water will flow more evenly through the distribution piping if all the legs are connected, but then I'm not sure how you'd make use of the standpipe design as water will just go where it isn't blocked.
As for cleaning/clearing the gravel, I think it's moot if you're going all pea gravel. The stuff is too dense to let much through it after you get more than a foot deep or so, I think. So I think backwashing would be a lost cause.
In any case, I (obviously) like the settling chamber design as it gives you the best chance to keep the bog running indefinitely. If I did an all pea gravel bog, I'd probably make it only 12" deep because, if it were to clog, digging up 12" of pea gravel is pretty easy work.
All that said, I think we've seen over and over that it really doesn't matter. So many different depths/sizes/designs, and they all seem to work.
- Joined
- Apr 22, 2021
- Messages
- 603
- Reaction score
- 727
- Location
- Tampa, FL
- Hardiness Zone
- 9b/10a
- Country
HI, @bagsmom . I'm not sure it was me who posted about a bog clean-out pipe, or how much detail I'd posted about my bog set up which I put in at the end of last summer. It's 12" deep, slits up PVC, pea gravel, and a cleanout pipe with a screw on/off top and a screw on flex hose to direct water to the garden. The grubby water that exits isn't grubby for long, but I run it a bit longer since the garden likes the water. Because I have a lot of plants with leaves, I also occasionally siphon grubby water off the top 3" of the pond - I just shove some gravel to the side, put in the siphon hose and get any upper stuff out.I was reading somewhere else on here - I forget who posted - that they have a clean out pipe on their more simple arrangement. They unscrew the cap on the top and put a piece of flexible PVC over the top to use like a directional nozzle. They spray the nasty black water on their garden till the water runs clear. That is intriguing. If the water is black, that says a periodic clean out is probably a good idea.
Sooooooo. More thinking. Depending on the plumbing and set up method, it seems like the slots in the pipe would go in different directions? Maybe?
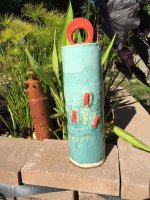
(To cover the PVC cleanout pipe, I made a ceramic cover that is simply decor-fun, not functional.)
Attachments
Thanks everyone! @combatwombat - I am planning to do graduated sizes of rock in the bog. A layer of large cobbles, then smaller cobbles, then egg rock, then gravel (not quite pea gravel - somewhere between pea size and grape size.) I am hoping that works well since the Aquascape folks do it that way.
@SarahT - I like your decorative cover!
@poconojoe - is it you who talked about your bog standpipe - and using it to shoot out the dirty water onto the garden? Could you share some details and pictures if so?
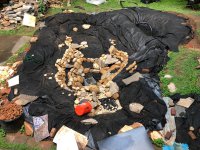
I got out today and worked 5 hours. I had to pump out about a foot of rain water in the deep end. Then I undid the overlay, liner and underlay pieces between the bog and pond. I lowered and widened my spillway notches and started to replace the layers as GBBUDD suggested (with the two pieces of liner touching) and then -- it happened again. While I had everything peeled back, I started looking at the shape of the pond and allllll that excess liner! Before I knew what was happening, I was carving out the pond excavation again - for a little more water volume. Then I put everything back together and did a bit of rocking. The hot sun chased me in around 1:45.
Now I need to watch some waterfall videos.
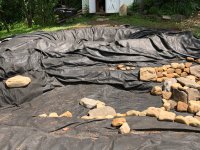
I know I am not going to get anything that looks completely natural. I would need enormous rocks for that and heavy equipment to move them. Not gonna happen. I would like to try for something that looks kind of natural, though. I have some big fieldstone slabs that I can hopefully put upright, leaning back onto the bog wall. That will hopefully give the illusion of big rocks. I will need help moving them, though -- and I feel like we will need access to get up close. This means not rocking from the bottom up. I know it's no good to see rocks just stacked one on top of the other. It is better to put rocks in front of others to hide the line of stacking. So it seems like it will be a top-down kind of job? I am having a time wrapping my brain around the process.
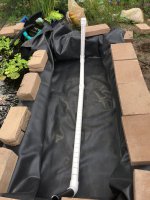
I also have a ton of rock on a roll that I can use. I am thinking perhaps along the high side? (Near the black flex PVC pipe - along the side where it runs between the intake bay and bog.) If I stack rocks up to that point, it will probably look weird. I was thinking some rock on a roll as a background would work with some other rocks placed here and there.
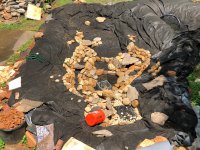
Here are a few pix from today.
The last picture shows the spillway and wall between the bog and pond. It is the area scrambling my brain right now. If I was The Hulk, I wouldn't worry so much about the process. But I have to be strategic so I can maneuver those big rocks. (Excuse the big wrinkles. The wind got a hold of the overlay.)
@SarahT - I like your decorative cover!
@poconojoe - is it you who talked about your bog standpipe - and using it to shoot out the dirty water onto the garden? Could you share some details and pictures if so?
I got out today and worked 5 hours. I had to pump out about a foot of rain water in the deep end. Then I undid the overlay, liner and underlay pieces between the bog and pond. I lowered and widened my spillway notches and started to replace the layers as GBBUDD suggested (with the two pieces of liner touching) and then -- it happened again. While I had everything peeled back, I started looking at the shape of the pond and allllll that excess liner! Before I knew what was happening, I was carving out the pond excavation again - for a little more water volume. Then I put everything back together and did a bit of rocking. The hot sun chased me in around 1:45.
Now I need to watch some waterfall videos.
I know I am not going to get anything that looks completely natural. I would need enormous rocks for that and heavy equipment to move them. Not gonna happen. I would like to try for something that looks kind of natural, though. I have some big fieldstone slabs that I can hopefully put upright, leaning back onto the bog wall. That will hopefully give the illusion of big rocks. I will need help moving them, though -- and I feel like we will need access to get up close. This means not rocking from the bottom up. I know it's no good to see rocks just stacked one on top of the other. It is better to put rocks in front of others to hide the line of stacking. So it seems like it will be a top-down kind of job? I am having a time wrapping my brain around the process.
I also have a ton of rock on a roll that I can use. I am thinking perhaps along the high side? (Near the black flex PVC pipe - along the side where it runs between the intake bay and bog.) If I stack rocks up to that point, it will probably look weird. I was thinking some rock on a roll as a background would work with some other rocks placed here and there.
Here are a few pix from today.
The last picture shows the spillway and wall between the bog and pond. It is the area scrambling my brain right now. If I was The Hulk, I wouldn't worry so much about the process. But I have to be strategic so I can maneuver those big rocks. (Excuse the big wrinkles. The wind got a hold of the overlay.)
Attachments
YShahar
Enthusiastic duct-tape engineer
It's looking great, and really professional!
Cool how we're working almost in parallel here. Move rocks, watch waterfall videos, move rocks...
Regarding leaning the slabs against the wall, it's something you see a lot in Japanese ponds. They use the same type of rocks as are used for stepping stones -- fieldstones that are wider than they are tall, and simply stand them on edge and backfill with gravel. It's a technique I'm using as well, simply because almost all my rocks are shaped like that. Once the shelves behind them are backfilled with gravel, I'm hoping they'll look more natural. But yeah, same problem here with moving the heavier ones. I'm currently working on the waterfall...Version 6.2, having already built it and revised it numerous times. Since those are heavier rocks than I can lift, I'm putting underlayment down and rolling them end over end to get them where I want them. Laborious process!
I would love to be able to get some rock-on-a-roll. I've got a cousin coming to visit me in a week, and I wish I'd thought to have a sheet of it sent to her ahead of time. Probably no time now, alas.
Keep the photos coming!
If we were neighbors, we could take coffee breaks and talk about how tired we are!It's looking great, and really professional!
Cool how we're working almost in parallel here. Move rocks, watch waterfall videos, move rocks...
Regarding leaning the slabs against the wall, it's something you see a lot in Japanese ponds. They use the same type of rocks as are used for stepping stones -- fieldstones that are wider than they are tall, and simply stand them on edge and backfill with gravel. It's a technique I'm using as well, simply because almost all my rocks are shaped like that. Once the shelves behind them are backfilled with gravel, I'm hoping they'll look more natural. But yeah, same problem here with moving the heavier ones. I'm currently working on the waterfall...Version 6.2, having already built it and revised it numerous times. Since those are heavier rocks than I can lift, I'm putting underlayment down and rolling them end over end to get them where I want them. Laborious process!
I would love to be able to get some rock-on-a-roll. I've got a cousin coming to visit me in a week, and I wish I'd thought to have a sheet of it sent to her ahead of time. Probably no time now, alas.
Keep the photos coming!

Thank you for the encouragement. Yours is looking fantastic and I am so impressed with the size of rocks you are maneuvering!
I'm a little intimidated by the rock on a roll. If I decide to use it somewhere, it has to go down first so it is behind rocks. Pond building is definitely a mental exercise - lots of thinking ahead and strategic planning!
Ask a Question
Want to reply to this thread or ask your own question?
You'll need to choose a username for the site, which only take a couple of moments. After that, you can post your question and our members will help you out.
Similar Threads
Forum statistics
Latest Threads
-
Cleanout pipe in the bog
- Started by sherry
-
Red Squirrel at the stream
- Started by RobAmy
-
New here from northern Utah, USA
- Started by bluefrog
-
DIY pump vault?
- Started by bluefrog
-
Lotus essentials
- Started by Hound Heaven
-
Ideas needed to hide this liner
- Started by toeknee
-
Securing EPDM Liner to Top of Block Wall
- Started by TurtTown
-
Plants
- Started by stonehouse
-
Shelter for frogs sunning themselves on edge of pond?
- Started by jay moussy