For the record anyone reading this, adding dirt, clay, sand to a concrete or mortar mix can seriously alter the concretes strength and stability. If it is in any structural Don't do it.
You are using an out of date browser. It may not display this or other websites correctly.
You should upgrade or use an alternative browser.
You should upgrade or use an alternative browser.
Here we go -- FINALLY! A pond for wildlife...
- Thread starter bagsmom
- Start date
Yes. For sure! I mostly needed a little "glue" to keep things in place long enough for me to get my liner and components all situated. And the bricks I added are just for a little bit of extra height at the top of the weir. It all seems to be pretty solid as of now. Once the aqua blocks and liner are in there, the water is going to be enough to keep things in place. For anything truly structural, I would have used retaining wall blocks or some other stronger, more secure method of building!For the record anyone reading this, adding dirt, clay, sand to a concrete or mortar mix can seriously alter the concretes strength and stability. If it is in any structural Don't do it.
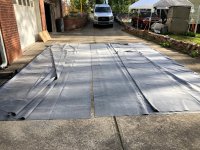
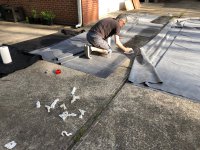
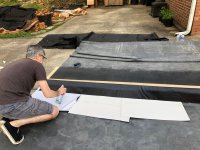
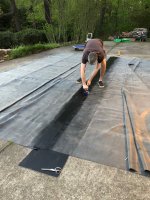
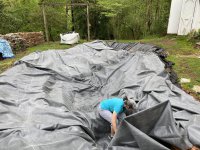
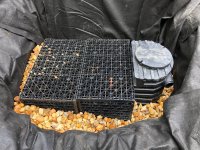
Adventures in Pondbuilding: Seaming the liner! Husband left work a bit early and got home at 6. I had everything ready and we started working at 6:15. I expressed skepticism that we would finish and was fairly certain we would NOT get the liner placed in the pond the same night. Husband was aghast at my pessimism. I guessed the seaming would take 3 hours. He guessed 1. After cleaning - and cleaning - and cleaning, we did some more cleaning.  That probably took the longest. We liked the way the spray primer worked, by the way. (The third picture shows how we masked off the rest of the area with poster board.) The actual work with the tape went well, thanks to the tips from our own GBBUDD and all the pro videos. It started to get dark (and we were really hungry) by 8:15, so we stopped. I don't know if we will caulk it this evening or wait till tomorrow. So - some progress happened. YAY! We seamed along the 20 foot ends of two pieces of liner. I now have a very heavy liner measuring 20 x 40.
That probably took the longest. We liked the way the spray primer worked, by the way. (The third picture shows how we masked off the rest of the area with poster board.) The actual work with the tape went well, thanks to the tips from our own GBBUDD and all the pro videos. It started to get dark (and we were really hungry) by 8:15, so we stopped. I don't know if we will caulk it this evening or wait till tomorrow. So - some progress happened. YAY! We seamed along the 20 foot ends of two pieces of liner. I now have a very heavy liner measuring 20 x 40.Attachments
Last edited:
Slow but steady wins the race!
- Joined
- Nov 16, 2019
- Messages
- 1,228
- Reaction score
- 1,227
- Location
- sarasota, fl
- Hardiness Zone
- 10a
- Country

My back hurts looking at the photos!Slow but steady wins the race!
j.w
I Love my Goldies
- Joined
- Feb 1, 2010
- Messages
- 34,117
- Reaction score
- 21,010
- Location
- Arlington, Washington
- Showcase(s):
- 1
- Hardiness Zone
- USDA 8a
- Country
You are getting there!
I think this weekend, we will get the liner in while our college aged son is home. None of us is very strong. But we have a flatbed cart that holds a lot of weight. (We used it to move the larger liner piece out of the garage.). If we get it all folded lengthwise and then strategically accordion fold the middle area, I think husband and I can be on each end and son can roll the middle part on the cart -- just to get it at the side of the excavation. I'm going out to clean up the surrounding area because I know there will have to be some careful sliding and dragging.
You don't have to be as strong when you're real smart. See, like me, I was SMART enough to have THREE sons!
People! We have a liner in the pond!!!!!!!
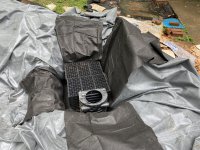
Yayyyyyyyy! I even got the overlay on and put the aqua blocks and pump vault in the intake bay. I started putting some egg rock around the edges to hold it in place but I had to stop. I was exhausted. But I think today was a turning point and major progress was made. Monday afternoon, I will backfill behind the intake bay so I can take those boards out and make my berm and shelf around that edge. After that, it will be time to start rocking!!!!!
Yayyyyyyyy! I even got the overlay on and put the aqua blocks and pump vault in the intake bay. I started putting some egg rock around the edges to hold it in place but I had to stop. I was exhausted. But I think today was a turning point and major progress was made. Monday afternoon, I will backfill behind the intake bay so I can take those boards out and make my berm and shelf around that edge. After that, it will be time to start rocking!!!!!
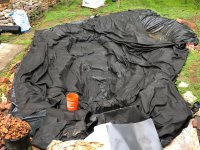
Just a few pictures - not great pictures - but enough to show we got the liner and overlay in! Today I will go around and adjust and smooth and fold, etc. I will also finish filling the intake bay with egg rock and backfill behind it all with dirt. (We are going to lengthen the opening to the pump vault with a collar of 12" culvert pipe. It fits perfectly. (Any ideas on how to attach it? Some kind of fish-safe adhesive?) If I get that done today, I can begin some fun rocking tomorrow!
I am thinking about making the most of the extra liner at the back end by the swing -- just enlarging the footprint a bit. But I am going to wait and see how much liner I actually have when I get up to that point.
FYI - the bog will have its own separate liner that I will overlap into the main pond.
I'm very excited!
Attachments
- Joined
- Jun 23, 2010
- Messages
- 45,140
- Reaction score
- 30,224
- Location
- Frederick, Maryland
- Showcase(s):
- 1
- Hardiness Zone
- 6b
- Country
Way to go!
- Joined
- Sep 18, 2020
- Messages
- 3,435
- Reaction score
- 3,771
- Location
- Pacific NW
- Hardiness Zone
- 8b
- Country
I have no idea how I missed all this. So many notifications to keep up with. haha. Way to go! Looks great.
Remind me, again, why you bought two separate liners to seam? I thought you said it was because one liner would be too heavy, but it looks like you ended up with one liner outside the pond that had to be transported anyway? Or was it a shipping cost thing?
Anyway, re: the pump vault extension. Good idea with the culvert. Probably don't need to attach it at all. Just place it over the vault opening and backfill around it with your gravel. Should lock it in place pretty well. Is the vault made of HDPE? Do you know? I would imagine it is. If so, those culverts are typically HDPE and you could pretty easily heat weld them together with a strip of the stuff cut off of the culvert + a heat gun with a concentrating attachment.
j.w
I Love my Goldies
- Joined
- Feb 1, 2010
- Messages
- 34,117
- Reaction score
- 21,010
- Location
- Arlington, Washington
- Showcase(s):
- 1
- Hardiness Zone
- USDA 8a
- Country
Yahoo, you are really on your way!
@combatwombat -- it was a matter of cost and maneuverability. The two individual pieces of liner could be shipped via regular UPS. I ordered as big as I could go without incurring the special trucking/freight fee. The size and weight of the big one would have to be sent on a special truck, which cost more - AND there was a separate lift gate fee. Also, they would not bring it out to the back yard. We would have had to hire a forklift or something to get it up from the street. It ended up being a total price difference of over five hundred dollars, if I remember right.
The two individual pieces were driven up the driveway in the regular truck and the one burly dude hand-trucked them right to the door.
We had to do some strategizing to move it once it was seamed. But we were able to move the two separate pieces and seam them right next to the pond. It wasn't easy - but it was do-able. We couldn't have handled the single big one.
Ask a Question
Want to reply to this thread or ask your own question?
You'll need to choose a username for the site, which only take a couple of moments. After that, you can post your question and our members will help you out.
Similar Threads
Forum statistics
Latest Threads
-
Cleanout pipe in the bog
- Started by sherry
-
Red Squirrel at the stream
- Started by RobAmy
-
New here from northern Utah, USA
- Started by bluefrog
-
DIY pump vault?
- Started by bluefrog
-
Lotus essentials
- Started by Hound Heaven
-
Ideas needed to hide this liner
- Started by toeknee
-
Securing EPDM Liner to Top of Block Wall
- Started by TurtTown
-
Plants
- Started by stonehouse
-
Shelter for frogs sunning themselves on edge of pond?
- Started by jay moussy