i had never used the spray primer nor have i seen it used. So i checked firestones web site and they have a spray primer so it's the latest's hopefully the greatestI have a spray primer. I got it from Webb's. I hope it works OK.
I do have all the tape - double sided and also the wide cover tape. The PL caulk stuff is on the way!
You are using an out of date browser. It may not display this or other websites correctly.
You should upgrade or use an alternative browser.
You should upgrade or use an alternative browser.
Here we go -- FINALLY! A pond for wildlife...
- Thread starter bagsmom
- Start date
i just removed the bog and i found plant roots had grown into and through the caulking i had used on the seams . so i'm glad i had those as protection to the actual seam its selfNo - this is a seam for the main body of the pond. It will probably run horizontally across one of the shallow zones. The liner coming from the bog into the pond will just overlap.
- Joined
- Nov 16, 2019
- Messages
- 1,228
- Reaction score
- 1,227
- Location
- sarasota, fl
- Hardiness Zone
- 10a
- Country

Don't I know it...My pond installer put in the auto dosing system with the "maintain" option saying that he puts them in all of his ponds and that I would love it...I unplugged it a couple of days ago because I hardly had any algae in the pond at all and all of these little tadpoles that need it to survive..Now I am getting a nice carpet of algae on the rocks for them to eat100% agree with that. I remind myself that when I see them selling algaecide or their auto dosing systems. If customers want it and they don't sell it they will just go buy it somewhere else.
") I tried to find out if anyone else noticed this problem (most would probably welcome no algae but that is just not natural for a wildlife habitat...) but I could not find anyone else who was troubled by this.....
I tried to find out if anyone else noticed this problem (most would probably welcome no algae but that is just not natural for a wildlife habitat...) but I could not find anyone else who was troubled by this.....- Joined
- Nov 16, 2019
- Messages
- 1,228
- Reaction score
- 1,227
- Location
- sarasota, fl
- Hardiness Zone
- 10a
- Country
No, I am the queen of overthinking! LOL@Lisak1 - overthinking - I am the QUEEN of overthinking! I mentioned before that I really love Aquascape - truly - but they are a business and part of that business is selling products, including concrete cloth. Not that I think they would ever be misleading - they are a company with a lot of integrity. But maybe chipmunks aren't quite the big threat to the liner that I'm thinking they are.
We did buy a bag of crack-resistant Quikrete yesterday. We are going to play around with it and experiment. Even if I just smear a thick coating under the waterfall area, that might be worth doing. I will take pictures and share the fun!
Thanks to all of you for the brainstorming!
No - just a lack of knowledge and insufficient research on my part. In my head, EPDM was still the "gold standard" and I didn't even question it. I should have! (I still don't know what RPE is but I will go look!)Looking good @bagsmom. Enjoying watching the progress ramp up.
A couple thoughts if you’re open to them:
1. Might be better to slope your bottoms just a bit rather than make them perfectly flat. Will make draining/cleaning if necessary much easier as you can stick your pump in the one low spot. Applies to the pond and the intake.
2. It’s easier to form a liner to curves than sharp corners, so I would round off square areas if you can. If not, and you don’t love the look of the square edges, rocks will round them off when you add them, like you noted.
Also curious why you chose to seam 2 EPDM liners vs using a lighter material like RPE. Was that a consideration?
Bottoms are actually sloped a tiny bit. I made a slope on the bottom of the front yard pond and it is a little too extreme. When I get in to clean, it is dangerous. I go slip sliding away!
I was thinking about the whole corner thing, too. I am sure getting the liner in the very square intake bay is going to be a booger!
combatwombat -- I know there is some good-natured teasing about you taking a long time and sort of making more work for yourself. I GET IT!!!!!! I keep seeing things I could do differently. Some are just preference but some are very practical and I'd rather do it right - much easier to do now, rather than trying to undo and redo!
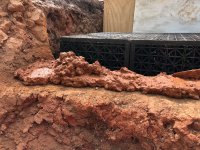
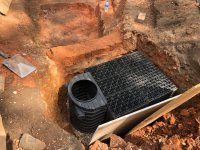
After I took care of the intake bay avalanche, I put gravel in the bottom and tamped and leveled it. This raised up my aquablox a bit too much. They were higher than the weir wall. I know I could try to just put thick rocks on top of the wall when I am rocking. But I don't think the pull of water would be as efficient as if it was flowing just over the top.
So - I made like an Egyptian and made up some concrete/mortar. I figured if the hippies on the Discovery Channel can make mud houses, I can do a homemade mix and fix on my wall. We will see how it works. I'm optimistic.
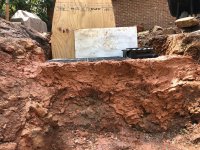
I mixed some of the crack resistant Quikrete we bought with some of the nice, orange red clay I dug out of the pond. There was an area where the clay was gorgeous - like an artist would use to throw a pot. Very smooth and pure and elastic consistency. I mixed it up with the Quikrete and added water. I used it to stick in about ten bricks on top of the weir wall. That should give the height I want. I will put the liner and underlay, etc. right over this. I think it will work! We will see.
I didn't get a picture of the unmortared bricks, but I think you can see the bricks in the third picture. Honestly, the clay mortar is just something to hold them in place till the pond is done and water is in. I think once everything is rocked and it is filled, it will hold up even better.
After I took care of the intake bay avalanche, I put gravel in the bottom and tamped and leveled it. This raised up my aquablox a bit too much. They were higher than the weir wall. I know I could try to just put thick rocks on top of the wall when I am rocking. But I don't think the pull of water would be as efficient as if it was flowing just over the top.
So - I made like an Egyptian and made up some concrete/mortar. I figured if the hippies on the Discovery Channel can make mud houses, I can do a homemade mix and fix on my wall. We will see how it works. I'm optimistic.
I mixed some of the crack resistant Quikrete we bought with some of the nice, orange red clay I dug out of the pond. There was an area where the clay was gorgeous - like an artist would use to throw a pot. Very smooth and pure and elastic consistency. I mixed it up with the Quikrete and added water. I used it to stick in about ten bricks on top of the weir wall. That should give the height I want. I will put the liner and underlay, etc. right over this. I think it will work! We will see.
I didn't get a picture of the unmortared bricks, but I think you can see the bricks in the third picture. Honestly, the clay mortar is just something to hold them in place till the pond is done and water is in. I think once everything is rocked and it is filled, it will hold up even better.
Attachments

YShahar
Enthusiastic duct-tape engineer

Thank you! Well - soil is a word I use loosely down here. It is really 80% sandstone/hard clay deposits that you have to chisel and pry out. There are a few areas of very solid, nice orange clay. I used a lot of that to blop on top of the jagged stuff, in an effort to smooth it out. It is horrible to work with but on the plus side, it is SOLID!
Oh wow, so what you're working with is similar to what I've been dealing with here. Ours is caliche, which is basically a naturally occurring form of cement when dry. I've found that when it's waterlogged, I can actually pry holes in it with the pickaxe without too much effort (other than lifting the pickaxe over my head and letting gravity do the work). But it doesn't hold a shelf at all, so I've had to do without contours for the most part. Closer to the top, there's a good bit of black organic soil, which has the consistency of clumpy clay when wet (and more or less like rock when dry). That stuff can be shaped into ledges a bit more easily.
Your design looks great! Can't wait to see how it looks all lined and rocked in!
- Joined
- Sep 18, 2020
- Messages
- 3,435
- Reaction score
- 3,771
- Location
- Pacific NW
- Hardiness Zone
- 8b
- Country
Good idea. Keeping the edge of the liner @ the weir above the blocks will definitely eliminate loss of concentrated suction over it. I see some of the Aquascape pros building their weirs entirely over the liner for simplicity and foaming them in. Also seems to work well. I think your way is better, albeit harder to adjust in the future if necessary.
YShahar
Enthusiastic duct-tape engineer
I mixed some of the crack resistant Quikrete we bought with some of the nice, orange red clay I dug out of the pond. There was an area where the clay was gorgeous - like an artist would use to throw a pot. Very smooth and pure and elastic consistency. I mixed it up with the Quikrete and added water. I used it to stick in about ten bricks on top of the weir wall. That should give the height I want. I will put the liner and underlay, etc. right over this. I think it will work!
Now that is cool! Looks pretty solid to me, but the real test will be when you put the liner over it. Given that it will have more or less the same pressure from both sides, it should hold up. I had a similar issue, but in my case, I left the edge low to make it easier to fit the liner (it's 60 mil and much harder to fold than the 45 mil stuff). Then I put in an offcut of liner as a bib liner extending over the milk crates (alternative to aquablocks), and put a concrete paver topped with rocks on top of it to raise the level of the weir. This means I can adjust the height by taking off or adding more rocks, just in case I need a water level adjustment later on. Your solution is more elegant!
OK - this old woman is beat! I am going to make the sensible decision to NOT try to seam liner tonight after the hubby gets off work. I think it is smarter to do a job like this when we are less tired! It is going to rain Wednesday night and Thursday morning. Maybe we will seam liner Thursday afternoon? Stay tuned! Thanks to everyone for all the encouragement and advice - both are very appreciated!
Yes - we have the same stuff here! Isn't it horrible?Oh wow, so what you're working with is similar to what I've been dealing with here. Ours is caliche, which is basically a naturally occurring form of cement when dry. I've found that when it's waterlogged, I can actually pry holes in it with the pickaxe without too much effort (other than lifting the pickaxe over my head and letting gravity do the work). But it doesn't hold a shelf at all, so I've had to do without contours for the most part. Closer to the top, there's a good bit of black organic soil, which has the consistency of clumpy clay when wet (and more or less like rock when dry). That stuff can be shaped into ledges a bit more easily.
Your design looks great! Can't wait to see how it looks all lined and rocked in!
I feel like I should be some kind of supermodel from all the manual labor - but I'm still waiting on that! It's more likely that one morning I will wake up looking like the AARP version of a mole woman.
- Joined
- Jun 23, 2010
- Messages
- 45,140
- Reaction score
- 30,224
- Location
- Frederick, Maryland
- Showcase(s):
- 1
- Hardiness Zone
- 6b
- Country
Looking so good! Get that liner seamed perfectly!
2nd need to angle the walls although if you are rocking the pond and you only are using small watermellon sized rocks you may want those walls agled and not straight
how deep will the inlet be the lesser the depth the better the surface pull. i imagine you added the clay for color. FOR FUTURE reference if you add some Portland cement along with it the Portland will make up for the dilution the clay cause to the concrete. but i have done the same when bright white concrete was not desired . they also have a dust / and a dye you can use and that is permanent color. You called it over thinking i call it thinking outside the boxthey were higher than the weir wall. I know I could try to just put thick rocks on top of the wall when I am rocking. But I don't think the pull of water would be as efficient as if it was flowing just over the top.
You know - now that you mention it, I have NO IDEA why I added the clay. I was really hot out there in the sun and it seemed to make sense at the time!2nd need to angle the walls although if you are rocking the pond and you only are using small watermellon sized rocks you may want those walls agled and not straight
how deep will the inlet be the lesser the depth the better the surface pull. i imagine you added the clay for color. FOR FUTURE reference if you add some Portland cement along with it the Portland will make up for the dilution the clay cause to the concrete. but i have done the same when bright white concrete was not desired . they also have a dust / and a dye you can use and that is permanent color. You called it over thinking i call it thinking outside the box
I might have been thinking that it might work well to have clay in the mix, since I was putting it on top of the clay soil. We will see if it works!Ask a Question
Want to reply to this thread or ask your own question?
You'll need to choose a username for the site, which only take a couple of moments. After that, you can post your question and our members will help you out.
Similar Threads
Forum statistics
Latest Threads
-
Cleanout pipe in the bog
- Started by sherry
-
Red Squirrel at the stream
- Started by RobAmy
-
New here from northern Utah, USA
- Started by bluefrog
-
DIY pump vault?
- Started by bluefrog
-
Lotus essentials
- Started by Hound Heaven
-
Ideas needed to hide this liner
- Started by toeknee
-
Securing EPDM Liner to Top of Block Wall
- Started by TurtTown
-
Plants
- Started by stonehouse
-
Shelter for frogs sunning themselves on edge of pond?
- Started by jay moussy