My basement pond project

Joined
Mar 13, 2009
Messages
245
Reaction score
1
Location
Markham, Ontario
I watched this guy on youtube on how he folded his turtle pond liner. He called it the V fold. The place I bought the liner from said the same thing. It's hard to explain and I actually had to test it out with a paper towel and small rectangular box to see what was going on. What needs to be done is take the liner on the left side, pull the liner nice and flat until you get to the corner. Now that you found the corner on the left side, do the same thing on the right making sure that the left side is still nice and taught. Once that's done, fold the extra into a V and bring it up to one side of the wall. It's a little tricky at first but it's pretty straight forward.


What I used was pond tape. I didn't take any close ups of it. Basically, the dude sold me 8ft of this stuff and some glue he poured for me into a vitamin bottle (smells like plastic model cement). It's pretty $$$ stuff. I think it was $4 a foot. Instructions and decent pics from his site (it's right at the bottom):

http://www.clarkekoi.com/Liners.htm
 
Joined
Mar 13, 2009
Messages
245
Reaction score
1
Location
Markham, Ontario
Dammit! I wrote something up and I lost it (thought I hit send but didn't).

Anyway, going to make is short as opposed to long. I want to get some zzzzzzzz....

I saw a video on youtube for an indoor turtle pond. He called it a V fold. The dude that sold me the liner said the same thing. Basically make liner nice and taught on left side all the way to the corner, then go and do the same thing on the right side (making sure it's still nice and taught on the left side). Once both sides done, fold the liner up nicely and bring it to one side of the wall. It's pretty tricky at first.

The liner he used looks so crispy... Must be even harder for him.


I used pond tape (I think it's same type of tape for patching leaks) and glue to keep it in place. No close ups or application pics. But go here for detailed instructions (starting at the bottom of this page). His website is pretty good. I bought liner and the tape from him. http://www.clarkekoi.com/Liners.html

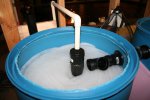
My big ass air pump arrived today (Pondmaster AP-60). Wow, this thing can pump air! I almost bought a Coral life Luft pump instead. glad I didn't... Even though no fish, pond still looks cool with bubbles. Gosh, my koi are going to look like baby guppies in this pond!

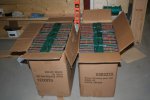
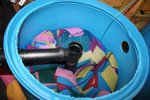
Bought 100 bags of scrubbies (15 per bag). Soaking them up now in garbage bins.
 
Joined
Mar 13, 2009
Messages
245
Reaction score
1
Location
Markham, Ontario
Pics are pretty much self explanatory.

1st barrel is mechanical filtration, 2nd and 3rd are full of scrubby pads. A friend gave me a big bag of poly filter equivalent years ago. I thought I would have a life time supply for my reef tank. But I don't even toss that stuff out in my reef tank. In the last two years. I just clean it and put it back in and I'd only washed it once. I forgot what this stuff was really meant for. He got it from work and it ain't fish related. I saved 4-5ft of this stuff for my reef tank and stuffed the rest into the barrel.

2 boxes of scrubby pads (50 bags per box, 12 per bag).
 

Attachments

  • pond11.jpg
    pond11.jpg
    68.7 KB · Views: 449
  • pond12.jpg
    pond12.jpg
    73.3 KB · Views: 482
  • pond13.jpg
    pond13.jpg
    58.8 KB · Views: 436
  • pond14.jpg
    pond14.jpg
    84.5 KB · Views: 416
  • pond15.jpg
    pond15.jpg
    70.8 KB · Views: 417
Joined
Mar 13, 2009
Messages
245
Reaction score
1
Location
Markham, Ontario
More pics...

Waiting for my other bulkheads to arrive (tomorrow) and I'll hook up the rest...
 

Attachments

  • pond16.jpg
    pond16.jpg
    103.5 KB · Views: 464
  • pond17.jpg
    pond17.jpg
    63.9 KB · Views: 450
  • pond18.jpg
    pond18.jpg
    63.6 KB · Views: 440
  • pond19.jpg
    pond19.jpg
    76.3 KB · Views: 409
Joined
Mar 13, 2009
Messages
245
Reaction score
1
Location
Markham, Ontario
I have a 4th barrel ready to be hooked up anytime and I guess this one will be a true skippy filter with no mechanical filtration before it. It'll be all by itself hiding in the corner (opposite of white basement sink in last pic). Dump system is in place for that. Essentially, all I need is another pump, scrubby pads and it's good to go.

I don't think i need it anytime soon. When water parameters show signs of weakness, I'll add it. I plan to grow my koi. But you'll know.
 
Joined
Nov 23, 2008
Messages
685
Reaction score
1
Location
Garden Grove, CA
you could fill the space where the "shelves" are with more insulation...just an idea...your construction design is interesting...do you have a problem with flexing of the boards
 
Joined
Mar 13, 2009
Messages
245
Reaction score
1
Location
Markham, Ontario
I'm done with insulation for now. I don't plan to heat it any time soon. The "shelves" are pretty useful. I don't think I'll cover it up, maybe paint instead.

Long side: 2x6 on bottom and 2nd one from bottom are bowing about 1/2" in the middle. Top half has no noticeable bow. 8ft sides have no visual bow from top to bottom.

I borrowed this guy's idea to build pond: http://www.backyardpuddle.com/diy/
 
Joined
Mar 13, 2009
Messages
245
Reaction score
1
Location
Markham, Ontario
For now, no more insulation since I don't plan to heat the pond. I like the shelves. I'll just paint it in the future instead of covering it up. Very handy right now during construction period too! 8ft sides shows zero flexing. 11ft side, bottom 2x6 bowing about 1/2", same with 2nd frame from the bottom. Top two sections, unnoticeable.

I installed the last 3 bulkheads to the 2nd and 3rd barrels. Total of 8 bulkheads used. Leak free on all except for 1. Fortunately, it's at the top. What a pain. I don't think the area behind the inside wall is completely smooth. It's a little bit bumpy. I tightened the nut VERY hard but the nut is fighting me. It's hard to break that initial resistance. I ended up using aquarium silicone to seal the inside. Then I read people use 3M 5200 sealant instead on these blue barrels. They say silicone doesn't bond that well to it. It looks like it bonds strong enough for now and fortunately, it's at the top so it's not under pressure. I siliconed the rest of the top bulkheads just in case. Should be leak free now for years.
 
Joined
Mar 13, 2009
Messages
245
Reaction score
1
Location
Markham, Ontario
So far, in this build... Mistakes made were:

Cut bottom drain hole on wrong side of barrel (hole is off set). Thankfully, no harm done. This barrel can be used for additional filter.

Used elbow pipe instead of t-pipe for draining system. Forgot that t-pipe is needed for future barrel in different location. Solution, cut pipe. lol

When building wood frame, cut 2x6 down to 7ft for the sides. In reality, I wanted 8ft. Got inside dimensions and out dimensions mix up. Wasted 1 hour b/c I assembled 2 of the 4 frames already. Wasted no 2x6s. Later used for corner bracing.

Used 3 different types of glue - make sure to double check on glue before using. ABS, ABS to PVC, and PVC. Used ABS to PVC for PVC and wondered why I could still twist pipe after 10 seconds. Ooops, but fortunately, I think that's ok. Wear carbon respirator as much as possible. I glued lots and lots of pipe. I still got a little high.

Other misc mistakes were made but not worth mentioning.
 

DrCase

Moderator
Moderator
Joined
Dec 29, 2007
Messages
4,400
Reaction score
789
Location
Arkansas
Hardiness Zone
7a
The project looks real good , Jameskoi the pics help a real lot to see what you are doing, Now we need some fish pics
 
Joined
Mar 13, 2009
Messages
245
Reaction score
1
Location
Markham, Ontario
Thanks! I should be able to introduce 10 or so koi by tomorrow night. They'll look like baby guppies in this pond. I'll try and snap some pics when they're in.

Currently, water is still warming up. Target is room temp.. 68-70F. It's 60F now. Started out at around 36F. I wanted to speed up the process and only raised it by 2F and stopped when hot water became luke warm. I'm going to do another hot water dump, this time with hot water tank cranked up to full temp (it's on the low setting now). I can't wait any longer.

Timing would be perfect. I'm going to run the whole system tonight and look for leaks in the next 24 hrs. If all goes well... some fishes going in tomorrow!
 
Joined
Mar 13, 2009
Messages
245
Reaction score
1
Location
Markham, Ontario
Not really a concern for me. Especially when hot water tank is small, turnover rate is under 24hrs and I've been doing this with fresh water tanks all my life.
 

Ask a Question

Want to reply to this thread or ask your own question?

You'll need to choose a username for the site, which only take a couple of moments. After that, you can post your question and our members will help you out.

Ask a Question

Members online

Forum statistics

Threads
30,942
Messages
510,415
Members
13,182
Latest member
HeavyMetalPeach

Latest Threads

Top