Good job! Keep us posted on all the tweaks.
You are using an out of date browser. It may not display this or other websites correctly.
You should upgrade or use an alternative browser.
You should upgrade or use an alternative browser.
My mini-pond pics and stories
- Thread starter WolfStock
- Start date
- Joined
- Jun 23, 2010
- Messages
- 45,151
- Reaction score
- 30,231
- Location
- Frederick, Maryland
- Showcase(s):
- 1
- Hardiness Zone
- 6b
- Country

Neato wolfstock.......you are doing great, tweaking is part of pond building and maintaining and changing......lol
Some more updates - the water wheel setup is better, though still not perfect. The flow is good now to the center of the wheel, and doesn't splash nearly as much. The wheel does need to be slowed down some though, so I'm going to split the water flow with a tee (thanks to james06scl for the tip) so there will be less water flowing over the wheel.
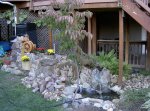
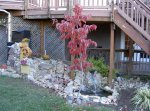
Got some fall landscaping added, including the first wooden box style planter. Not sure what I'll end up long-term landscaping wise, but for now some inexpensive mums look pretty decent. I'll add a liner (pond liner actually) to the wood planter to prevent rot.
Unfortunately my next attempt at sealing, using caulking, didn't quite work right - it was good for sealing, but turned white as well. More discussion in the other thread: https://www.gardenpondforum.com/sealing-cement-t5439p3.html
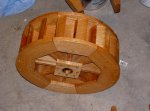
One thing interesting - any place in the waterwheel that wasn't sealed with the spar urethane (around the axle, and some places that got worn from my temporary nail placeholders) turned quite black from water exposure. Also interesting - the outer wooden portions actually appear to have shrunk some from water exposure! There are now gaps between them where before there weren't. Odd. Functionally it's still OK though. The wood did warp some and will need a few more screws.
Adding some more rocks over time, and I'll be adding some lighting soon as well.
Got some fall landscaping added, including the first wooden box style planter. Not sure what I'll end up long-term landscaping wise, but for now some inexpensive mums look pretty decent. I'll add a liner (pond liner actually) to the wood planter to prevent rot.
Unfortunately my next attempt at sealing, using caulking, didn't quite work right - it was good for sealing, but turned white as well. More discussion in the other thread: https://www.gardenpondforum.com/sealing-cement-t5439p3.html
One thing interesting - any place in the waterwheel that wasn't sealed with the spar urethane (around the axle, and some places that got worn from my temporary nail placeholders) turned quite black from water exposure. Also interesting - the outer wooden portions actually appear to have shrunk some from water exposure! There are now gaps between them where before there weren't. Odd. Functionally it's still OK though. The wood did warp some and will need a few more screws.
Adding some more rocks over time, and I'll be adding some lighting soon as well.
Attachments
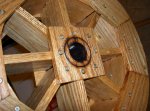

Looks like you used oak. Can you give us a shot of the vanes?
- Joined
- Jun 23, 2010
- Messages
- 45,151
- Reaction score
- 30,231
- Location
- Frederick, Maryland
- Showcase(s):
- 1
- Hardiness Zone
- 6b
- Country
baby steps wolfstock, doing good there
DrDave said:Looks like you used oak. Can you give us a shot of the vanes?
Yeah, did use oak. I wanted to use 1/2" thick wood, and about the only thing I could find for a reasonable price was some 3" x 1/2" oak I found at Home Depot. Teak would have been ideal, but there wasn't any at HD or Lowes, and I knew getting it at a specialty wood place would be super-expensive, if they had it. Interesting how the oak turned so black in the places exposed to water. It actually is adding some character in spots. There are a couple of rings where the wheel turned on the axle, where the nail I had in holding it in place temporarily wore through the finish. I'm going to rig it so that it's set on that axle from now on though, so varnished over the worn spots, including the inside of the spokes. Character is good, but water exposure on wood makes for trouble down the road.
Here's a shot where you can see the vanes pretty well. They work well actually - I tapered them to a point so they wouldn't splash, which seems to work well.
One thing I've found though is that some of the side panels are warping outward some (they were originally they're all just screwed in on the inside part), so I'm having to go back and add screws farther out, at the vanes. Originally all the vanes were just glued into place - eventually probably all will be held by screws though (I ran out - need to get some of the same ones).
This weekend I did some lighting, which is turning out well.
Attachments
Thanks, looks like you did a great job of designing it. Maybe a little sealer will prevent the wood from warping.
I was hoping so - the side panels are actually sealed quite well with the spar urethane. They didn't pick up any black staining like the unsealed portions (next to the axle) did. They still warped some though, surprisingly. Not sure if it might be partly due to temperature, or just natural wood warping over time as it cures. Either way not a big deal, as I'm able to push them back via clamps and hold them via screws.
As another complete side question - since my pond is quite small and shallow - the filter box in the bottom is fairly visible and thus kind of ugly. Eventually I hope to hide it some via plants. Any other tips perhaps? From reading other threads it appears that putting rocks in the bottom of the pond (another possible option?) to cover it isn't a good idea.
As another complete side question - since my pond is quite small and shallow - the filter box in the bottom is fairly visible and thus kind of ugly. Eventually I hope to hide it some via plants. Any other tips perhaps? From reading other threads it appears that putting rocks in the bottom of the pond (another possible option?) to cover it isn't a good idea.
You only want rocks where you have a strong current to keep them clean. Wirey vine planted around the edge will hide a lot of stuff and it grows fast once established.
A fall pic. It'll probably stay in this state through the winter, since it's not the best time for mortaring. The wheel is working well - thanks to james06scl for the tip on running part of the water below the wheel. Now there's not really any splash or leakage.
Originally I had tried a PondMaster 1/2" diverter valve - turned out to be a piece of crap. The valve had a screw-on cover that leaked like a sieve when only a modest amount of pressure (from my 330gph pump) was applied. I changed to a tee and two ball valves, which worked great (should have done that from the start).
Originally I had tried a PondMaster 1/2" diverter valve - turned out to be a piece of crap. The valve had a screw-on cover that leaked like a sieve when only a modest amount of pressure (from my 330gph pump) was applied. I changed to a tee and two ball valves, which worked great (should have done that from the start).
Attachments
stroppy
stroppy
very pretty :0)
- Joined
- Jun 23, 2010
- Messages
- 45,151
- Reaction score
- 30,231
- Location
- Frederick, Maryland
- Showcase(s):
- 1
- Hardiness Zone
- 6b
- Country
doing good there wolfstock
JustJack
Jack of all trades
Looks great!
About the planter "sconces"...Home Depot usually has lined wire baskets in the orchid section that work well for that. They come in all shapes and sizes and some have flat backs to be mounted on a wall.
I bet your son always wants to go out there and play in the water! My 2 year old granddaughter loves to stick her hands in running water and say "Grandma, I catched it!"
JustJack said:Looks great!
About the planter "sconces"...Home Depot usually has lined wire baskets in the orchid section that work well for that. They come in all shapes and sizes and some have flat backs to be mounted on a wall.
I bet your son always wants to go out there and play in the water! My 2 year old granddaughter loves to stick her hands in running water and say "Grandma, I catched it!"
I looked into the sconces - nothing seemed to be a good size really. The wooden things that I made I think will work well, though it'll be spring I think before I plant anything in them.
I'm in winter mode now. I was hoping to run the water wheel some, but it's been super-cold for like 4 weeks now here. I got it running a couple of times, including the other day, by running hot water over the 1/2" line (it was kind of a pain), but after running overnight the water level was down quite a bit, like 6 inches or so. I've shut off my outdoor hoses for the winter so it's not a really good situation, so I'll probably just leave the pump off for the winter, except maybe during warm spells. I did get one of the 100W heaters and will probably keep that running just so the pond doesn't freeze solid, and I can maybe run it some during warm spells.
sissy
sissy
- Joined
- Jan 17, 2011
- Messages
- 33,190
- Reaction score
- 15,798
- Location
- Axton virginia
- Showcase(s):
- 1
- Hardiness Zone
- 7A
- Country
great job it looks good
LOL men and that I'm going to get you no matter what well at list it was worth it and you found a treasure for your pond .A little sweat later
I really like where you put your pond you can hear it from the deck and when you finish creating I'm sure it will be a masterpiece worth the sweat and work you put into it
I liked watching your progress I wish I would have taken pics as I was doing my pond it really helps looking at what you did as you went along just in case you want to change something or add something as you go along .It gives you a better look at where you are going with the pond .I hope you post some with the lights on
Ask a Question
Want to reply to this thread or ask your own question?
You'll need to choose a username for the site, which only take a couple of moments. After that, you can post your question and our members will help you out.
Similar Threads
Forum statistics
Latest Threads
-
Floating greens
- Started by Mattyme75
-
The wonders and magic of lights in and around the pond.
- Started by GBBUDD
-
Lighting for Indoor Pond
- Started by PondintheCity
-
Brown water
- Started by pond maven
-
Silversand in pond?
- Started by Eira Makepeace
-
Will hot pepper spray hurt the koi or shubunkins?
- Started by JAL
-
Foam on lower pond surface . . . (?)
- Started by SangyPA
-
Putting into practice what I've read here.
- Started by chibae
-
New pond owner.
- Started by Metricscaler
-
Plants for pond, shade and sunny
- Started by billdolloff