I don't have enough info about this project to make any direct suggestions. So here are some general things I think might be going on.
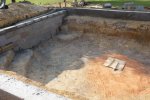
It looked to me like the current wall is 'A'. Hopefully there was a footer with two strands of rebar. I don't know how deep the footer actually is.
Only to show you my perspective, not saying you should tear it all down and do this way...'B' is how I think it should have been built. The problem is the width of the shelf is not wide enough for a foundation (I assume it's 2-3' wide). For example, when a pond or pool is dug next to a house it has to be a minimum of 6' away from the house (actual distance depends on local code) so there's enough soil to support the house's foundation. You see why with that wall collapse. So when you repair the collapsed wall you can use this info to try and guesstimate a hack. This is why I didn't think the current contractor should be 'fixing' the problem. To fix a problem you have to understand the why's, like why are walls built like 'B' and not 'A'. The contractor does not understand this and therefore he cannot 'fix' it. This is only my impression based on limited info.
I assume 'C' is what the collapsed wall looks like. If you add a footer like at the same depth as 'A' you'd be at high risk of soil eroding from under the footer in the future and the wall failing to some degree. We're talking about risks here, not certainties. If you put the footer at the depth of 'B' you would be reducing your risk almost to zero. I assume you'll pick somewhere in between.
Obviously few people would actually build 'B' because if they went to all the trouble of building that wall they would also opt to remove the soil shelf. They'd gain a lot of pond volume for almost no additional cost.
Plan D
You could also shore up the shelf with a retaining wall.
That would make 'A' acceptable (assuming a proper footer depth) and 'B' footer would now be deeper than needed.
Rebar
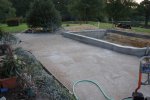
I don't have enough info to understand the patio tie in so I'll make some general comments...
I don't think the patio should be tied into the pond wall. I'm not sure on code, but I'd bet it wouldn't be allowed. Concrete patios can't be tied into a house foundation. And certainly at this point you wouldn't want to tie what could be a properly built patio to the incorrectly built pond wall. The risk is the pond wall might only last 1, 5, 10, 20 years. Tying into the patio means it would probably fail right along with the pond wall. Instead there should be an expansion joint between the pond wall and patio. Personally, I like something like a 1" gap between the two which I plant flowers or flag stone over. I like the gap because I'll probably want to run sprinkler pipe or electric there someday. Always seems to work that way.
It's a rookie mistake to think tying the patio and wall together adds strength. Proper building means each structure is stable on it's own. Rookies seem to understand they aren't building correctly and like to "add strength" but they're actually making things worst. I've done the rookie mistakes too.
As a side note on rookie mistakes...when the patio is built you sure do some research on whether wire mesh should be used. Ask the building department. I've seen local codes change over the last 30 years from requiring mesh to prohibiting mesh. The thinking is that for the cost of the mesh the slab can be made a little thicker and therefore strong enough without the mesh. That eliminates the rust risk and also greatly reduces removal costs and patio are remodeled often. Your contractor seems mesh happy.
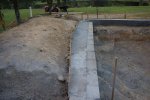
In concrete applications rebar is not to be in contact with soil. Ever. Under any circumstances. In the photos I see rebar bent at a 90 and it looks to me like the rebar is in soil. Meaning I don't see how poured concrete is going to cover the rebar. Also, I read about "pounding rebar into the ground". I've seen this done several times over the years in pond forums. People seem to think that pounding rebar into the ground adds some strength. It doesn't. A multi ton wall, and the forces that would move the multi ton wall, wouldn't be slowed down even a little by having to pull that rebar right back out of the ground. The reason rebar isn't allowed in the ground is because it will quickly rust and that rust will travel right up the rebar into the concrete. Rust expands, just like freezing water, and busts the concrete. You can see examples of this in US bridges where salt sped up the rust issue.
Rebar has to be completely enclosed in 1" of concrete (I think, but not sure of the 1").
Footers
Some general red flags to look for...
Footers must be on undisturbed soil (below loam layer). Not back filled soil. It is possible to place a footer on back fill but the back fill has to be properly tamped. I wouldn't trust most contractors to do this, certain not your contractor. It's one of the things a building inspector does, check the bottom of the footer for undisturbed soil.
The width of the footer depends on soil. Could be anywhere between 6-16". It's worth a phone call to the local building department to find out the requirement because if your soil only needs a 8" footer and you're using 8" wide block it means you don't need any footer at all. 20 minute call can save a lot of money and time. The building department probably won't know your specific project so just ask for the footer width needed for a one story wood frame house. That's about the same bearing weight as a 4' high pond wall I think.
Footers require rebar, not mesh. Vertical rebar also to tie in the wall.