- Joined
- Feb 4, 2020
- Messages
- 51
- Reaction score
- 42
- Country

Been holding with no leaks for a few days now! Keep on filling keep on filling

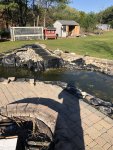
I'm sure it feels great with things getting back to normal, i'll have another year before i get to that stage again.Got the falls running today! Starting to clean up this mess and landscape really makes it all start to come together. Need to pick up a few loads of river stone to bring it up to the sides of the falls and the rest of the way around but in time. Plants were delivered from pondmegastore this week and can’t wait to see those lily and grasses start to take off.
View attachment 128270
View attachment 128270
I'm sure it feels great with things getting back to normal, i'll have another year before i get to that stage again.

So I’m putting two pieces together and like I need more than one double sided tape and the tape primer??Started from scratch this morning. Laid a plastic table underneath to make a perfectly flat surface. Cleans with soap and water. Let dry. Put down edpm primer. Double sided tape. Then the single sided tape. Then used the liquid rubber over that. Then used gorilla glue waterproof tape which was way more tacky than the seam tape over it all with a few layers. Then every 2 hours I did more coats of liquid rubber for 4 total. I have way more faith in this seam then I did last week. All products are made for pond waterproofing and are water based. Letting cute over night and will hit with one more coat of liquid rubber in the morning then I will shape back in and start filling.
View attachment 127033
Oh my I hope I can do this ok!! ThanksFiirst step is to get the rubber played out and onto a flat surface as possible. slipping a board under the seam area the length of the seam is best. I just use gasoline to clean the rubber but I believe they recommend alcohol.
using paper towels or shop towels anything that will not leave little behind clean the rubber removing all hints of dirts. using a nylon kitchen sponge or scotch guard scuff pad do a great job. I dont know what glue or primer you have but it sounds like you probably have rubber primer. Use the kitchen scuff pad to apply your primer to the rubber making little circles scrubbing lightly. Again not knowing what materials you have I would spread out your seam tape and apply in the same manner primer to one side of the tape. let these dry COMPLETELY it's a contact cement.once the tape is dry reroll the tape back up. The glue won't stick to the paper.it only sticks to other glued surface. line up your roll of tape and roll out slowly using one hand to control the roll and the other hand to press the tape down smoothing the tape as it touches the other glue . THERE IS NO FORGIVENESS. YOU WANT TO PRESS THE TAPE IN WITH NO AIR BUBLES AND KEEP THE TAPE ON THE PRIMER. its really not that hard. now you have the tape to one side flip the other rubber over and repeat the process. clean next piece of rubber . primer. let it dry . now this time you need help maybe two if the seam is long. roll the next rubber the long way sliding your hand fsourcing the rubber with no air to the tape. roll the seam with a wood or plastic 1" roller. making sure they are fully bonded. Take your caulking apply over the edge and smooth out with a ice cube making a nice smooth caulk joint. then repeat the process again with the single sided tape over the seam let dry and call that and your done ... cut off what ever you can spare 3 or 4 feet and give it a try get use to how the process works it's pretty easy.... go to you tube watch a video on rubber roofing same principles.
Does it need cleaned if it’s brand new?Oh my I hope I can do this ok!! Thanks
Want to reply to this thread or ask your own question?
You'll need to choose a username for the site, which only take a couple of moments. After that, you can post your question and our members will help you out.